Yamaha NS-F700 Owners Manual - Page 9
Procedure, Méthode de fixation, Vorgehensweise, Procedimiento, Speaker Installation Precaution
 |
View all Yamaha NS-F700 manuals
Add to My Manuals
Save this manual to your list of manuals |
Page 9 highlights
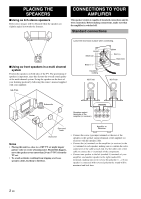
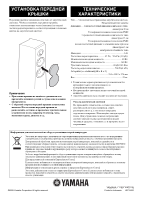
NS-F700 JGT WQ07210 (R)(D) Back Arrière Rückseite Parte trasera (L)(G) Front Avant Vorderseite Parte delantera (L)(G) (R)(D) View from the bottom of the speaker Vue de dessous de l'enceinte Ansicht von der Unterseite des Lautsprechers Vista desde la parte inferior del altavoz Use the 8 specified holes located on the base of the speaker. Utiliser les 8 trous indiqués situés sur la base de l'enceinte. Verwenden Sie die acht spezifizierten Löcher im Unterbau des Lautsprechers. Utilice los 8 agujeros especificados situados en la base del altavoz. Pad Patin Unterlage Pata Screw (6mm (1/4")) Vis (6mm) Schraube (6 mm) Tornillo (6 mm) Wood screw (4mm (3/16")) Vis à bois (4mm) Holzschraube (4 mm) Tornillo para madera (4 mm) Speaker Installation Precaution • Make sure to have another person support it. • Pay extra attention to avoid scratching on the speaker's surface. • Place the speaker to a seat (height of 5 cm (2") or more). Use a blanket or a cushion on it to avoid scratching. • The provided stands are in two types. Two stands are for the right side and others are for the left side. Attach each stand to the proper position on the bottom of the speaker by following the figure below. • To attach the stands to the speaker, be sure to lay down the speaker with the side facing up. Procedure 1 Put the 6 mm (1/4") screw through the large hole in the stand, and screw it into the speaker at one of the outside holes in the base of the speaker. At this time, screw it in loosely so that the stand can still be moved. 2 Put the 4 mm (3/16") wood screw through the other hole in the stand, and screw it into the other hole in the base of the speaker. 3 Tighten both of the screws firmly. 4 Attach a pad to the bottom of the end portion of the stand. 5 Attach the other stands to the other corners of the base of the speaker in the same way and confirm that all 4 stands have been firmly attached. Note Be carefully not to apply force to the side of the speaker, otherwise the speaker may fall causing damage to the speaker or personal injury. Précautions lors de l'installation • Pour fixer les pieds à l'enceinte, demandez à une autre personne de tenir l'enceinte. • Prenez soin de ne pas rayer la surface de l'enceinte lors de cette opération. • Placez l'enceinte sur un support d'une épaisseur d'au moins 5 cm. Utilisez une couverture ou un coussin pour éviter de rayer l'enceinte. • Les pieds d'enceinte fournis sont de deux types : deux pieds pour le côté droit et deux autres pour le côté gauche. Fixez chaque pied sous l'enceinte à l'emplacement adéquat (voir illustration ci-dessous). • Pour fixer les pieds à l'enceinte, posez l'enceinte côté vers le haut. Méthode de fixation 1 Insérez la vis de 6 mm dans le grand trou situé sur le pied, puis vissez-la dans l'enceinte sur l'un des orifices extérieurs sur la base de l'enceinte. Laissez néanmoins un peu de jeu afin de pouvoir déplacer le pied. 2 Insérez la vis à bois de 4 mm dans l'autre trou situé sur le pied, puis vissez-la dans l'autre orifice sur la base de l'enceinte. 3 Vissez fermement les deux vis. 4 Placez un patin à l'extrémité inférieure du pied. 5 Installez les autres pieds aux autres coins de la base de l'enceinte en procédant de la même manière, puis vérifiez que les 4 pieds sont correctement fixés. Remarque Assurez-vous de ne jamais appliquer de force excessive sur la partie latérale de l'enceinte lors de cette opération ; celle-ci pourrait tomber, et vous pourriez vous blesser ou blesser votre entourage. Vorsichtsmaßnahmen bei der Lautsprecherinstallation • Es muss eine andere Person zum Abstützen anwesend sein. • Achten Sie besonders darauf, die Oberfläche des Lautsprechers nicht zu zerkratzen. • Stellen Sie den Lautsprecher auf einen Stuhl (Höhe mindestens 5 cm). Verwenden Sie eine Decke oder ein Kissen, um Kratzer zu vermeiden. • Die beiliegenden Stützen unterscheiden sich. Zwei Stützen sind für die rechte und die anderen für die linke Seite bestimmt. Befestigen Sie jede Stütze wie in der Abbildung unten gezeigt in der korrekten Position an der Unterseite des Lautsprechers. • Legen Sie zum Anbringen der Ständer am Lautsprecher den Lautsprecher immer mit der Seite nach oben hin. Vorgehensweise 1 Passen Sie die 6 mm lange Schraube durch das große Loch an der Stütze und schrauben Sie sie in eines der äußeren Löcher am Unterbau des Lautsprechers. Ziehen Sie die Schraube zu diesem Zeitpunkt noch nicht fest an, damit die Stütze später noch ausgerichtet werden kann. 2 Passen Sie die 4 mm lange Holzschraube durch das andere Loch an der Stütze und schrauben Sie sie in das Loch am Unterbau des Lautsprechers. 3 Ziehen Sie nun beide Schrauben fest an. 4 Befestigen Sie eine Unterlage an der Unterseite des Endbereichs der Stütze. 5 Befestigen Sie auf dieselbe Weise die anderen Stützen an den anderen Ecken des Lautsprecher-Unterbaus und überzeugen Sie sich davon, dass alle 4 Stützen sicher befestigt sind. Hinweis Achten Sie darauf, dass Sie keinen Druck auf die Seite des Lautsprechers ausüben; anderenfalls könnte der Lautsprecher umfallen, was unter Umständen eine Beschädigung des Lautsprechers oder auch Personenschäden zur Folge haben könnte. Precaución sobre la instalación de los altavoces • Cuando coloque los soportes en el altavoz, pida a otra persona que le ayude. • Preste especial atención para no arañar la superficie de los altavoces. • Coloque el altavoz en un soporte (de 5 cm de altura o más). Utilice una manta o un cojín para no arañarlo. • Los soportes suministrados son de dos tipos. Dos soportes son para el lado derecho y los otros son para el lado izquierdo. Coloque cada soporte en la posición correcta en la parte inferior del altavoz según la figura que aparece a continuación. • Para colocar los soportes en el altavoz asegúrese de poner el altavoz tumbado en el suelo con su parte lateral hacia arriba. Procedimiento 1 Introduzca el tornillo de 6 mm a través del agujero grande en el soporte y atorníllelo dentro del altavoz en uno de los agujeros exteriores en la base. Ahora, atorníllelo suavemente de tal forma que la base se pueda mover. 2 Introduzca el tornillo para madera de 4 mm a través de otro agujero en el soporte y atorníllelo dentro de otro agujero en la base del altavoz. 3 Apriete ambos tornillos firmemente. 4 Fije una pata a la parte inferior de la parte final del soporte. 5 Fije los otros soportes a las otras esquinas de la base del altavoz de la misma forma y confirme que los 4 soportes se han fijado correctamente. Nota Tenga cuidado de no aplicar fuerza a los lados del altavoz, de lo contrario el altavoz se puede caer, romperse y provocar lesiones personales.
-
 1
1 -
2
-
3
-
 4
4 -
 5
5 -
 6
6 -
 7
7 -
 8
8 -
 9
9
 |
 |
