Yamaha PCY95AT PCY95AT Owners Manual - Page 9
Assembling the cymbal pad,
 |
View all Yamaha PCY95AT manuals
Add to My Manuals
Save this manual to your list of manuals |
Page 9 highlights
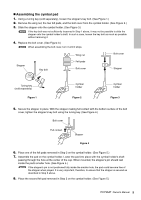
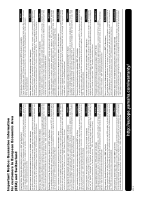
Assembling the cymbal pad 1. Using a tuning key (sold separately), loosen the stopper's key bolt. (See Figure 1.) 2. Remove the wing nut, the two felt pads, and the bolt cover from the cymbal holder. (See Figure 2.) 3. Slide the stopper onto the cymbal holder. (See Figure 3.) If the key bolt was not sufficiently loosened in Step 1 above, it may not be possible to slide the stopper onto the cymbal holder's shaft. In such a case, loosen the key bolt as much as possible without removing it. 4. Replace the bolt cover. (See Figure 3.) When assembling the bolt cover, turn it until it stops. Wing nut Bolt cover Stopper Key bolt Felt pads Bolt cover Stopper Tuning key (sold separately) Figure 1 Cymbal holder Figure 2 Cymbal holder Figure 3 5. Secure the stopper in place. With the stopper making full contact with the bottom surface of the bolt cover, tighten the stopper's key bolt using the tuning key. (See Figure 4.) Bolt cover Full contact Stopper Figure 4 6. Place one of the felt pads removed in Step 2 on the cymbal holder. (See Figure 5.) 7. Assemble the pad on the cymbal holder. Lower the pad into place with the cymbal holder's shaft passing through the hole at the center of the cup. When mounted, the stopper's pin should rest inside the pad's smaller hole. (See Figure 5.) If the stopper's pin is not positioned fully inside the smaller hole, the pad could become free of the stopper when played. It is very important, therefore, to ensure that the stopper is secured as described in Step 5 above. 8. Place the second felt pad removed in Step 2 on the cymbal holder. (See Figure 5.) PCY95AT Owner's Manual 9
-
 1
1 -
2
-
3
-
 4
4 -
 5
5 -
 6
6 -
 7
7 -
 8
8 -
 9
9 -
 10
10 -
 11
11 -
 12
12 -
 13
13 -
 14
14 -
15
 |
 |