Yamaha PJP-CAM1 Owners Manual - Page 19
Using This Unit in Combination with a PJP, Placing this unit and PJP
 |
UPC - 086792881843
View all Yamaha PJP-CAM1 manuals
Add to My Manuals
Save this manual to your list of manuals |
Page 19 highlights
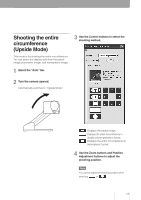
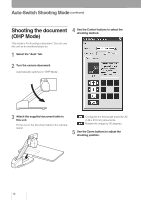
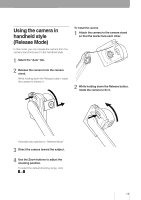
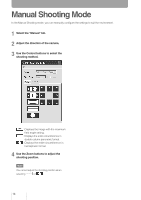
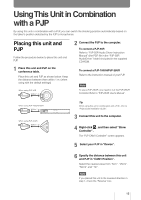
Using This Unit in Combination with a PJP By using this unit in combination with a PJP, you can switch the shooting position automatically based on the talker's position detected by the PJP's microphones. Placing this unit and PJP Follow the procedure below to place this unit and PJP. 1 Place this unit and PJP on the conference table. Place this unit and PJP as shown below. Keep the distance between them within 1 m. (when using with the default settings) When using PJP-50R Within 1 m 2 Connect the PJP to the computer. To connect a PJP-50R Refer to "PJP-50R Audio Driver Instruction Manual" (the PDF file in the "PJP-50R AudioDriver" folder) included in the supplied CD-ROM. To connect a PJP-100UH/PJP-25UR Refer to the instruction manual of your PJP. Note To use a PJP-25UR, you need to run the PJP-25UR Controller. Refer to "PJP-25UR User's Manual". When using PJP-100UH/100H Within 1 m When using PJP-25UR Within 1 m Tip When using this unit in combination with a PJC, refer to "ProjectCast Installation Guide". 3 Connect this unit to the computer. 4 Right-click , and then select "Show Controller". The "PJP-CAM1 Controller" screen appears. 5 Select your PJP in "Device". 6 Specify the distance between this unit and PJP in "CAM1 Position". Select the nearest value from "5cm", "25cm", "50cm" and "1m". Note If you placed this unit in the reversed direction in step 1, check the "Reverse" box. 15
-
 1
1 -
2
-
3
-
4
-
5
-
6
-
7
-
8
-
9
-
10
-
11
-
12
-
13
-
 14
14 -
 15
15 -
 16
16 -
 17
17 -
 18
18 -
 19
19 -
 20
20 -
 21
21 -
 22
22 -
 23
23 -
 24
24 -
25
-
26
 |
 |
