Yamaha PSR-E263 PSR-E263 YPT-260 Owners Manual - Page 27
Using the Song Lesson Feature, Listening, Timing and Waiting, Practicing with Song Lesson
 |
View all Yamaha PSR-E263 manuals
Add to My Manuals
Save this manual to your list of manuals |
Page 27 highlights
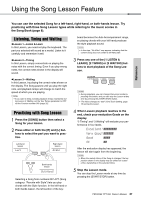
Using the Song Lesson Feature Reference You can use the selected Song for a left-hand, right-hand, or both-hands lesson. Try practicing with three Song Lesson types while referring to the music scores in the Song Book (page 8). Listening, Timing and Waiting Lesson 1-Listen & Learn In this Lesson, you need not play the keyboard. The part you selected will sound as a model. Listen to it carefully and remember it well. Lesson 2-Timing In this Lesson, simply concentrate on playing the notes with the correct timing. Even if you play wrong notes, the correct notes shown in the display will sound. Lesson 3-Waiting In this Lesson, try playing the correct notes shown on the display. The Song pauses until you play the right note, and playback tempo will change to match the speed at which you are playing. NOTE • If you want to keep a steady playback tempo maintained during Lesson 3: Waiting, set the Your Tempo parameter to OFF via the Function number 018 (page 32). board becomes the Auto Accompaniment range, so playing chords with your left hand produces the style playback sound. NOTE • In this step, "No LPart" may appear, indicating that the current Song does not contain a left-hand part. 3 Press any one of the [1 LISTEN & LEARN], [2 TIMING] or [3 WAITING] buttons to start playback of the Song Lesson. NOTE • During playback, you can change the Lesson mode by pressing this button, and you can stop the Lesson at any time by pressing the [START/STOP] button. • The Voice changes to "000" (One Touch Setting; page 16) during the lesson. Practicing with Song Lesson 1 Press the [SONG] button then select a Song for your lesson. 2 Press either or both the [R] and [L] buttons to select the part you want to practice. Left-hand lesson Left Right-hand lesson Right Both-hands lesson BothHand Selecting a Song from numbers 057-077 (Song category: "Favorite with Style") lets you play chords with the Style function. In the left-hand or both-hands lesson, the left section of the key- 4 When Lesson playback reaches to the end, check your evaluation Grade on the display. "2 Timing" and "3 Waiting" will evaluate your performance in four levels. Excellent!~~~~~~~~ Very Good!~~~~~~ Good ~~~~ OK ~~ After the evaluation display has appeared, the lesson will start again from the beginning. NOTE • When the melody Voice of the Song is changed, the key position shown in the display may be shifted (in octave units), depending on the selected Voice. 5 Stop the Lesson mode. You can stop the Lesson mode at any time by pressing the [START/STOP] button. PSR-E263 YPT-260 Owner's Manual 27
-
 1
1 -
2
-
3
-
4
-
5
-
6
-
7
-
8
-
9
-
10
-
11
-
12
-
13
-
14
-
15
-
16
-
17
-
18
-
19
-
20
-
21
-
 22
22 -
 23
23 -
 24
24 -
 25
25 -
 26
26 -
 27
27 -
 28
28 -
 29
29 -
 30
30 -
 31
31 -
 32
32 -
33
-
34
-
35
-
36
-
37
-
38
-
39
-
40
-
41
-
42
-
43
-
44
-
45
-
46
-
47
-
48
 |
 |
