Yamaha RX-396 Owner's Manual - Page 11
English, A/B/C/D/E button - rds
 |
View all Yamaha RX-396 manuals
Add to My Manuals
Save this manual to your list of manuals |
Page 11 highlights
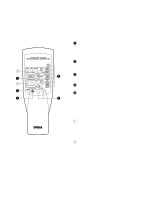
English 1 STANDBY/ON switch Press this switch to turn on the power to this unit. Press it again to turn this unit into the standby mode. Standby mode In this state, this unit consumes a very small quantity of power to receive infrared-signals from the remote control transmitter. 2 Remote control sensor Receives signals from the remote control transmitter. 3 Display panel Shows various information. (For details, refer to page 13.) 4 Input selector buttons Select a program source to listen to. When a button is pressed, the name of the selected source appears on the display. 5 PURE DIRECT switch and indicator RX-496RDS and RX-496 only Press this switch so that the indicator lights up to listen to a source in the purest sound. (Refer to page 16 for details.) 6 VOLUME control Used to raise or lower the volume level. 7 PHONES jack When you listen with headphones, connect the headphones to the PHONES jack. When listening with headphones privately, set both the SPEAKERS A and B switches to the OFF position. PHONES 8 SPEAKERS switches Set the switch A or B (or both A and B) for the speaker system (connected to this unit) you will use to the ON position. Set the switch for the speaker system you will not use to the OFF position. 9 A/B/C/D/E button Press this button to select a desired group (A-E) of preset stations. 0 Preset station number selector buttons Select a preset station number (1 to 8). A Tone controls BASS Used to increase or decrease the low frequency response. The 0 position produces flat response. TREBLE Used to increase or decrease the high frequency response. The 0 position produces flat response. B BALANCE control Adjusts the balance of the output volume to the left and right speakers to compensate for sound imbalance caused by speaker location or listening room conditions. C Continuously variable LOUDNESS control Used to compensate for the human ears' loss of sensitivity to high and low-frequency ranges at low volume. D RDS MODE/FREQ button RX-496RDS and RX-396RDS only When an RDS station is received, pressing this button changes the display mode into the PS mode, PTY mode, RT mode and/or CT mode (if the station employs these RDS data services), and frequency display in turn. E PTY SEEK MODE button RX-496RDS and RX-396RDS only When this button is pressed, the unit turns into the PTY SEEK mode. F PTY SEEK START button RX-496RDS and RX-396RDS only Press this button to begin searching for a station after the desired program type is selected in the PTY SEEK mode. G EON button RX-496RDS and RX-396RDS only Press this button to select a desired program type (NEWS, INFO, AFFAIRS, SPORT) when you want to call a radio program of that program type automatically. H FM/AM button Press this button to switch the reception band to FM or AM. I MEMORY (MAN'L/AUTO FM) button When this button is pressed, the "MEMO" indicator flashes for about 5 seconds. While the indicator is flashing, select a desired preset station number by pressing the corresponding preset station number selector button to enter the displayed station into the memory. When this button is held down for more than 3 seconds, the automatic preset tuning begins. (For details, refer to page 19.) J EDIT button This button is used to exchange the places of two preset stations with each other. K TUNING DOWN/UP button Used for tuning. Press the "UP" side to tune in to higher frequencies, and press the "DOWN" side to tune in to lower frequencies. * RX-496RDS and RX-396RDS only When this unit is in the PTY SEEK mode, pressing this switch changes the currently selected program type. L TUNING MODE (AUTO/MAN'L MONO) button Press this button to switch the tuning mode to automatic or manual. To select the automatic tuning mode, press this button so that the "AUTO" indicator lights up on the display. To select the manual tuning mode, press this button so that the "AUTO" indicator goes off. 11
-
 1
1 -
2
-
3
-
4
-
5
-
 6
6 -
 7
7 -
 8
8 -
 9
9 -
 10
10 -
 11
11 -
 12
12 -
 13
13 -
 14
14 -
 15
15 -
 16
16 -
17
-
18
-
19
-
20
-
21
-
22
-
23
-
24
-
25
-
26
-
27
-
28
-
29
 |
 |
