Yamaha RX-V2090 Owner's Manual - Page 19
Basic Operations
 |
View all Yamaha RX-V2090 manuals
Add to My Manuals
Save this manual to your list of manuals |
Page 19 highlights
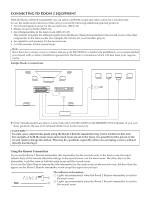
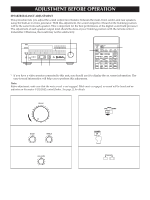
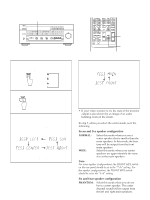
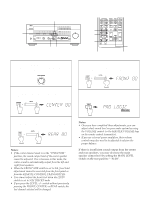
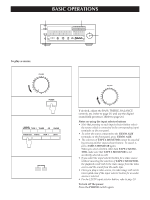
BASIC OPERATIONS 2 3 1,6 4 To play a source 1 Set to the "∞" position. VOLUME l8 l6 l4 20 l2 24 l0 28 8 34 6 40 4 50 3 60 70 2 l 0 -dB 2 Press the POWER switch to turn on the power. POWER 3 Select the desired input source by using the input selector buttons. (For video sources, turn the video monitor ON.) TAPE 2 MONITOR TAPE 1 TUNER CD PHONO VIDEO AUX VCR 2 VCR 1 LD/TV • The name of the selected input source will appear on the display. 4 Select the main speakers to be used. SPEAKERS A B • If you use two main speaker systems, press both the A and B switches. 5 Play the source. (For detailed information on the tuning operation, refer to page 22.) 6 Adjust to the desired output level. VOLUME l8 l6 l4 20 l2 24 l0 28 8 34 6 40 4 50 60 70 3 2 l 0 -dB If desired, adjust the BASS, TREBLE, BALANCE controls, etc. (refer to page 21) and use the digital sound field processor. (Refer to page 26.) Notes on using the input selector buttons • Note that pressing on each input selector button selects the source which is connected to the corresponding input terminals on the rear panel. • To select the source connected to the VIDEO AUX terminals on the front panel, press VIDEO AUX. • The selection of TAPE 2 MONITOR cannot be canceled by pressing another input selector button. To cancel it, press TAPE 2 MONITOR again. When you select a button other than TAPE 2 MONITOR, make sure that TAPE 2 MONITOR is not accidently selected as well. • If you select the input selector button for a video source without canceling the selection of TAPE 2 MONITOR, the playback result will be the video image from the video source and the sound from the audio tape. • Once you play a video source, its video image will not be interrupted even if the input selector button for an audio source is selected. • For the LD/TV input selector button, refer to page 28. To turn off the power Press the POWER switch again. 19
-
 1
1 -
2
-
3
-
4
-
5
-
6
-
7
-
8
-
9
-
10
-
11
-
12
-
13
-
 14
14 -
 15
15 -
 16
16 -
 17
17 -
 18
18 -
 19
19 -
 20
20 -
 21
21 -
 22
22 -
 23
23 -
 24
24 -
25
-
26
-
27
-
28
-
29
-
30
-
31
-
32
-
33
-
34
-
35
-
36
-
37
-
38
-
39
-
40
 |
 |
