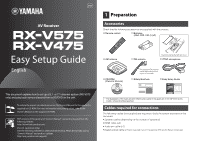
Yamaha RX-V475 RX-V575/RX-V475 Easy Setup Guide - Page 5
Connecting external devices
 |
View all Yamaha RX-V475 manuals
Add to My Manuals
Save this manual to your list of manuals |
Page 5 highlights
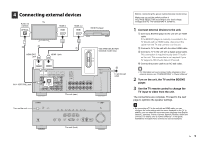
4 Connecting external devices Audio out TV (optical) OPTICAL HDMI in HDMI HDMI out HDMI BD/DVD player O c b HDMI HDMI OUT jack HDMI HDMI OUT ARC HDMI 1 jack HDMI HDMI 1 (BD/DVD) HDMI a VOLTAGE SELECTOR 110V 120V 220V 240V AV 4 (OPTICAL) jack HDMI OUT ARC HDMI 1 (BD/DVD) HDMI 2 HDMI 3 HDMI 4 HDMI 5 MHL 5V 1A PR PB O Y COMPONENT VIDEO ANTENNA AM (RADIO) FM COMPONENT VIDEO PR OPTICAL VIDEO (TV) AV 4 PB Y MONITOR OUT 1 NETWORK (NET) DC OUT 5V 0.5A FRONT CENTER SPEAKERS SURROUND SURROUND BACK/BI AMP /ZONE B SINGLE OPTICAL AV 1 COAXIAL AV 2 COAXIAL AV 3 OPTICAL ( TV ) AV 4 AV 5 AV 6 AV OUT AUDIO 2 SUBWOOFER PRE OUT The unit (rear) VOLTAGE SELECTOR (General model only) d To an AC wall outlet YPAO MIC Turn on the unit PHONES SILENT CINEMA INFO MEMORY PRESET FM AM TUNING INPUT BD DVD SCENE TV NET RADIO TONE CONTROL PROGRAM STRAIGHT VIDEO AUX AUDIO VIDEO 5V 2.1A The unit (front) DIRECT VOLUME Before connecting the power cable (General model only) Make sure you set the switch position of VOLTAGE SELECTOR according to your local voltage. Voltages are AC 110-120/220-240 V, 50/60 Hz. 1 Connect external devices to the unit. a Connect a BD/DVD player to the unit with an HDMI cable. If the BD/DVD player is currently connected to the TV directly with an HDMI cable, disconnect the cable from the TV and connect it to this unit. b Connect a TV to the unit with the other HDMI cable. c Connect a TV to the unit with a digital optical cable. This connection is required to play back TV audio on the unit. This connection is not required if your TV supports ARC (Audio Return Channel). d Connect the power cable to an AC wall outlet. • For information on how to connect radio antennas or other external devices, see "PREPARATIONS" in "Owner's Manual". 2 Turn on the unit, the TV and the BD/DVD player. 3 Use the TV remote control to change the TV input to video from the unit. The connections are complete. Proceed to the next page to optimize the speaker settings. • By connecting a TV to the unit with an HDMI cable, you can configure the unit's settings with the menu displayed on the TV. In addition, you can select the on-screen menu language from English (default), Japanese, French, German, Spanish, Russian, Italian and Chinese. For details, refer to "Owner's Manual". In this guide, illustrations of English menu screens are used as examples. En 5
-
 1
1 -
 2
2 -
 3
3 -
 4
4 -
 5
5 -
 6
6 -
 7
7 -
 8
8
 |
 |
