Yamaha RX-V567 Quick Reference Guide - Page 3
Connect the speakers - canada
 |
UPC - 027108935980
View all Yamaha RX-V567 manuals
Add to My Manuals
Save this manual to your list of manuals |
Page 3 highlights
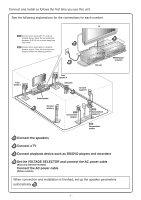
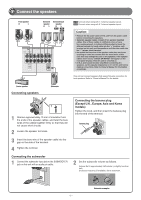
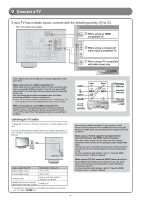
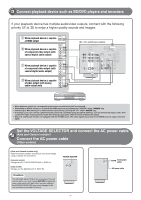
1 Connect the speakers Front speaker R L Surround speaker R L Surround back speaker R L 7.1 7.1 6.1 SPEAKERS HDMI 3 HDMI 4 FRONT CENTER SURROUND SURROUND BACK/ BI-AMP SINGLE AUDIO OUT SUBWOOFER PRE OUT 7.1 Connect when using with 7.1-channel speaker layout. 6.1 Connect when using with 6.1-channel speaker layout. Caution: • Remove the AC power cable of this unit from the power outlet before connecting the speakers. • Generally speaker cables consist of two parallel insulated cables. One of these cables is a different color, or has a line running along it, to indicate different polarity. Insert the different colored (or lined) cable into the "+" (positive, red) terminal on this unit and the speakers, and the other cable into the "-" (minus, black) terminal. • Be careful that the core of the speaker cable does not touch anything or come into contact with the metal areas of this unit. This may damage this unit or the speakers. If the speaker cables short circuit, "CHECK SP WIRES!" will appear on the front panel display when this unit is switched on. • (U.S.A. and Canada models only) When connecting 6 Ω speakers, set the speaker impedance to 6 Ω on this unit before making connections. Refer to Owner's Manual for information on settings. This unit can connect speakers that support Bi-amp connection for front speakers. Refer to "Owner's Manual" for the details. Center speaker Subwoofer Connecting speakers 3 2 FRONT 1 4 1 Remove approximately 10 mm of insulation from the ends of the speaker cables, and twist the bare wires of the cables together firmly so that they will not cause short circuits. 2 Loosen the speaker terminals. 3 Insert the bare wire of the speaker cable into the gap on the side of the terminal. 4 Tighten the terminal. Connecting the subwoofer 1 Connect the subwoofer input jack to the SUBWOOFER jack on this unit with an audio pin cable. Connecting the banana plug (Except U.K., Europe, Asia and Korea models) Tighten the knob, and then insert the banana plug into the end of the terminal. FRONT Banana plug 2 Set the subwoofer volume as follows. Volume: Set to approximately half volume (or slightly less than half). Crossover frequency (if available): Set to maximum. VOLUME CROSSOVER/ HIGH CUT - 3 - MIN MAX MIN MAX Subwoofer examples
-
 1
1 -
 2
2 -
 3
3 -
 4
4 -
 5
5 -
 6
6 -
 7
7 -
 8
8
 |
 |
