Yamaha Rio1608-D Rio3224-D/Rio1608-D Update Guide V3.10 or older - Page 8
The User Account Control dialog box may appear. Click [Continue] or [Yes].
 |
View all Yamaha Rio1608-D manuals
Add to My Manuals
Save this manual to your list of manuals |
Page 8 highlights
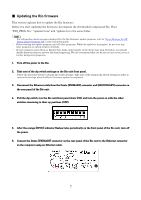
7. Pull the dip switches 4 and 8 on the Rio unit front panel down (ON) and turn the power on with the other switches remaining in their up positions (OFF). All the +48V indicators start flashing and the unit is activated in update mode. 8. Double-click [updatev2.exe]. The R Series Update Program V2 will start up. Make sure that the fields in the "File" section indicate as follows: file name :RIO_PROG.bin product name :R-Series Version :Version number to which the firmware will be updated ・The "User Account Control" dialog box may appear. Click [Continue] or [Yes]. 9. Click the [Connection] button in the "Connect and Update" column. The "product name" field will display "R-Series," and the "version" field will display the version number of the Rio firmware. ・If these fields are empty, your computer may not be properly connected to the Rio. Please make sure that the cable is not disconnected or damaged, that the TCP/IP settings are correct, and that the Rio has started in Update mode. 10. Click the [Update] button in the "Connect and Update" column. The update operation will begin. The update will take about 30 seconds. During the update operation, do not turn off the power to the unit or disconnect the cable. If update fails due to disconnection of the power cable during the update, or due to other reasons, the device may become inoperative. 11. When the "Connect and Update" section displays the message "Update was completed. Close this Update Program." click the [X] button in the upper-right corner of the program window to close the program. 12. Turn off the power to Rio. 8
-
 1
1 -
2
-
 3
3 -
 4
4 -
 5
5 -
 6
6 -
 7
7 -
 8
8 -
 9
9 -
 10
10 -
 11
11 -
 12
12 -
 13
13 -
14
-
15
-
16
-
17
-
18
 |
 |
