Yamaha S1800 Owner's Manual - Page 41
Selecting the DVI output range, Setting the HDMI audio, DISC setup menu
 |
UPC - 027108928968
View all Yamaha S1800 manuals
Add to My Manuals
Save this manual to your list of manuals |
Page 41 highlights
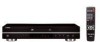
English y • Refer to the manual supplied with your monitor to select the appropriate aspect ratio. • You can also select the HDMI resolution by pressing HDMI on the remote control repeatedly. Selecting the DVI output range You can select the DVI output range to match the connected component. This function is only available when this unit is connected to an DVI-D-compatible component via the HDMI jack. • Select [DVI Output Range] in [HDMI] menu. Standard Select this if you cannot see the correct image when you select [Enhanced]. Enhanced Select this if black and white in the image is not distinct. Setting the HDMI audio Set the HDMI audio output to match the connected component. This function is only available when this unit is connected to an HDMI-compatible component via the HDMI jack. For details about the relationship between the audio format and the setting, see "HDMI audio output" on page 13. • Select [HDMI Audio] in [HDMI] menu. Auto Select this to set this unit to the best setting automatically based on the component you have connected via the HDMI jack. PCM Select this to output the decoded multi-channel or 2ch linear PCM audio signals via the HDMI jack. Off Select this to turn off the HDMI audio output. Notes • SA-CD signals cannot be output using HDMI. • When [HDMI Audio] is set to [Auto] or [PCM], digital output signals are muted. DISC setup menu SETUP MENU SETUP GENERAL AUDIO SPEAKER VIDEO HDMI DISC Move : 1/1 AUDIO Language Subtitle Language DVD Menu Language Angle Mark PBC Time Interval Return Select : Enter Selecting the default audio/subtitle/ DVD menu language These menus contain various language options for the audio, subtitles and disc menus recorded on the DVD. For details, see "Setting the audio, subtitle and disc menu languages" on page 17. Selecting an angle mark display You can switch an angle mark display on or off when sequences recorded from different camera angles are played back. • Select [Angle Mark] in [DISC] menu. On Select this if you want to display an angle mark. An angle mark is displayed continuously. Off Select this if you do not want to display an angle mark. An angle mark appears for five seconds, and then disappears. 37 En
-
 1
1 -
2
-
3
-
4
-
5
-
6
-
7
-
8
-
9
-
10
-
11
-
12
-
13
-
14
-
15
-
16
-
17
-
18
-
19
-
20
-
21
-
22
-
23
-
24
-
25
-
26
-
27
-
28
-
29
-
30
-
31
-
32
-
33
-
34
-
35
-
 36
36 -
 37
37 -
 38
38 -
 39
39 -
 40
40 -
 41
41 -
 42
42 -
 43
43 -
 44
44 -
 45
45 -
 46
46 -
47
-
48
-
49
 |
 |