Yamaha SLB300PRO SLB300 SLB300PRO Owners Manual - Page 15
Attaching the Frame Unit, Installation Procedure
 |
View all Yamaha SLB300PRO manuals
Add to My Manuals
Save this manual to your list of manuals |
Page 15 highlights
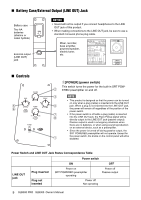
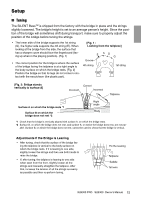
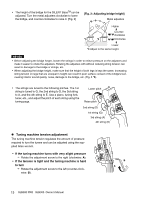
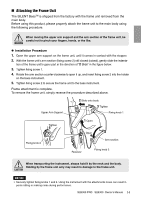
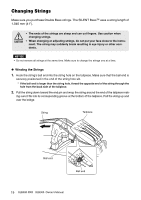
Attaching the Frame Unit The SILENT BassTM is shipped from the factory with the frame unit removed from the main body. Before using this product, please properly attach the frame unit to the main body using the following procedure. When moving the upper arm support and the arm section of the frame unit, be careful not to pinch your fingers, hands, or the like. Installation Procedure 1. Open the upper arm support on the frame unit, until it comes in contact with the stopper. 2. With the frame unit's arm section (fixing screw 2) still closed (raised), gently slide the indenta- tion of the frame unit's upper part in the direction of "2 Slide" in the figure below. 3. Tighten fixing screw 1. 4. Rotate the arm section counter-clockwise to open it up, and insert fixing screw 2 into the holder on the bass instrument. 5. Tighten fixing screw 2 to secure the frame unit to the bass instrument. Frame attachment is complete. To remove the frame unit, simply reverse the procedure described above. Upper Arm Support 2 Slide onto body 3 Tighten Fixing knob 1 Tighten 5 Fixing knob 2 1 Open Open 4 Arm section Receiver Fixing knob 2 When transporting the instrument, always hold it by the neck and the body. Holding by the frame unit only may result in damage to the frame unit. NOTICE • Securely tighten fixing knobs 1 and 2. Using the instrument with the attachments loose can result in parts rattling or making noise during performance. SLB300 PRO SLB300 Owner's Manual 14
-
 1
1 -
2
-
3
-
4
-
5
-
6
-
7
-
8
-
9
-
 10
10 -
 11
11 -
 12
12 -
 13
13 -
 14
14 -
 15
15 -
 16
16 -
 17
17 -
 18
18 -
 19
19 -
 20
20 -
21
-
22
-
23
-
24
 |
 |
