Yamaha SPM-K30 Support Guide - Page 9
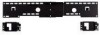
Installation procedure, 1 Attach the large wall mount bracket to the wall. - mounting instructions
 |
UPC - 027108928456
View all Yamaha SPM-K30 manuals
Add to My Manuals
Save this manual to your list of manuals |
Page 9 highlights
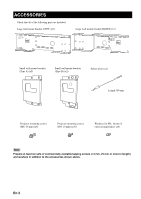
English INSTALLATION PROCEDURE INSTALLATION PROCEDURE Make sure to leave adequate ventilation space around the unit and follow the instructions below. The illustrations used in each step are the examples of YSP-800 and YSP-900. 1 Attach the large wall mount bracket to the wall. In order to secure the unit to the wall, you will need to attach the bracket to the wall first in a manner befitting the structure and quality of the wall. Choose a location where the wall can bear the weight of the whole unit. Before installing the bracket, make sure of the size (see "DIMENSIONS" on the first page of this manual). Installation example 4 mm Tapping Screw (commercially available) In order to secure the unit to the wall, drive six (or more) tapping screws from the outside through the holes in the wall mount bracket. Washer (commercially available) Installing into a dry wall 25 mm or more Installing directly into a wall, etc. 25 mm or more Beam, etc. Dry wall Note Choose a secure wall or beam to fasten the screws. Do not install them into walls made of weak material that can easily come off, such as mortar or plywood wall panels. Loose screws could cause the projector to fall, resulting in personal injury. 2 Detach the metal apparatuses from the Digital Sound Projector. (Some models of YSP-800 only) If the metal apparatuses are attached to the rear panel of your Digital Sound Projector, detach them from the rear left and right sides. If the metal apparatuses are not attached to the rear panel of your Digital Sound Projector, proceed to step 3. Metal apparatus Metal apparatus En 5
-
 1
1 -
2
-
3
-
 4
4 -
 5
5 -
 6
6 -
 7
7 -
 8
8 -
 9
9 -
 10
10 -
 11
11 -
 12
12 -
 13
13 -
 14
14
 |
 |
