Yamaha SV150 Owner's Manual - Page 11
Usage
 |
View all Yamaha SV150 manuals
Add to My Manuals
Save this manual to your list of manuals |
Page 11 highlights
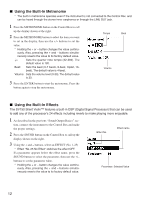
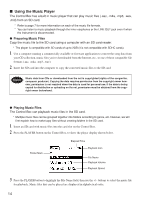
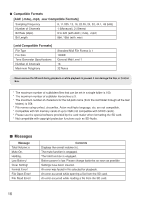
Usage ■ Sound Output Basics 1 First, connect the instrument to the Control Box using the supplied cable. 2 Connect the supplied stereo inner earphones to the jack with the mark. To reproduce sound from an external audio device, use a cable that matches the input jack on the audio device and connect it to the instrument's LINE OUT jack. 3 Press and hold the power button on the Control Box for about 1 second to switch the power ON and light the LCD display. * The power will not switch ON if the HOLD switch is in the lower position. Slide the HOLD switch to the upper position and press the POWER button again. * To switch the power off, hold the POWER button for more than 2 seconds. 4 The volume is controlled with the volume control on the instrument, and the VOL/MUTE dial on the Control Box. The volume control on the instrument only adjusts the instrument's volume, while the VOL/ MUTE dial on the Control Box adjusts the overall volume level (0 to 30) of the violin plus the effect/ metronome/player. * This instrument will not produce any sound if the volume control on the instrument is set to "0". * Pressing the VOL/MUTE dial engages the mute function and displays the icon ( ). Press the VOL/MUTE dial again disengages the mute and the headphones icon ( ) reappears. * When the HOLD switch is set to its lower position, none of the buttons on the Control Box will operate. ■ Using the Built-In Tuner 1 Connect the instrument to the Control Box and make the proper settings as described in the previous "Sound Output Basics" section. 2 Press the TUNER button on the Control Box, and call up the display shown on the right. 3 Using the + and - buttons, set the standard pitch (A=430 to 450 Hz). 4 Play a string and its note name will appear in the lower center of the display. The tuner will indicate whether the note played on the instrument is flat/lower b>, or sharp/higher # and #< icons appear, and the meter stops at the "0" position in the center. Also, pressing the ENTER button plays a tuning note that corresponds to the set standard pitch (A note). Press the ENTER button once again to stop playback of the tuning note. Meter Display Standard Pitch (Cent) Note Flat Sharp [When the note is in tune: C] 11
-
 1
1 -
2
-
3
-
4
-
5
-
 6
6 -
 7
7 -
 8
8 -
 9
9 -
 10
10 -
 11
11 -
 12
12 -
 13
13 -
 14
14 -
 15
15 -
 16
16 -
17
-
18
-
19
 |
 |
