Yamaha Soavo-2 Owner's Manual - Page 3
Connecting To Your Amplifier, No Good - speakers
 |
View all Yamaha Soavo-2 manuals
Add to My Manuals
Save this manual to your list of manuals |
Page 3 highlights
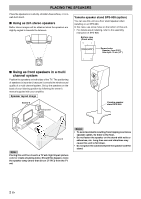
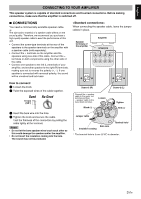
English CONNECTING TO YOUR AMPLIFIER This speaker system is capable of standard connections and bi-wired connections. Before making connections, make sure that the amplifier is switched off. ■ CONNECTIONS You need a commercially available speaker cable. y The size and/or material of a speaker cable affects on the sound quality. Therefore, we recommend you purchase a high-quality speaker cable to exert the performance of this unit. • Connect the screw-type terminals at the rear of the speakers to the speaker terminals on the amplifier with a speaker cable (sold separately). • Connect the + terminals on the amplifier and the speakers using one side of the cable. Connect the - terminals on both components using the other side of the cable. • Connect one speaker to the left (L) terminals of your amplifier, and another speaker to the right (R) terminals, making sure not to reverse the polarity (+, -). If one speaker is connected with reversed polarity, the sound will be unnatural and lack bass. When connecting the speaker cable, leave the jumper cables in place. Speaker terminals of the amplifier Amplifier SPEAKERS R +- L A -+ B How to connect: 1 Loosen the knob. 2 Twist the exposed wires of the cable together. Good 10 mm (3/8") No Good 3 Insert the bare wire into the hole. 4 Tighten the knob and secure the cable. Test the firmness of the connection by pulling the cable lightly at the terminal. Notes • Do not let the bare speaker wires touch each other as this could damage the speaker and/or the amplifier. • Do not insert the insulation coating into the hole. The sound may not be produced. Soavo-2 (R) Connect the + speaker cable to the upper red terminal and then - speaker cable to the lower black terminal. Loosen Black (-) Soavo-2 (L) Tighten Red (+) Jumper cable Bare wire Insulation coating Terminal hole* * The terminal hole is 5 mm (3/16") in diameter. 3 En
-
 1
1 -
 2
2 -
 3
3 -
 4
4 -
 5
5 -
 6
6
 |
 |
