Yamaha YDP-165 YDP-165_YDP-145_YDP-S55_YDP-S35_Owners Manual - Page 33
Keyboard Stand Assembly, Assembly Precautions, Moving/Installing - review
 |
View all Yamaha YDP-165 manuals
Add to My Manuals
Save this manual to your list of manuals |
Page 33 highlights
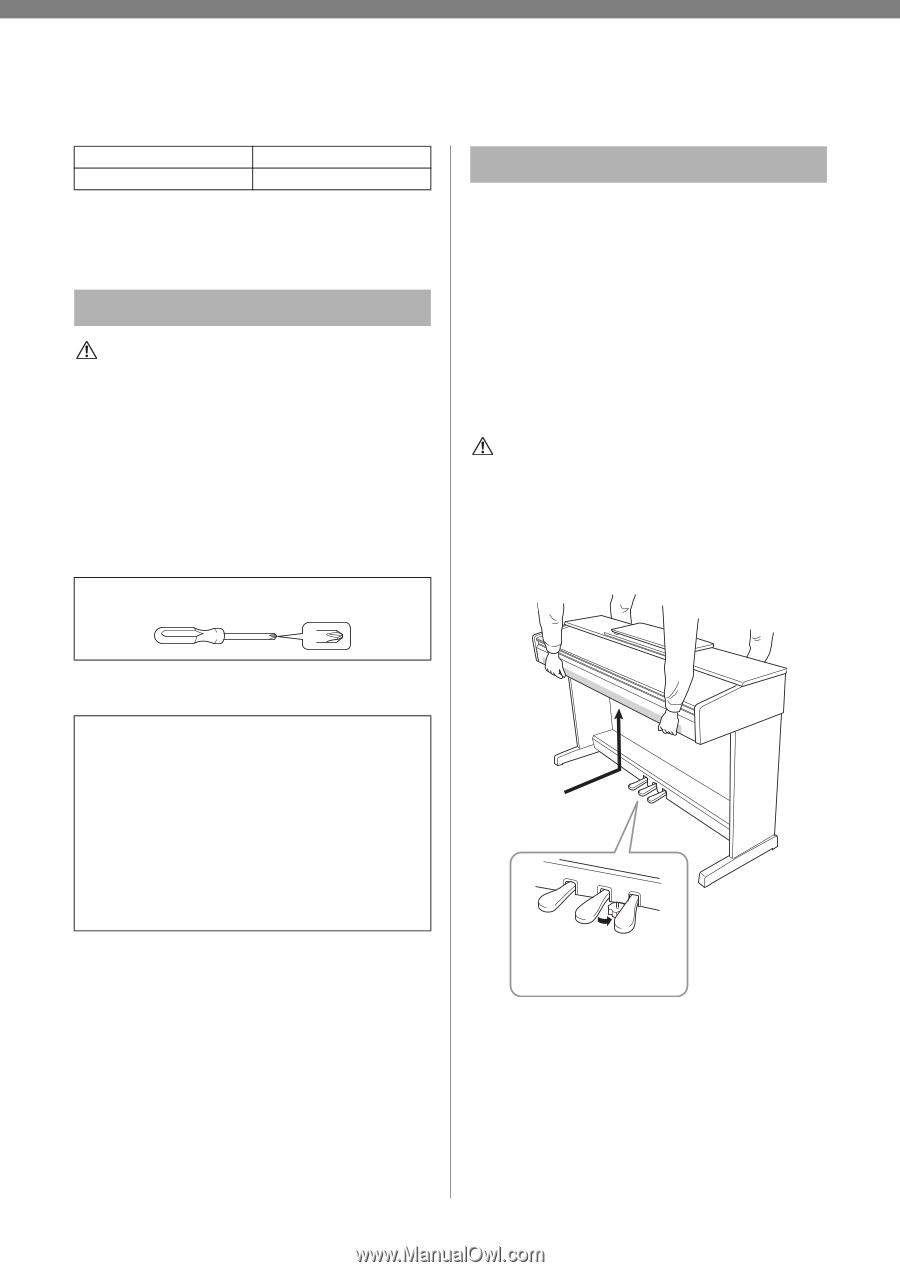
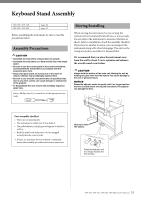
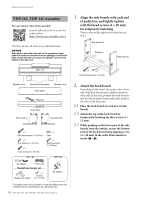
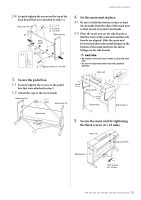
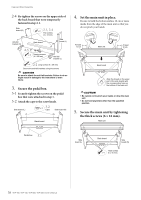
Keyboard Stand Assembly YDP-165, YDP-145 YDP-S55, YDP-S35 page 34 page 37 Before assembling the instrument, be sure to read the precautions below. Assembly Precautions CAUTION • Assemble the instrument using at least two people. • Assemble the instrument on a hard and flat floor with ample space. • Be sure to use the correct parts in the correct orientation, and assemble the instrument in accordance with the sequence given here. • Keep small parts (such as screws) out of the reach of infants. Children may accidentally swallow them. • Be sure to use only the included screws of specified sizes. Use of any other screws can cause damage or malfunction of the product. • To disassemble the unit, reverse the assembly sequence given here. Have a Phillips-head (+) screwdriver of the appropriate size ready. Moving/Installing When moving the instrument, be sure to keep the instrument horizontal and hold with two or more people. Do not subject the instrument to excessive vibration or shock. After re-installation, check the assembly checklist. If you move to another location, you can transport the instrument along with other belongings. The unit can be transported either assembled or disassembled. We recommend that you place the instrument away from the wall by about 5 cm to optimize and enhance the overall sound even further. CAUTION Always hold the bottom of the main unit. Moving the unit by holding any part other than the bottom may cause damage to the unit or personal injury. NOTICE Rotate the adjuster under the pedal until it no longer touches the floor surface before moving the instrument. The adjuster can damage the floor. Post-assembly checklist • There are no unused parts. • The instrument is stable even if you shake it. • The pedal adjuster is firmly pressed against to the floor surface. • Both the pedal cord and power cord are plugged securely into the correct jacks. → If there are any items above you haven't confirmed, review the assembly procedure and correct any errors. Be sure to hold the bottom. Rotate the adjuster until it no longer touches the floor surface. 33 YDP-165, YDP-145, YDP-S55, YDP-S35 Owner's Manual
-
 1
1 -
2
-
3
-
4
-
5
-
6
-
7
-
8
-
9
-
10
-
11
-
12
-
13
-
14
-
15
-
16
-
17
-
18
-
19
-
20
-
21
-
22
-
23
-
24
-
25
-
26
-
27
-
 28
28 -
 29
29 -
 30
30 -
 31
31 -
 32
32 -
 33
33 -
 34
34 -
 35
35 -
 36
36 -
 37
37 -
 38
38 -
39
-
40
-
41
-
42
-
43
-
44
-
45
-
46
-
47
-
48
 |
 |