Yamaha YEV-104 YEV-104/YEV-105 Owners Manual - Page 7
Set up
 |
View all Yamaha YEV-104 manuals
Add to My Manuals
Save this manual to your list of manuals |
Page 7 highlights
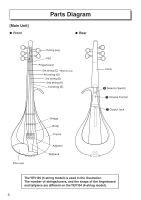
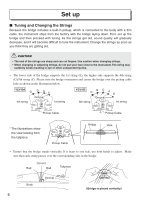
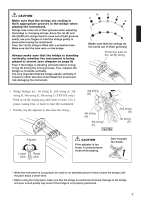
Set up ■ Tuning and Changing the Strings Because the bridge includes a built-in pickup, which is connected to the body with a thin cable, the instrument ships from the factory with the bridge laying down. First, set up the bridge and then proceed with tuning. As the strings get old, sound quality will gradually decrease, and it will become difficult to tune the instrument. Change the strings as soon as you think they are getting old. CAUTION • The end of the strings are sharp and can cut fingers. Use caution when changing strings. • When changing or adjusting strings, do not put your face close to the instrument. The string may suddenly break resulting in eye or other unexpected injuries. • The lower side of the bridge supports the 1st string (E), the higher side supports the 4th string (G)/5th string (C). Please note the bridge orientation and center the bridge over the pickup cable hole as shown in the illustration below. YEV104 G D A E Groove 4th string 1st string YEV105 GD C 5th string Groove A E 1st string Pickup Cable Pickup Cable * The illustrations show the view looking from the tailpiece. Pickup Cable Bridge Hole • Ensure that the bridge stands vertically. If it leans to one side, use both hands to adjust. Make sure that each string passes over the corresponding slits in the bridge. Correct Bad Bad Tailpiece Body Vertical 6 [Bridge is placed vertically]
-
 1
1 -
 2
2 -
 3
3 -
 4
4 -
 5
5 -
 6
6 -
 7
7 -
 8
8 -
 9
9 -
 10
10 -
 11
11
 |
 |
