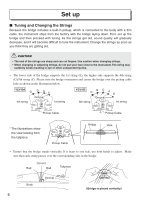
Yamaha YEV-104 YEV-104/YEV-105 Owners Manual - Page 8
string D, 4th string G, 5th string C YEV105 only.
 |
View all Yamaha YEV-104 manuals
Add to My Manuals
Save this manual to your list of manuals |
Page 8 highlights
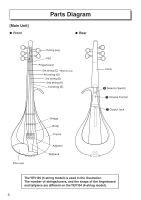
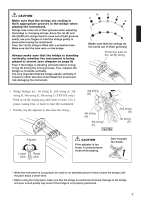
CAUTION Make sure that the strings are resting in their appropriate grooves in the bridge when playing the instrument. Strings may come out of their grooves when adjusting the bridge or changing strings. Since the 1st (E) and 4th (G)/5th (C) strings tend to come out of their grooves easily, use your fingers to hold the strings gently in place when tuning the instrument. Also, the 1st (E) string is fitted with a protective tube. Make sure that the tube rests on the bridge. Always make sure that the bridge is standing vertically, whether the instrument is being played or stored. (see diagram on page 6) Even if the bridge is standing vertically before tuning, it may tilt during the tuning process. If so, readjust the bridge so it stands vertically. It is very important that the bridge stands vertically. If it leans in either direction it will impair the sound and risk damaging the instrument. G C D A E [Make sure that the strings do not come out of their grooves] Protective tube on the 1st (E) string • String tunings are, 1st string E, 2nd string A, 3rd string D, 4th string G, 5th string C (YEV105 only). Push in on the tuning peg and rotate to tune. Use a piano, tuning fork, or tuner to tune the instrument. • Finally, use the adjuster to fine tune the strings. 3rd string (D) 4th string (G) 5th string (C) YEV105 2nd string (A) 1st string (E) Adjuster Lower pitch Raise pitch CAUTION If the adjuster is too loose, it could produce noise while playing. Don't loosen too much. • When the instrument is not going to be used for an extended period of time, loosen the strings until the pitch drops a whole tone. • Before using the instrument, make sure that the bridge is positioned vertically. Damage to the bridge and poor sound quality may result if the bridge is not properly positioned. 7
-
 1
1 -
2
-
 3
3 -
 4
4 -
 5
5 -
 6
6 -
 7
7 -
 8
8 -
 9
9 -
 10
10 -
 11
11
 |
 |
