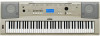
Yamaha YPG-225 Owner's Manual - Page 89
Installing the Musicsoft, Downloader and Digital, Music Notebook Applications - usb midi driver
 |
View all Yamaha YPG-225 manuals
Add to My Manuals
Save this manual to your list of manuals |
Page 89 highlights
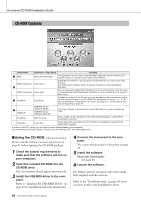
Accessory CD-ROM Installation Guide Installing the driver on Windows XP 1 Start the computer and use the "Administrator" account to log into Windows. 2 Select [Start] ➔ [Control Panel]. If the control panel appears as "Pick a category", click "Switch to Classic View" in the upper left of the window. All control panels and icons will be displayed. 3 Go to [System] ➔ [Hardware] ➔ [Driver Signing Options] and check the radio button to the left of "Ignore" and click [OK]. 4 Click the [OK] button to close System Properties, and then click "X" in the upper right of the window to close the Control Panel. 5 Insert the supplied CD-ROM into the CDROM drive. A start window will appear automatically. 6 First, make sure the POWER switch on the MIDI device is set to OFF, then use a USB cable to connect the MIDI device to the computer. After making the connections, turn on the power of the MIDI device. The system launches the Found New Hardware Wizard automatically. Otherwise, refer to "Troubleshooting" in the "Accessory CD-ROM Installation Guide" section of the Owner's Manual. If the system displays "Found New Hardware" in the lower right corner, wait until Wizard windows is displayed. (Some computers may take a while to display the window.) If the Wizard window prompts you to specify whether or not to connect to Windows Update, select the radio button for "No, not this time", then click [Next]. 7 Select the radio button for "Install the software automatically (recommended)", then click [Next]. NOTE • If during the installation the system displays "...has not passed Win- dows Logo testing to verify its compatibility with Windows XP", click [Continue Anyway]. 8 When the installation is complete, the Wizard displays "Completing the Found New Hardware Wizard". Click [Finish]. (Some computers may take a while to display the Wizard window.) 9 Restart the computer. If the system displays "Found New Hardware" in the lower right corner, wait until the Wizard window is displayed. (Some computers may take a while to display the Wizard window.) The USB-MIDI driver installation is complete. ■Installing the Musicsoft Downloader and Digital Music Notebook Applications● ● ● IMPORTANT • You will need to log in with administrator (root) privileges in order to install Musicsoft Downloader on a computer running Windows 2000 or XP. • You will need to log in with administrator (root) privileges in order to install Digital Music Notebook on a computer running Windows 2000 or XP. IMPORTANT • When installing the Digital Music Notebook, make sure that Inter- net Explorer 6.0 (with SP1) or higher is installed to your computer. IMPORTANT • Credit card settlement is required to purchase Digital Music Note- book content. Credit card processing may not be possible for some areas, so please check with your local authorities to make sure that your credit card can be used. 1 Insert the Accessory CD-ROM into your computer's CD-ROM drive. The start window will appear automatically showing software applications. NOTE • If the start window does not appear automatically, double click your "My Computer" folder to open it. Right-click the CD-ROM icon and select "Open" from the pop-up menu. Double click "Start.exe" and proceed to step 2, below. 2 Click [Musicsoft Downloader] or [Digital Music Notebook]. 3 Click the [install] button for Musicsoft downloader, or [Digital Music Notebook Download] button for Digital Music Notebook, and follow the on-screen instructions to install the software. For Digital Music Notebook operating instructions see the help menu: launch the Digital Music Notebook application and click "Help". For Musicsoft Downloader operating instructions see the Help menu: launch the Musicsoft Downloader application and click "Help". * You can obtain the latest version of the Musicsoft Downloader at the following Internet URL. http://music.yamaha.com/download/ IMPORTANT • Only Musicsoft Downloader can be used to transfer files between this instrument and a computer. No other file transfer application can be used. DGX-220/YPG-225 Owner's Manual 89
-
 1
1 -
2
-
3
-
4
-
5
-
6
-
7
-
8
-
9
-
10
-
11
-
12
-
13
-
14
-
15
-
16
-
17
-
18
-
19
-
20
-
21
-
22
-
23
-
24
-
25
-
26
-
27
-
28
-
29
-
30
-
31
-
32
-
33
-
34
-
35
-
36
-
37
-
38
-
39
-
40
-
41
-
42
-
43
-
44
-
45
-
46
-
47
-
48
-
49
-
50
-
51
-
52
-
53
-
54
-
55
-
56
-
57
-
58
-
59
-
60
-
61
-
62
-
63
-
64
-
65
-
66
-
67
-
68
-
69
-
70
-
71
-
72
-
73
-
74
-
75
-
76
-
77
-
78
-
79
-
80
-
81
-
82
-
83
-
 84
84 -
 85
85 -
 86
86 -
 87
87 -
 88
88 -
 89
89 -
 90
90 -
 91
91 -
 92
92 -
 93
93 -
 94
94 -
95
-
96
-
97
-
98
-
99
-
100
-
101
-
102
-
103
-
104
-
105
-
106
-
107
-
108
-
109
-
110
-
111
-
112
-
113
-
114
-
115
-
116
-
117
-
118
 |
 |
