Zenith XBR413 Operating Guide - Page 42
Recording from an External Input, Recording from External Components, Recording from a Digital
 |
UPC - 044642700652
View all Zenith XBR413 manuals
Add to My Manuals
Save this manual to your list of manuals |
Page 42 highlights
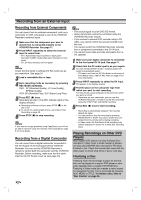
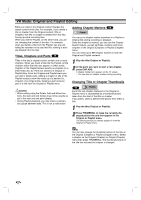
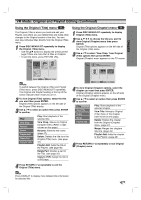
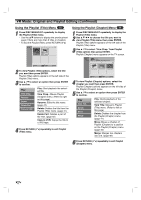
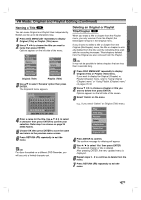
Recording from an External Input Recording from External Components You can record from an external component, such as a camcorder or VCR, connected to any of the VCR/DVD Recorder's external inputs. 1 Make sure that the component you want to record from is connected properly to the VCR/DVD Recorder. See page 17. 2 Press INPUT repeatedly to select the external input to record from. • AV1: Audio/Video Input mounted on back panel • AV2 (AV2 COMP): Audio/Video Input mounted on front panel • DV: DV Input mounted on front panel ote Check that the Audio In settings DV Rec Audio are as you want them. See page 24. 3 Load a recordable disc or tape. 4 Set a recording mode as necessary by pressing REC MODE repeatedly. DVD: SP (Standard Quality), LP (Low Quality), XP(High Quality) VCR: SP (Standard Play), SLP (Super Long Play) 5 Press REC (z) once. Recording will start. (The REC indicator lights in the display window.) Recording continues until you press STOP (x) or the disc is full. To record for a fixed length of time, see Instant Timer Recording on page 39. 6 Press STOP (x) to stop recording. ote If your source is copy-protected using CopyGuard, you will not be able to record it using this recorder. See Copyright on page 8 for more details. Recording from a Digital Camcorder You can record from a digital camcorder connected to the DV IN jack on the front panel of this VCR/DVD Recorder. You can use the VCR/DVD Recorder's remote to control both the camcorder and the VCR/DVD Recorder. Before recording, make sure that the audio input for the DV IN jack is set up (see page 24). ips • The source signal must be DVC-SD format. • Some camcorders cannot be controlled using the VCR/DVD Recorder remote. • If you connect a second DVD recorder using a DV cable, you cannot control the second recorder from this one. • You cannot control the VCR/DVD Recorder remotely from a component connected to the DV IN jack. • You cannot record date and time information from a DV cassette. 1 Make sure your digital camcorder is connected to the front panel DV IN jack. See page 17. 2 Check that the DV audio input is as you require. You can choose between Audio 1 (original audio) and Audio 2 (overdubbed audio). • DV Input is set from the DV Rec Audio in sub-menu of the General menu. See DV Rec Audio on page 24 for more information. 3 Press INPUT repeatedly to select the DV input. DV appears in the display window. 4 Find the place on the camcorder tape from which you want to start recording. For best results, pause playback at the point from which you want to record. • Depending on your camcorder, you can use this VCR/DVD Recorder's remote to control the camcorder using the STOP, PLAY and PAUSE functions. 5 Press REC (z) once to start recording. • Recording is automatically stopped if the recorder detects no signal. • You can pause or stop the recording by pressing PAUSE/STEP or STOP. You cannot control the camcorder from this remote control during recording. • In Video mode, the final frame of the recording may remain displayed on screen for a while after recording stops. Playing Recordings on Other DVD Players Most regular DVD players can play finalized discs recorded in Video mode. A small number of players can also play DVD-RW discs recorded in VR mode, finalized or not. Check the manual that came with the other player to check what kinds of discs it will play. Finalizing a Disc Finalizing 'fixes' the recordings in place so that the disc can be played on a regular DVD player or computer equipped with a suitable DVD-ROM drive. Finalizing a Video mode disc creates a menu screen for navigating the disc. This is accessed by pressing DISC MENU or TITLE. To finalize a disc, refer to "Disc Finalize" on page 25. 42
-
 1
1 -
2
-
3
-
4
-
5
-
6
-
7
-
8
-
9
-
10
-
11
-
12
-
13
-
14
-
15
-
16
-
17
-
18
-
19
-
20
-
21
-
22
-
23
-
24
-
25
-
26
-
27
-
28
-
29
-
30
-
31
-
32
-
33
-
34
-
35
-
36
-
 37
37 -
 38
38 -
 39
39 -
 40
40 -
 41
41 -
 42
42 -
 43
43 -
 44
44 -
 45
45 -
 46
46 -
 47
47 -
48
-
49
-
50
-
51
-
52
-
53
-
54
-
55
-
56
-
57
-
58
-
59
 |
 |