ZyXEL NWA3550 Quick Start Guide - Page 4
Wall Mounting
 |
View all ZyXEL NWA3550 manuals
Add to My Manuals
Save this manual to your list of manuals |
Page 4 highlights
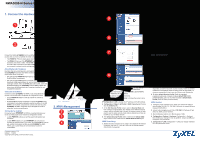
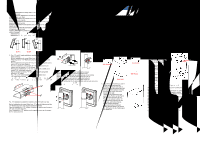
Install the NWA3550-N vertically with a +15, 0, or -15 degree angle relative to the pole.. Installieren Sie den NWA3550-N vertikal mit einem Winkel von +15°, 0° oder -15° relativ zum Mast. Instale el NWA3550-N verticalmente con un ángulo de +15, 0, o -15 grados en relación al poste. Installez le NWA3550-N verticalement avec un angle de +15, 0, ou -15 degrés par rapport au mât. Installare il NWA3550-N verticalmente con un angolo di +15, 0, -15 gradi rispetto al track NWA3550-N 15, 0 или -15 Installera NWA3550-N vertikalt med +15, 0 eller -15 graders vinkel relativt till stolpen. 将 NWA3550-N 15、 0 或 -15 NWA3550-N 15、0 或 -15 度角。 +15o 0o -15o Down Down Top 1. For +15° and 0° angle installations, position the bracket with the +15° mark on the top. Bei der Installation mit einem Winkel von +15° und 0° muss die Halterung mit der +15°-Markierung nach oben zeigend positioniert werden. Para instalaciones a ángulos de +15° y 0°, coloque el soporte con la marca +15° en la parte superior. Pour les installations à des angles de +15° et 0°, positionnez le support avec la marque +15° au sommet. Per angoli di installazione di +15° e 0°, posizionare la staffa con il simbolo +15° sulla parte superiore 15° и 0 15 För +15° och 0° vinkelinstallationer, positionera fästet med +15°-markeringen överst. 对于 +15° 和 0 15 15° 角和 0 15 15o Per un'installazione di -15°, posizionare la staffa con il simbolo -15° sulla parte superiore 15 15 För -15°-installation, positionera fästet så att -15°-markeringen befinner sig överst. 对于 -15 15 15 15 2. This is a 0° angle installion example. Use a wrench to tighten the nuts onto the U bolt. Das Beispiel zeigt die Installation mit einem Winkel von 0°. Ziehen Sie die Muttern auf dem Bügel fest. Éste es un ejemplo de instalación a un ángulo de 0°. Utilice una llave para apretar las tuercas en el perno en U. Ceci est un exemple d'installation avec un angle de 0°. Utilisez une clé pour serrer les écrous sur le boulon en U. Questo è un esempio di installazione con angolo 0° Utilizzare una chiave per serrare i dadi sul bullone U 0 U Detta är ett exempel på en 0°-vinkelinstallion. Använd en skiftnyckel för att spänna muttrarna på U-bulten. 如下为 0 U 0 U 3. Use a wrench to tighten the four nuts onto the screws. Ziehen Sie die vier Muttern auf den Schrauben fest. Utilice una llave para apretar las cuatro tuercas en los tornillos. Utilisez une clé pour serrer les quatre écrous sur les vis. Utilizzare una chiave per serrare i quattro dadi sulle viti Använd en skiftnyckel för att spänna de fyra muttrarna på skruvarna 0o For -15° installation, position the bracket so the -15° mark is on top. Bei der Installation mit einem Winkel von -15° muss die Halterung mit der -15°-Markierung nach oben zeigend positioniert werden. Para una instalación a -15°, coloque el soporte de manera que la marca 15° esté en la parte superior. Pour l'installation à -15°, positionnez le support de sorte que la marque de -15° soit au sommet. Wall Mounting Wandmontage Montaje en pared Fixation murale Montaggio a parete Väggmontering Wall Mounting Kit Wandmontagezubehör Kit de montaje en pared Kit de fixation murale Kit montaggio a parete Väggmonteringssats M6 Screws Anchors Bracket 1. Place the bracket where you want it on the wall (W) and mark the position of the outer holes with a pencil. Remove the bracket and drill the holes where marked. Insert the anchors in the holes. Screw the bracket to the wall. Halten Sie die Halterung an die gewünschte Position an der Wand (W), und kennzeichnen Sie die Position der äußeren Löcher mit einem Bleistift. Entfernen Sie die Halterung, und bohren Sie die Löcher entsprechend den gekennzeichneten Positionen. Führen Sie die Dübel in die Löcher ein. Schrauben Sie die Halterung an der Wand fest. M6 Nuts Coloque el soporte donde lo desee en la pared (W) y marque la posición de los agujeros externos con un lápiz. Quite el soporte y perfore los agujeros por las marcas. Inserte los tacos en los agujeros. Atornille el soporte en la pared. Placez le support où vous le souhaitez sur le mur (W) et marquez la position des trous extérieurs avec un crayon. Retirez le support et percez les trous aux endroits marqués. Insérer les chevilles dans les trous. Vissez le support au mur. Posizionare la staffa nel punto desiderato sulla parete (W) e segnare la posizione dei fori esterni con una matita. Rimuovere la staffa e praticare i fori dove segnato. Inserire i ganci nei fori. Avvitare la staffa nella parete W Placera fästet på önskad plats på väggen (W) och markera positionen för de yttre hålen med en penna. Ta bort fästet och borra hålen på de markerade punkterna. För in ankarna i hålen. Skruva fast fästet vid väggen W W 2. Use the nuts and a wrench to attach the NWA3550-N to the bracket. Befestigen Sie den NWA3550-N mit den Muttern an der Halterung. Utilice las tuercas y una llave para unir el NWA3550-N al soporte. Utilisez les écrous et une clé pour fixer le NWA3550-N au support. Usare i dadi e una chiave per collegare il NWA3550-N alla staffa NWA3550-N Använd muttrarna och en skiftnyckel för att fästa NWA3550-N vid fästet NWA3550-N NWA3550-N Although this is an IP66-certified product, we recommend you deploy it in a dry, sheltered place. Auch wenn dieses Gerät gemäß IP66 zertifiziert ist, sollte es möglichst an einem trockenen, geschützten Ort eingesetzt werden. Aunque este producto está certificado con IP66, le recomendados usarlo en un lugar seco y protegido. Bien que ce soit un produit certifié IP66, nous vous recommandons de le déployer dans un endroit sec et abrité. Nonostrante si tratti di un prodotto certificato IP66, si consiglia di l'installazzione in un luogo asciutto e riparato IP66 Trots att detta är en IP66-certifierad produkt, rekommenderar vi att du använder den på en torr och skyddad plats IP66 IP66
-
 1
1 -
 2
2 -
 3
3 -
 4
4
 |
 |
