ZyXEL NWD310N Quick Start Guide
ZyXEL NWD310N Manual
 |
View all ZyXEL NWD310N manuals
Add to My Manuals
Save this manual to your list of manuals |
ZyXEL NWD310N manual content summary:
- ZyXEL NWD310N | Quick Start Guide - Page 1
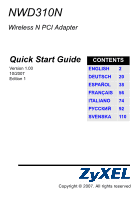
NWD310N Wireless N PCI Adapter Quick Start Guide Version 1.00 10/2007 Edition 1 CONTENTS ENGLISH 2 DEUTSCH 20 ESPAÑOL 38 FRANÇAIS 56 ITALIANO 74 P 92 SVENSKA 110 Copyright © 2007. All rights reserved - ZyXEL NWD310N | Quick Start Guide - Page 2
a wireless network adapter for your desktop computer. The NWD310N is WPS (Wi-Fi Protected Setup) compatible. 1 Install the Software " Install the software from the CD before you insert the NWD310N. Do not insert the NWD310N yet. 1 Remove the NWD310N if you already inserted it. 2 Insert the included - ZyXEL NWD310N | Quick Start Guide - Page 3
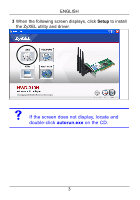
ENGLISH 3 When the following screen displays, click Setup to install the ZyXEL utility and driver. V If the screen does not display, locate and double-click autorun.exe on the CD. 3 - ZyXEL NWD310N | Quick Start Guide - Page 4
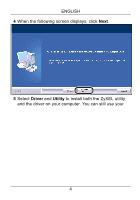
ENGLISH 4 When the following screen displays, click Next. 5 Select Driver and Utility to install both the ZyXEL utility and the driver on your computer. You can still use your 4 - ZyXEL NWD310N | Quick Start Guide - Page 5
ENGLISH operating system's wireless network utility, if you choose not to install the ZyXEL utility. 6 Click Install. 5 - ZyXEL NWD310N | Quick Start Guide - Page 6
ENGLISH " You will need to shut down your computer after installing the ZyXEL utility. Make sure you have saved your work before continuing. 7 When the following screen displays, select No, I will restart my computer later. You will turn - ZyXEL NWD310N | Quick Start Guide - Page 7
yourself by wearing an anti-static wrist strap if you have one or touching a grounded metal object. 4 Remove the computer cover, and then remove the NWD310N from its packaging. 5 If the antennas are attached to the - ZyXEL NWD310N | Quick Start Guide - Page 8
into an available PCI slot. Make sure the NWD310N's contacts are fully seated in the PCI slot (A). A 7 Secure the NWD310N to the computer with a bracket screw and replace the computer cover. 8 Attach (screw) the antennas onto the NWD310N. 9 Point the antennas up. 10 Connect the power and turn - ZyXEL NWD310N | Quick Start Guide - Page 9
) turns on if it is properly inserted. V If the NWD310N's Link LED is not on after you have installed the software and the NWD310N, make sure the NWD310N is properly inserted. 11A Found New Hardware Wizard window displays. Select Install the software automatically (recommended) and click Next - ZyXEL NWD310N | Quick Start Guide - Page 10
if you want to use the utility to join a wireless network. The NWD310N supports two WPS methods for creating a secure connection: • Push Button Configuration - 2 Press the WPS button on the NWD310N and on your wireless AP (ZyXEL's NWA570N is shown as an example). It doesn't matter which button - ZyXEL NWD310N | Quick Start Guide - Page 11
on its panel, as well as a WPS button in its configuration utility. Other WPS enabled devices have a similar WPS button. NWD310N AP Internet WPS 3 The AP and the NWD310N establish a secure connection. This can take up to two minutes. 4 You are now ready to connect to the Internet wirelessly - ZyXEL NWD310N | Quick Start Guide - Page 12
section shows you how to use the WPS PIN method to connect to an AP as well as how to configure wireless settings manually to join a wireless network. 4.1 Open the Utility 1 After you install the ZyXEL utility and insert the NWD310N, an icon appears in the system tray. Doubleclick the icon. 2 The - ZyXEL NWD310N | Quick Start Guide - Page 13
ENGLISH V If the icon does not display, uninstall and reinstall the ZyXEL utility. See the User's Guide for how to uninstall the utility. The NWD310N automatically connects to an available wireless network without security enabled. However, this wireless network may not be connected to the - ZyXEL NWD310N | Quick Start Guide - Page 14
ZyXEL utility Adapter screen displays. In the WPS section, select WPS and PIN - Use this device's PIN. Write down the 8-digit PIN that is displayed in the grayedout text field of the pop-up window AP's or wireless router's PIN with the NWD310N (see the User's Guide if you want to use this instead). 3 - ZyXEL NWD310N | Quick Start Guide - Page 15
screen from ZyXEL's NWA570N is shown). 4 Click Start in the NWD310N Adapter screen and Apply or Start in the AP's WPS screen within two minutes. The AP authenticates the NWD310N and sends the proper configuration settings to the NWD310N. This may take up to two minutes. The NWD310N is now able - ZyXEL NWD310N | Quick Start Guide - Page 16
ENGLISH 2 The available wireless networks display in the Available Network List. SSID means Service Set Identifier and is the name of the wireless network. 3 If a wireless network has no security, one of the following icons appears next to its - ZyXEL NWD310N | Quick Start Guide - Page 17
correctly, you are successfully connected to the Internet. Note for Windows XP Users If you want to use Windows Zero Configuration (WZC), rightclick the icon and select Use Windows Zero Configuration as Configuration utility. To activate the ZyXEL utility again, right-click the icon and select Use - ZyXEL NWD310N | Quick Start Guide - Page 18
ENGLISH Procedure to View a Product's Certification(s) 1 Go to www.zyxel.com. 2 Select your product from the drop-down list box on the ZyXEL home page to go to that product's page. 3 Select the certification you wish to view from this 18 - ZyXEL NWD310N | Quick Start Guide - Page 19
ENGLISH 19 - ZyXEL NWD310N | Quick Start Guide - Page 20
Setup"; Wi-Fi-geschützte Installation). 1 Installation der Software " Installieren Sie die Software von der CD, bevor Sie die NWD310N einstecken. 1 Entfernen Sie die NWD310N wieder, falls Sie sie bereits eingesteckt haben. 2 Legen Sie die mitgelieferte CD in das CD-ROM-Laufwerk des Computers ein - ZyXEL NWD310N | Quick Start Guide - Page 21
DEUTSCH 3 Klicken Sie im folgenden Bildschirm auf Setup, um das ZyXEL-Utility und den Treiber zu installieren. V Falls dieses Fenster nicht erscheinen sollte, navigieren Sie auf der CD zur Datei autorun.exe und klicken Sie doppelt darauf. 21 - ZyXEL NWD310N | Quick Start Guide - Page 22
Utility (Utility), um das ZyXEL Utility Programm und den Treiber auf dem Computer zu installieren. Wenn Sie nur den Treiber installieren und die Wireless Zero Configuration (WZC) mit Windows XP verwenden möchten, wählen Sie nur Driver (Treiber) (siehe Hinweis für Windows XP-Benutzer). Klicken Sie - ZyXEL NWD310N | Quick Start Guide - Page 23
DEUTSCH verwenden, oder klicken Sie auf Browse (Durchsuchen), um einen anderen Ordner auszuwählen. 6 Klicken Sie auf Install (Installieren). 23 - ZyXEL NWD310N | Quick Start Guide - Page 24
DEUTSCH " Wenn Sie das ZyXEL Utility Programm installiert haben, muss der Computer neu gestartet werden. Stellen Sie sicher, dass Sie vor dem Neustart Ihre Arbeiten sichern! 7 Wenn das folgende Fenster - ZyXEL NWD310N | Quick Start Guide - Page 25
, indem Sie ein antistatisches Handgelenkband umbinden oder einen geerdeten Metallgegenstand berühren. Entfernen Sie das Gehäuse des Computers, und nehmen Sie den NWD310N aus der Verpackung heraus. 5 Wenn die Antennen am NWD310N befestigt sein sollten, schrauben Sie diese vor dem Einbau heraus. 25 - ZyXEL NWD310N | Quick Start Guide - Page 26
freien PCI-Steckplatz. Stellen Sie sicher, dass die Kontakte des NWD310N vollständig im PCI-Steckplatz sitzen(A). A 7 Schrauben Sie den NWD310N mit einer Schraube an der Halterung fest. 8 Schrauben Sie die Antennen wieder an den NWD310N. 9 Richten Sie die Antennen nach oben. 10 Schalten Sie den - ZyXEL NWD310N | Quick Start Guide - Page 27
beginnt zu leuchten, sobald das Gerät angeschlossen ist. V Wenn die Link-LED des NWD310N nach dem Installieren der Software und des NWD310N nicht leuchtet, prüfen Sie, ob der NWD310N richtig angeschlossen ist. 11Auf dem Bildschirm erscheint das Fenster Assistent für das Suchen neuer Hardware - ZyXEL NWD310N | Quick Start Guide - Page 28
gen. " Wenn Sie Ihr Gerät mit dieses Programm zu einem Drahtlosnetzwerk hinzufügen möchten, gehen Sie zu Abschnitt 4. Der NWD310N unterstützt zwei WPS-Methoden, um eine sichere Verbindung herzustellen: • PBC (Push Button Configuration; Tastenkonfiguration) Sie erstellen ein sicheres Drahtlosnetzwerk - ZyXEL NWD310N | Quick Start Guide - Page 29
am drahtlosen AP (NWA570N von ZyXEL ist ein Beispiel) auf die WPSTaste. Dabei ist es egal, welche Taste Sie zuerst drücken. Jedoch muss die zweite Taste spätestens zwei Minuten nach dem Drücken der ersten Taste gedrückt werden. " Die WPS-Taste des NWD310N befindet sich sowohl auf dem Bedienfeld - ZyXEL NWD310N | Quick Start Guide - Page 30
DEUTSCH 4 Herstellen der Verbindung zu einem drahtlosen Netzwerk mit ZyXEL In diesem Abschnitt wird beschrieben, wie Sie mit der . 4.1 Öffnen des Utility-Programms 1 Wenn Sie das ZyXEL Utility-Programm installiert und den NWD310N angeschlossen haben, erscheint in der Taskleiste ein Symbol. Klicken - ZyXEL NWD310N | Quick Start Guide - Page 31
das Utility-Programm und installieren Sie es erneut. Im Benutzerhandbuch finden Sie eine Beschreibung, wie das UtilityProgramm deinstalliert wird. Der NWD310N sucht automatisch nach verfügbaren Netzwerken und stellt eine Verbindung zu einem ungesicherten Drahtlosnetzwerk her. Es ist jedoch möglich - ZyXEL NWD310N | Quick Start Guide - Page 32
DEUTSCH 4.2 WPS PIN-Konfiguration 1 Klicken Sie auf die Registerkarte Adapter. 2 Das Fenster Adapter des ZyXEL-Utility-Programms erscheint. Wählen Sie im Bereich WPS die Option WPS und PIN - Use this device's PIN (PIN - Die PIN dieses Geräts verwenden). Geben - ZyXEL NWD310N | Quick Start Guide - Page 33
das Fenster auf, in dem Sie die WPSEinstellungen konfigurieren und die PIN des NWD310N eingeben können (die Abbildung zeigt als Beispiel ein Fenster des NWA570N von ZyXEL). 4 Klicken Sie im Fenster Adapter des NWD310N auf Start und innerhalb der folgenden zwei Minuten im WPSFenster des AP auf Apply - ZyXEL NWD310N | Quick Start Guide - Page 34
zu zwei Minuten dauern. Der NWD310N kann nun in einer sicheren Verbindung mit dem AP kommunizieren. 4.3 Herstellen einer Verbindung zu einem Drahtlosnetzwerk 1 Klicken Sie doppelt auf das -Symbol. Das Fenster Link Info (Verbindungsinformatio nen) des ZyXEL-UtilityProgramms erscheint. Klicken Sie auf - ZyXEL NWD310N | Quick Start Guide - Page 35
DEUTSCH Identifier, und sie ist der Name des Drahtlosnetzwerks. 3 Wenn ein Drahtlosnetzwerk nicht gesichert ist, erscheint eines der folgenden Symbole neben dem jeweiligen Eintrag in der Liste. Wenn ein Drahtlosnetzwerk gesichert ist, erscheint eines der folgenden Symbole neben dem jeweiligen - ZyXEL NWD310N | Quick Start Guide - Page 36
mit der rechten Maustaste auf das Symbol . Wählen Sie dann die Option Use Windows Zero Configuration as Configuration utility (Als Konfigurationsprogramm Windows Zero Configuration verwenden). Um das ZyXEL-Utility-Programm wieder zu aktivieren, klicken Sie mit der rechten Maustaste auf das Symbol - ZyXEL NWD310N | Quick Start Guide - Page 37
DEUTSCH Vorgehensweise zum Aufrufen einer Produktzertifizierung 1 Gehen Sie auf www.zyxel.com. 2 Wählen Sie Ihr Produkt aus der Auswahlliste auf der ZyXEL Homepage aus, um die Seite des entsprechenden Produkts aufzurufen. 3 Wählen Sie die Zertifizierung, die Sie von dieser Seite aus aufrufen möchten - ZyXEL NWD310N | Quick Start Guide - Page 38
compatible con Wi-Fi Protected Setup (WPS) para su ordenador de sobremesa. 1 Instalar el software " Instale el software del CD antes de insertar el NWD310N. No inserte el NWD310N todavía. 1 Quite el NWD310N si ya lo ha insertado. 2 Inserte el CD incluido en la unidad de CD-ROM de su ordenador. 38 - ZyXEL NWD310N | Quick Start Guide - Page 39
ESPAÑOL 3 Cuando aparezca la siguiente pantalla, haga clic en Setup para instalar la utilidad ZyXEL y el controlador. V Si la pantalla no aparece, busque y haga doble clic en autorun.exe. 39 - ZyXEL NWD310N | Quick Start Guide - Page 40
(Utilidad) para instalar la utilidad y el controlador ZyXEL en su ordenador. Si desea instalar el controlador solamente y utiliza Wireless Zero Configuration (WZC) con Windows XP, seleccione Driver (Controlador) solamente (ver Nota para usuarios de Windows XP). Haga clic en Next (Siguiente) para - ZyXEL NWD310N | Quick Start Guide - Page 41
ESPAÑOL predeterminada o haga clic en Browse (Examinar) para seleccionar una carpeta distinta. 6 Haga clic en Install (Instalar). 41 - ZyXEL NWD310N | Quick Start Guide - Page 42
ESPAÑOL " Necesitará reiniciar su ordenador tras la instalación de la utilidad ZyXEL. Asegúrese de haber guardado su trabajo antes de continuar. 7 Cuando aparezca la siguiente pantalla, seleccione No, I will restart my computer later (No, reiniciaré el - ZyXEL NWD310N | Quick Start Guide - Page 43
tierra llevando una muñequera antiestática si tiene una o tocando un objeto de metal conectado a tierra. Retire la tapa del ordenador y luego saque el NWD310N de su embalaje. 5 Si las antenas están conectadas al - ZyXEL NWD310N | Quick Start Guide - Page 44
en una ranura PCI libre. Asegúrese de que los contactos del NWD310N estén bien asentados en la ranura PCI (A). A 7 Fije el NWD310N al ordenador con un tornillo de soporte. 8 Coloque (enrosque) las antenas en el NWD310N. 9 Coloque las antenas hacia arriba. 10 Encienda su ordenador. El LED (luz - ZyXEL NWD310N | Quick Start Guide - Page 45
ESPAÑOL V Si el LED Link del NWD310N no se enciende tras haber instalado el software y el NWD310N, compruebe que el NWD310N esté bien insertado. 11Aparecerá la ventana del Asistente para hardware nuevo encontrado. Seleccione Instalar automáticamente el software (recomendado) y haga clic en - ZyXEL NWD310N | Quick Start Guide - Page 46
la sección 4 si desea usar la utilidad para unirse a una red inalámbrica. El NWD310N soporta dos métodos WPS para crear una conexión segura: • Push Button Configuration (Presionando un de sobremesa. 2 Presione el botón WPS en el NWD310N y en su PA inalámbrico (el NWA570N del ZyXEL aparece como 46 - ZyXEL NWD310N | Quick Start Guide - Page 47
ESPAÑOL ejemplo). No importa el botón que presione antes. Debe presionar el segundo botón en dos minutos tras presionar el primero. " Su NWD310N tiene un botón WPS situado en su panel, además de un botón WPS en su utilidad de configuración. Otros dispositivos con WPS tienen un botón - ZyXEL NWD310N | Quick Start Guide - Page 48
PA además de ajustar la configuración inalámbrica manualmente para unirse a una red inalámbrica. 4.1 Abra la utilidad 1 Tras instalar la utilidad ZyXEL e insertar el NWD310N, aparecerá un icono en la bandeja del sistema. Haga doble clic en el icono . 2 Aparecerá la pantalla Link Info (Información de - ZyXEL NWD310N | Quick Start Guide - Page 49
ESPAÑOL V Si el icono no aparece, desinstale y vuelva a instalar la utilidad ZyXEL. Consulte la Guía del usuario para saber cómo desinstalar la utilidad. El NWD310N buscará automáticamente una red o redes disponible(s) y se conectará a una red inalámbrica que no tenga la seguridad habilitada. Sin - ZyXEL NWD310N | Quick Start Guide - Page 50
ESPAÑOL 4.2 Configuración WPS PIN 1 Haga clic en la ficha Adapter (Adaptador). 2 Aparecerá la pantalla de la Utilidad ZyXEL Adapter (Adaptador). En la sección WPS, seleccione WPS y PIN Use this device's PIN (PIN - Usar el PIN de este dispositivo). Escriba el PIN de 8 dígitos - ZyXEL NWD310N | Quick Start Guide - Page 51
del PA, vaya a la pantalla donde puede ajustar la configuración WPS y escriba el PIN del NWD310N (se muestra una pantalla de ejemplo del ZyXEL NWA570N). 4 Haga clic en Start (Inicio) en la pantalla NWD310N Adapter (Adaptador) y en Apply (Aplicar) o Start (Inicio) en la pantalla WPS del PA antes de - ZyXEL NWD310N | Quick Start Guide - Page 52
Aparecerá la pantalla Link Info (Información de la conexión) de la utilidad ZyXEL. Haga clic en la ficha Site Survey (Sondeo de sitios). 2 Aparecerá(n) (s) en la Available Network List (Lista de redes disponibles). SSID significa Service Set Identifier y es el nombre de la red inalámbrica. 3 Si - ZyXEL NWD310N | Quick Start Guide - Page 53
ESPAÑOL Si una red inalámbrica tiene seguridad, aparecerá uno de los siguientes iconos junto a su entrada en la lista. Elija la red a la que desea conectarse haciendo clic en ella y haciendo clic en Connect (Conectar). 4 Si una red no tiene seguridad, aparecerá la pantalla Link Info (Información de - ZyXEL NWD310N | Quick Start Guide - Page 54
el botón derecho en el icono y seleccione Use Windows Zero Configuration as Configuration utility (Usar Windows Zero Configuration como utilidad de configuración). Para activar la utilidad ZyXEL de nuevo, haga clic en el icono y seleccione Use ZyXEL Utility as Configuration utility (Usar la utilidad - ZyXEL NWD310N | Quick Start Guide - Page 55
ESPAÑOL Procedimiento para ver las certificaciones de un producto 1 Vaya a www.zyxel.com. 2 Seleccione el producto que desea en el cuadro de lista desplegable que se encuentra en la página principal de ZyXEL para obtener acceso a la página de dicho producto. 3 Seleccione la certificación que desea - ZyXEL NWD310N | Quick Start Guide - Page 56
-Fi Protected Setup) pour votre ordinateur de bureau. 1 Installation du logiciel " Installez le logiciel à partir du CD avant d'insérer le NWD310N. Ne pas encore insérer le NWD310N. 1 Retirez le NWD310N si vous l'avez déjà inséré. 2 Insérez le CD inclus dans le lecteur CD-ROM de votre ordinateur. 56 - ZyXEL NWD310N | Quick Start Guide - Page 57
FRANÇAIS 3 Quand l'écran suivant s'affiche, cliquez sur Installer pour installer l'utilitaire et le pilote de ZyXEL. V Si l'écran n'apparaît pas, localisez et double cliquez sur autorun.exe. 57 - ZyXEL NWD310N | Quick Start Guide - Page 58
pour installer à la fois l'utilitaire et le pilote du ZyXEL sur votre ordinateur. Si vous voulez installer uniquement le pilote et utiliser Wireless Zero Configuration (Configuration zéro sans fil) (WZC) avec Windows XP, sélectionnez seulement Driver (Pilote) (voir Remarque pour les utilisateurs de - ZyXEL NWD310N | Quick Start Guide - Page 59
FRANÇAIS l'emplacement des fichiers par défaut ou cliquez sur Browse (Parcourir) ou pour sélectionner un autre dossier. 6 Cliquez sur Install (Installer). 59 - ZyXEL NWD310N | Quick Start Guide - Page 60
FRANÇAIS " Vous devrez redémarrer votre ordinateur après avoir installé l'utilitaire du ZyXEL. Vérifiez que vous avez sauvegardé votre travail avant de continuer. 7 Quand l'écran suivant apparaît, sélectionnez No, I will restart my computer later (Non, je redémarrerai - ZyXEL NWD310N | Quick Start Guide - Page 61
bracelet antistatique, si vous en avez un ou touchez un objet en métal relié à la terre. Retirez le capot de l'ordinateur, et retirez ensuite le NWD310N de son emballage. 5 Si les antennes sont fixées au - ZyXEL NWD310N | Quick Start Guide - Page 62
dans un logement PCI disponible. Vérifiez que les contacts du NWD310N sont entièrement insérés dans le logement PCI (A). A 7 Fixez le NWD310N à l'ordinateur avec une vis de support. 8 Fixez (vissez) les antennes au NWD310N. 9 Dirigez les antennes vers le haut. 10 Allumez votre ordinateur. La LED - ZyXEL NWD310N | Quick Start Guide - Page 63
FRANÇAIS V Si la LED Link (Liaison) du NWD310N n'est pas allumée après avoir installé le logiciel et le NWD310N, assurez-vous que le NWD310N est correctement inséré. 11Une fenêtre Assistant de Nouveau matériel trouvé s'affiche. Sélectionner Installer automatiquement le logiciel (recommandé) et - ZyXEL NWD310N | Quick Start Guide - Page 64
si vous voulez utiliser l'utilitaire pour vous joindre à un réseau sans fil. Le NWD310N supporte deux méthodes WPS pour créer une connexion sécurisée: • Appuyer sur le bouton WPS sur le NWD310N et sur votre AP sans fil (voir NWA570N de ZyXEL comme exemple). L'ordre de pression des boutons n'a pas - ZyXEL NWD310N | Quick Start Guide - Page 65
FRANÇAIS Vous devez appuyer sur le second bouton dans les deux minutes qui suivent l'appui sur le premier. " Votre NWD310N est équipé d'un bouton WPS situé sur son panneau, ainsi que d'un bouton WPS sur son utilitaire de configuration. Les autres périphériques WPS sont é - ZyXEL NWD310N | Quick Start Guide - Page 66
que comment configurer manuellement les paramètres sans fil pour se joindre à un réseau sans fil. 4.1 Ouvrez l'utilitaire 1 Après avoir installé l'utilitaire ZyXEL et avoir inséré le NWD310N, une icône apparaît dans la barre d'état. Double cliquez sur l'icône . 2 L'écran Info liaison de l'utilitaire - ZyXEL NWD310N | Quick Start Guide - Page 67
FRANÇAIS V Si l'icône ne s'affiche pas, désinstallez et réinstallez l'utilitaire ZyXEL. Consultez le guide de l'utilisateur pour désinstaller l'utilitaire. Le NWD310N recherche automatiquement les réseaux disponibles et se connecte à un réseau sans fil non sécurisé. Cependant, ce réseau sans fil - ZyXEL NWD310N | Quick Start Guide - Page 68
FRANÇAIS 2 L'écran Adaptateur de l'utilitaire ZyXEL s'affiche. Dans la section WPS, sélectionnez WPS et PIN quand vous voulez enregistrer le PIN de l'AP ou du routeur sans fil avec le NWD310N (consultez le guide de l'utilisateur si vous voulez utiliser cela à la place). 3 Lancez l'utilitaire de - ZyXEL NWD310N | Quick Start Guide - Page 69
(un écran d'exemple du NWA570N du ZyXEL est présenté). 4 Cliquez sur Start (Démarrer) dans l'écran Adapter (Adaptateur) NWD310N et Apply (Appliquer) ou Start (Démarrer) dans l'écran WPS de l'AP en l'espace de deux minutes. L'AP authentifie le NWD310N et envoie les paramètres de configuration ad - ZyXEL NWD310N | Quick Start Guide - Page 70
sur l'icône . L'écran Link Info (Info liaison) de l'utilitaire ZyXEL apparaît. Cliquez sur l'onglet Site Survey (Inspection de site). 2 Le(s) (x) sans fil disponibles s'affichent dans la Liste des réseaux disponibles. SSID signifie Service Set Identifier, c'est le nom du réseau sans fil. 3 Si un - ZyXEL NWD310N | Quick Start Guide - Page 71
Le réseau devrait être connecté à Internet. Si le site web s'affiche correctement, vous êtes connecté à Internet. Remarque pour les utilisateurs de Windows XP Si vous voulez utiliser Configuration zéro de Windows (WZC), faites un clic droit sur l'icône et sélectionnez Utiliser Configuration zéro de - ZyXEL NWD310N | Quick Start Guide - Page 72
. Procédure permettant de consulter une(les) Certification(s) du Produit 1 Connectez vous sur www.zyxel.com. 2 Sélectionnez votre produit dans la liste déroulante se trouvant sur la page d'accueil ZyXEL pour accéder à la page du produit concerné. 3 Sélectionnez sur cette page la certification que - ZyXEL NWD310N | Quick Start Guide - Page 73
FRANÇAIS 73 - ZyXEL NWD310N | Quick Start Guide - Page 74
wireless compatibile WPS (Wi-Fi Protected Setup) per computer desktop. 1 Installare il Software " Installare il software dal CD prima di inserire NWD310N. Non inserire ancora NWD310N. 1 Rimuovere NWD310N se è già stato inserito. 2 Inserire il CD fornito a corredo nell'unità CD-ROM del computer. 74 - ZyXEL NWD310N | Quick Start Guide - Page 75
ITALIANO 3 Quando viene visualizzata la seguente schermata, fare clic su Setup per installare l'utility e il driver ZyXEL. V Se la schermata non viene visualizzata, individuare e fare doppio clic sul file autorun.exe. 75 - ZyXEL NWD310N | Quick Start Guide - Page 76
su Next (Avanti). 5 Selezionare Driver e Utility per installare sia l'utility ZyXEL sia il driver sul computer. Se si desidera installare solo il driver e utilizzare Wireless Zero Configuration (WZC) di Windows XP, selezionare solo Driver (vedere Nota per gli utenti di Windows XP). Fare clic su Next - ZyXEL NWD310N | Quick Start Guide - Page 77
ITALIANO su Browse (Sfoglia) per selezionare una cartella alternativa. 6 Fare clic su Install (Installa). 77 - ZyXEL NWD310N | Quick Start Guide - Page 78
ITALIANO " Sarà necessario riavviare il computer dopo l'installazione dell'utility ZyXEL. Assicurarsi di aver salvato il lavoro prima di continuare. 7 Quando viene visualizzata la seguente schermata, selezionare No, I will restart my computer later (No, avvierò il - ZyXEL NWD310N | Quick Start Guide - Page 79
terra le scariche indossando un polsino anti-statico se posseduto oppure toccare un oggetto di metallo posto a massa. Rimuovere il coperchio del computer, quindi rimuovere NWD310N dalla sua confezione. 5 Se a NWD310N sono collegate le antenne, rimuoverle svitandole. 79 - ZyXEL NWD310N | Quick Start Guide - Page 80
ITALIANO 6 Inserire NWD310N in uno slot PCI libero. Verificare che i contatti di NWD310N siano completamente alloggiati nello slot PCI (A). A 7 Fissare NWD310N al computer utilizzando una vite da avvitare alla staffa. 8 Avvitare le antenne a NWD310N. 9 Puntare le antenne verso l'alto. 10 Accendere - ZyXEL NWD310N | Quick Start Guide - Page 81
viene segnalato dall'accensione dell'indicatore Link. V Se l'indicatore Link dell'NWD310N non è acceso in seguito all'installazione del software e dell'NWD310N, assicurarsi che l'NWD310N sia inserito correttamente. 11Appare la finestra Installazione guidata nuovo hardware. Scegliere Installare - ZyXEL NWD310N | Quick Start Guide - Page 82
alla propria rete wireless. " Se si desidera utilizzare il programma di utilità per collegarsi a una rete wireless, consultare la sezione 4. L'NWD310N supporta due metodi WPS per la creazione di una connessione sicura: • Push Button Configuration (configurazione con un tasto) consente di creare una - ZyXEL NWD310N | Quick Start Guide - Page 83
il pulsante WPS sull'NWD310N e sull'AP wireless (è mostrato l'NWA570N di ZyXEL a titolo di esempio). Non importa quale dei pulsanti viene premuto prima, occorre solo fare attenzione a premere il secondo pulsante entro due minuti dalla pressione del primo. " L'NWD310N ha il pulsante WPS localizzato - ZyXEL NWD310N | Quick Start Guide - Page 84
manualmente le impostazioni wireless per connettersi a una rete wireless. 4.1 Aprire l'utilità 1 In seguito all'installazione dell'utility ZyXEL e all'inserimento di NWD310N, nella barra di sistema viene visualizzata un'icona. Fare doppio clic sull'icona . 2 Viene visualizzata la schermata Link - ZyXEL NWD310N | Quick Start Guide - Page 85
ITALIANO V Se l'icona non viene visualizzata, disinstallare e reinstallare l'utility di ZyXEL. Fare riferimento alla Guida utente per le istruzioni su come disinstallare l'utility. L'NWD310N cerca automaticamente qualsiasi rete disponibile e si collega a una rete wireless se per questa non è - ZyXEL NWD310N | Quick Start Guide - Page 86
ITALIANO 4.2 Configurazione PIN WPS 1 Fare clic sulla scheda Adapter (adattatore). 2 Viene visualizzata la schermata Adapter dell'utilità ZyXEL. Nella sezione WPS, selezionare WPS e PIN - Use this device's PIN (utilizza questo PIN per il dispositivo). Annotare il PIN di 8 cifre visualizzato in testo - ZyXEL NWD310N | Quick Start Guide - Page 87
la schermata in cui è possibile configurare le impostazioni WPS e immettere il PIN dell'NWD310N (è raffigurata una schermata di esempio dell'NWA570N di ZyXEL). 4 Scegliere Start nella schermata NWD310N Adapter (adattatore) e quindi Apply oppure Start nella schermata WPS dell'AP entro due minuti - ZyXEL NWD310N | Quick Start Guide - Page 88
visualizzata la schermata Link Info dell'utility ZyXEL. Fare clic sulla scheda Site Survey (analisi sito). 2 Viene visualizzato l'elenco delle reti wireless disponibili nel campo Available Network List (elenco reti disponibili). SSID sta per Service Set Identifier e rappresenta il nome della rete - ZyXEL NWD310N | Quick Start Guide - Page 89
ITALIANO Se la rete senza fili è protetta, vicino alla voce dell'elenco appare una delle icone seguenti. Scegliere la rete a cui si desidera connettersi e quindi fare clic su Connect (connetti). 4 Se una rete non è protetta, viene visualizzata la schermata Link Info. Andare al passaggio 6. 5 Se una - ZyXEL NWD310N | Quick Start Guide - Page 90
), fare clic con il pulsante destro del mouse sull'icona e scegliere Use Windows Zero Configuration as Configuration utility (utilizzare WCZ come utilità di configurazione). Per attivare nuovamente l'utilità di ZyXEL, fare clic con il pulsante destro del mouse sull'icona e selezionare Use - ZyXEL NWD310N | Quick Start Guide - Page 91
ITALIANO Procedura per visualizzare le certificazioni di un prodotto 1 Andare alla pagina www.zyxel.com. 2 Nel sito ZyXEL, selezionare il proprio prodotto dall'elenco a discesa per andare alla pagina di quel prodotto. 3 Da questa pagina selezionare la certificazione che si vuole vedere. 91 - ZyXEL NWD310N | Quick Start Guide - Page 92
P Обзор NWD310N Wi-Fi Wi-fi Protected Setup (WPS). 1 CD NWD310N NWD310N. 1 NWD310N 2 CD CD-ROM 92 - ZyXEL NWD310N | Quick Start Guide - Page 93
3 Setup ZyXEL. V autorun.exe. 93 - ZyXEL NWD310N | Quick Start Guide - Page 94
1 Next 2 Driver and Utility ZyXEL WZC) для Windows XP Driver only Windows XP Next 94 - ZyXEL NWD310N | Quick Start Guide - Page 95
Browse 3 Install 95 - ZyXEL NWD310N | Quick Start Guide - Page 96
ZyXEL 4 No, I will restart my computer later Finish 96 - ZyXEL NWD310N | Quick Start Guide - Page 97
2 CDдиска. 1 2 3 4 NWD310N. 5 NWD310N 97 - ZyXEL NWD310N | Quick Start Guide - Page 98
6 NWD310N PCI на NWD310N PCI(A). A 7 NWD310N 8 NWD310N. 9 10 98 - ZyXEL NWD310N | Quick Start Guide - Page 99
NWD310N Link V NWD310N Link NWD310N NWD310N. 11 NWD310N 99 - ZyXEL NWD310N | Quick Start Guide - Page 100
3 WPS Wi-Fi Protected Setup (WPS 4. NWD310N WPS • Push Button Configuration 3.1. • PIN Configuration NWD310N AP 4.2. 100 - ZyXEL NWD310N | Quick Start Guide - Page 101
3.1 1 AP 2 WPS на NWD310N ZyXEL NWA570N " На NWD310N WPS WPS WPS NWD310N AP Internet WPS 101 - ZyXEL NWD310N | Quick Start Guide - Page 102
3 AP и NWD310N 4 NWD310N. 4 ZyXEL WPS 4.1 1 ZyXEL и NWD310N Windows 102 - ZyXEL NWD310N | Quick Start Guide - Page 103
2 Link Info ZyXEL. V ZyXEL NWD310N Internet. 103 - ZyXEL NWD310N | Quick Start Guide - Page 104
4.2 WPS 1 Adapter 2 ZyXEL Adapter WPS WPS и PIN - Use this device's PIN 8 PIN WPS вашей AP. PBC (Push Button Configuration 104 - ZyXEL NWD310N | Quick Start Guide - Page 105
WPS 3.1 PIN - Use the PIN from the AP or Wireless Router NWD310N 3 WPS NWD310N ZyXEL NWA570N). 4 Start NWD310N Adapter Apply Start WPS 105 - ZyXEL NWD310N | Quick Start Guide - Page 106
NWD310N NWD310N NWD310N 4.3 1 Link Info ZyXEL Site Survey 2 Available Network List SSID Service Set Identifier 106 - ZyXEL NWD310N | Quick Start Guide - Page 107
3 Connect 4 Link Info 6. 5 6 URL Internet. 107 - ZyXEL NWD310N | Quick Start Guide - Page 108
Windows XP Windows (WZC Use Windows Zero Configuration as Configuration utility Windows). ZyXEL Use ZyXEL Utility as Configuration utility ZyXEL). WZC Utility ZyXEL. 108 - ZyXEL NWD310N | Quick Start Guide - Page 109
1 www.zyxel.ru. 2 ZyXEL 3 109 - ZyXEL NWD310N | Quick Start Guide - Page 110
Setup) kompatibel trådlös nätverksadapter för din stationära dator. 1 Installera programvaran " Installera programvaran från CD-skivan innan du sätter i NWD310N. Sätt inte i NWD310N ännu. 1 Ta ut NWD310N om du redan satt i den. 2 Sätt i den medföljande CD-skivan i CD-ROM-enheten i datorn. 110 - ZyXEL NWD310N | Quick Start Guide - Page 111
SVENSKA 3 När följande skärmbild visas, klicka på Setup för att installera ZyXELs verktyg och drivrutin. V Om skärmen inte visas, leta reda på och dubbelklicka på autorun.exe på CD-skivan. 111 - ZyXEL NWD310N | Quick Start Guide - Page 112
(drivrutin) och Utility (verktyg) för att installera både ZyXEL-verktyget och drivrutinen i din dator. Om du enbart vill installera drivrutinen och använda WCZ (Wireless Zero Configuration) med Windows XP, välj enbart Driver (se Kommentar till Windows XP-användare). Klicka på Next (nästa) för att - ZyXEL NWD310N | Quick Start Guide - Page 113
SVENSKA installationskatalog eller klicka på Browse (sök) för att välja en annan mapp. 6 Klicka på Install (installera). 113 - ZyXEL NWD310N | Quick Start Guide - Page 114
SVENSKA " Du måste starta om datorn när du installerat ZyXEL-verktyget. Kontrollera att du har sparat ditt arbete innan du fortsätter. 7 När följande skärmbild visas, välj No, I will restart my computer later (nej, jag - ZyXEL NWD310N | Quick Start Guide - Page 115
ta på ett anti-statiskt armband (om du har ett sådant) eller vidröra ett jordat metallföremål. Ta bort datorhöljet och ta sedan upp NWD310N ur förpackningen. 5 Om antennerna är anslutna till NWD310N, ta bort (skruva loss) dem. 115 - ZyXEL NWD310N | Quick Start Guide - Page 116
SVENSKA 6 Sätt in NWD310N i en ledig PCI-plats. Kontrollera att NWD310Ns kontakter är helt införda i PCI-platsen (A). A 7 Fäst NWD310N vid datorn med en fästskruv. 8 Anslut (skruva fast) antennerna till NWD310N. 9 Rikta antennerna uppåt. 10 Sätt på datorn. NWD310Ns LED-lampa Link tänds om enheten är - ZyXEL NWD310N | Quick Start Guide - Page 117
SVENSKA V Om NWD310Ns LED-lampa Link inte tänds sedan du installerat programvaran och NWD310N, kontrollera att NWD310N är rätt införd. 11Följ instruktionerna på skärmen för att söka efter NWD310N och installera drivrutinen. 117 - ZyXEL NWD310N | Quick Start Guide - Page 118
4.2. 3.1 Tryckknappskonfiguration 1 Se till att din trådlösa AP (Access Point) är påslagen och inom räckhåll för din stationära dator. 2 Tryck på WPS-knappen på NWD310N och på din trådlösa AP (ZyXELs NWA570N visas som ett exempel). Det spelar ingen roll vilken knapp du trycker på först. Du 118 - ZyXEL NWD310N | Quick Start Guide - Page 119
inom två minuter efter det att du tryckt på den första. " NWD310N har en WPS-knapp på sin panel, samt en WPS-knapp i sitt konfigurationsverktyg. Andra WPS-kompatibla enheter har en liknande WPSknapp. NWD310N AP Internet WPS 3 AP och NWD310N upprättar en säker anslutning. Detta kan ta upp till tv - ZyXEL NWD310N | Quick Start Guide - Page 120
AP samt hur du konfigurerar trådlösa inställningar manuellt för att ingå i ett trådlöst nätverk. 4.1 Öppna verktyget 1 När du har installerat ZyXEL-verktyget och satt i NWD310N, visas en ikon i aktivitetsfältet. Dubbelklicka på ikonen . 2 ZyXEL-verktygets skärm Link Info (länkinformation) visas. 120 - ZyXEL NWD310N | Quick Start Guide - Page 121
SVENSKA V Om ikonen inte visas, avinstallera och ominstallera ZyXEL-verktyget. Se bruksanvisningen angående hur du avinstallerar verktyget. NWD310N söker automatiskt efter eventuella tillgängliga nätverk och ansluter till ett trådlöst nätverk utan säkerhetsfunktionen aktiverad. Men detta trådlösa - ZyXEL NWD310N | Quick Start Guide - Page 122
SVENSKA 4.2 WPS PIN-konfiguration 1 Klicka på fliken Adapter. 2 ZyXEL-verktygets skärm Adapter visas. I sektionen WPS, välj WPS och PIN - Use this device's PIN (PIN - använd denna enhets PIN). Skriv ner den 8-siffriga - ZyXEL NWD310N | Quick Start Guide - Page 123
Starta din APs konfigurationsverktyg, gå till skärmbilden där du kan konfigurera WPS-inställningar och ange NWD310Ns PIN (en exempelskärm från ZyXELs NWA570N visas). 4 Klicka på Start på skärmbilden NWD310N Adapter och Apply (verkställ) eller Start på APs WPS-skärm inom två minuter. AP autentiserar - ZyXEL NWD310N | Quick Start Guide - Page 124
dlöst nätverk 1 Dubbelklicka på ikonen . ZyXEL-verktygets skärm Link Info (länkinformation) visas. Klicka på fliken Site Survey (platsöversikt). 2 Tillgängliga trådlösa nätverk visas i Available Network List (lista över tillgängliga nätverk). SSID står för Service Set Identifier och är namnet på det - ZyXEL NWD310N | Quick Start Guide - Page 125
till Internet. Om webbplatsen visas korrekt, är du ansluten till Internet. Kommentar till Windows XPanvändare Om du vill använda Windows Zero Configuration (WZC), högerklicka på ikonen och välj Use Windows Zero Configuration as Configuration utility (använd WZP som konfigurationsverktyg). 125 - ZyXEL NWD310N | Quick Start Guide - Page 126
-verktyget. Procedur för att visa en produkts certifikat 1 Gå till www.zyxel.com. 2 Välj din produkt från rullgardinslistrutan på ZyXELs hemsida för att gå till denna produkts sida. 3 Välj det certifikat du vill titta på från denna sida. För ytterligare information besök www.support.zyxel.se. 126 - ZyXEL NWD310N | Quick Start Guide - Page 127
SVENSKA 127
-
 1
1 -
 2
2 -
 3
3 -
 4
4 -
 5
5 -
 6
6 -
 7
7 -
8
-
9
-
10
-
11
-
12
-
13
-
14
-
15
-
16
-
17
-
18
-
19
-
20
-
21
-
22
-
23
-
24
-
25
-
26
-
27
-
28
-
29
-
30
-
31
-
32
-
33
-
34
-
35
-
36
-
37
-
38
-
39
-
40
-
41
-
42
-
43
-
44
-
45
-
46
-
47
-
48
-
49
-
50
-
51
-
52
-
53
-
54
-
55
-
56
-
57
-
58
-
59
-
60
-
61
-
62
-
63
-
64
-
65
-
66
-
67
-
68
-
69
-
70
-
71
-
72
-
73
-
74
-
75
-
76
-
77
-
78
-
79
-
80
-
81
-
82
-
83
-
84
-
85
-
86
-
87
-
88
-
89
-
90
-
91
-
92
-
93
-
94
-
95
-
96
-
97
-
98
-
99
-
100
-
101
-
102
-
103
-
104
-
105
-
106
-
107
-
108
-
109
-
110
-
111
-
112
-
113
-
114
-
115
-
116
-
117
-
118
-
119
-
120
-
121
-
122
-
123
-
124
-
125
-
126
-
127
 |
 |

Copyright © 2007. All rights reserved
NWD310N
Wireless N PCI Adapter
Quick Start Guide
Version 1.00
10/2007
Edition 1
CONTENTS
ENGLISH
2
DEUTSCH
20
ESPAÑOL
38
FRANÇAIS
56
ITALIANO
74
P
УССКИЙ
92
SVENSKA
110