1997 Ford Expedition Owner's Manual - Page 149
1997 Ford Expedition Manual
Page 149 highlights
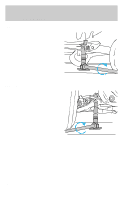
Roadside emergencies wrench to screw the lug nut snug against the wheel, but do not tighten. 4. Lower the vehicle by turning the jack handle counterclockwise. 5. Remove the jack and fully tighten the lug nuts to the proper torque specifications in the order shown. 3 1 Never use wheels or lug nuts different than the original equipment as this could damage the wheel or mounting system. This damage could allow the wheels to come off while the vehicle is being driven. 6. Replace any wheel covers, ornaments or hub caps that your vehicle may have. Make sure that they are screwed or snapped into place. 7. Put the jack and wrench away. Ensure that the jack is securely fastened. 8. To stow the flat tire, lay the tire on the ground with the inboard side facing up. Install the retainer through the wheel center and slide the wheel under the vehicle. Turn the spare handle clockwise until the spare tire is raised to its original position underneath the vehicle. The spare handle ratchets when the tire is raised to the stowed position. It will not allow you to overtighten. 9. Unblock the wheels. 150 4 5 2
-
 1
1 -
2
-
3
-
4
-
5
-
6
-
7
-
8
-
9
-
10
-
11
-
12
-
13
-
14
-
15
-
16
-
17
-
18
-
19
-
20
-
21
-
22
-
23
-
24
-
25
-
26
-
27
-
28
-
29
-
30
-
31
-
32
-
33
-
34
-
35
-
36
-
37
-
38
-
39
-
40
-
41
-
42
-
43
-
44
-
45
-
46
-
47
-
48
-
49
-
50
-
51
-
52
-
53
-
54
-
55
-
56
-
57
-
58
-
59
-
60
-
61
-
62
-
63
-
64
-
65
-
66
-
67
-
68
-
69
-
70
-
71
-
72
-
73
-
74
-
75
-
76
-
77
-
78
-
79
-
80
-
81
-
82
-
83
-
84
-
85
-
86
-
87
-
88
-
89
-
90
-
91
-
92
-
93
-
94
-
95
-
96
-
97
-
98
-
99
-
100
-
101
-
102
-
103
-
104
-
105
-
106
-
107
-
108
-
109
-
110
-
111
-
112
-
113
-
114
-
115
-
116
-
117
-
118
-
119
-
120
-
121
-
122
-
123
-
124
-
125
-
126
-
127
-
128
-
129
-
130
-
131
-
132
-
133
-
134
-
135
-
136
-
137
-
138
-
139
-
140
-
141
-
142
-
143
-
 144
144 -
 145
145 -
 146
146 -
 147
147 -
 148
148 -
 149
149 -
 150
150 -
 151
151 -
 152
152 -
 153
153 -
 154
154 -
155
-
156
-
157
-
158
-
159
-
160
-
161
-
162
-
163
-
164
-
165
-
166
-
167
-
168
-
169
-
170
-
171
-
172
-
173
-
174
-
175
-
176
-
177
-
178
-
179
-
180
-
181
-
182
-
183
-
184
-
185
-
186
-
187
-
188
-
189
-
190
-
191
-
192
-
193
-
194
-
195
-
196
-
197
-
198
-
199
-
200
-
201
-
202
-
203
-
204
-
205
-
206
-
207
-
208
-
209
-
210
-
211
-
212
-
213
-
214
-
215
-
216
-
217
-
218
-
219
-
220
-
221
-
222
-
223
-
224
 |
 |
