1997 Ford Expedition Owner's Manual - Page 78
1997 Ford Expedition Manual
Page 78 highlights
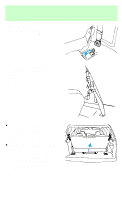
Seating and safety restraints 6. With assistance, lift the seat out of the vehicle. Installing the third row seat Before installing your thrid row seat, ensure that the seat belt anchors are stowed into the floor and the loose belts are stored out of the way. For proper latching, ensure that the floor tubs are clear of debris. From the rear of the vehicle, with the liftgate open: 1. With assistance, lift the seat into the rear of the vehicle and guide the seat positioners over the front pins of the floor tubs. 2. Guide the positioners around each pin and lower the seat down. • When the rear of the seat is 10-13 cm (4-5 in) above the rear pins, let the seat drop. This will insure that the seat will properly latch into the floor. 3. Locate the seat belt tongue in the plastic housing on the floor. • Disconnect the buckle from its stowage location and connect it to the tongue (making sure that the label on the buckle is pointing toward the outside of the vehicle (left side) and that the belts are not twisted or jammed). • Insert the seat buckle into detachable anchor until you hear a "click" and feel the latch engage. 79
-
 1
1 -
2
-
3
-
4
-
5
-
6
-
7
-
8
-
9
-
10
-
11
-
12
-
13
-
14
-
15
-
16
-
17
-
18
-
19
-
20
-
21
-
22
-
23
-
24
-
25
-
26
-
27
-
28
-
29
-
30
-
31
-
32
-
33
-
34
-
35
-
36
-
37
-
38
-
39
-
40
-
41
-
42
-
43
-
44
-
45
-
46
-
47
-
48
-
49
-
50
-
51
-
52
-
53
-
54
-
55
-
56
-
57
-
58
-
59
-
60
-
61
-
62
-
63
-
64
-
65
-
66
-
67
-
68
-
69
-
70
-
71
-
72
-
 73
73 -
 74
74 -
 75
75 -
 76
76 -
 77
77 -
 78
78 -
 79
79 -
 80
80 -
 81
81 -
 82
82 -
 83
83 -
84
-
85
-
86
-
87
-
88
-
89
-
90
-
91
-
92
-
93
-
94
-
95
-
96
-
97
-
98
-
99
-
100
-
101
-
102
-
103
-
104
-
105
-
106
-
107
-
108
-
109
-
110
-
111
-
112
-
113
-
114
-
115
-
116
-
117
-
118
-
119
-
120
-
121
-
122
-
123
-
124
-
125
-
126
-
127
-
128
-
129
-
130
-
131
-
132
-
133
-
134
-
135
-
136
-
137
-
138
-
139
-
140
-
141
-
142
-
143
-
144
-
145
-
146
-
147
-
148
-
149
-
150
-
151
-
152
-
153
-
154
-
155
-
156
-
157
-
158
-
159
-
160
-
161
-
162
-
163
-
164
-
165
-
166
-
167
-
168
-
169
-
170
-
171
-
172
-
173
-
174
-
175
-
176
-
177
-
178
-
179
-
180
-
181
-
182
-
183
-
184
-
185
-
186
-
187
-
188
-
189
-
190
-
191
-
192
-
193
-
194
-
195
-
196
-
197
-
198
-
199
-
200
-
201
-
202
-
203
-
204
-
205
-
206
-
207
-
208
-
209
-
210
-
211
-
212
-
213
-
214
-
215
-
216
-
217
-
218
-
219
-
220
-
221
-
222
-
223
-
224
 |
 |
