2005 Ford Explorer Sport Trac Quick Reference Guide 1st Printing - Page 8
2005 Ford Explorer Sport Trac Manual
Page 8 highlights
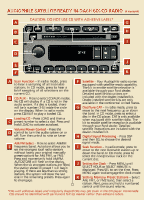
2 Headlamp/Panel Dimmer Control Rotate clockwise to the first position to turn on the parking lamps, instrument panel lamps, license plate lamps and tail lamps. Rotate to the second position to also turn on the headlamps. Use the instrument panel dimmer control, to the right of the headlamp control, to adjust the intensity of the panel lighting during headlamp and parking lamp operation. Rotate up to brighten and down to dim. Rotate to the full up position (past detent) to also turn on the interior lamps. To turn off the interior lamps, rotate to the full down position (past detent). You may also set the headlamps to automatically turn on at night and off during the day by using the autolamp delay system (if equipped) on the headlamp control. In addition, the delay system can be set to keep the headlamps on for up to three minutes after the key is turned to OFF. For more information, please consult your Owner's Guide. Your vehicle is also equipped with a check fuel cap lamp that illuminates when the fuel cap is not correctly installed. Continually driving with this light on may cause the check engine warning light to come on. To help prevent activation, always secure your fuel cap by turning it clockwise 1/8 of a turn until it stops. 4 ABS Warning Lamp Illuminates momentarily when the ignition is turned to the ON position. In an emergency, apply continuous force on the brake to prevent wheel lock when braking on slippery surfaces - do not pump your brakes. Any pulsation or noise you may feel or hear is normal. 5 Hazard Flasher Control The hazard flasher control is on the steering column, just behind the steering wheel. Press to activate all hazard flashers simultaneously in an emergency, or to warn traffic of vehicle breakdown, or approaching danger. Press the control again to turn the flashers off. The hazard flashers can be operated when the ignition is off. 6 Gearshift/Overdrive Control 3 Check Engine Lamp The Check Engine indicator light illuminates when the ignition is first turned to the ON position to check the bulb. Solid illumination after the engine is started indicates the On Board Diagnostics System (OBD-II) has detected a malfunction. For more information, please consult the On Board Diagnostics (OBD-II) section in the Maintenance and Specifications chapter of your Owner's Guide. Overdrive is the normal drive position for the best fuel economy. Only deactivate overdrive (O/D OFF) when driving with a heavy load, towing a trailer up or down steep hills, or when additional engine braking is desired. To deactivate, press the transmission control switch on the end of the gearshift lever. 7 Four-Wheel Drive (4X4) Control (if equipped) Two-wheel drive (2WD) powers the rear wheels only and is used for street and highway driving. 4X4 HIGH is used for extra traction such as in snow, on icy roads, or in off-road situations. It should not be operated on dry pavement.
-
 1
1 -
2
-
 3
3 -
 4
4 -
 5
5 -
 6
6 -
 7
7 -
 8
8 -
 9
9 -
 10
10 -
 11
11 -
 12
12
 |
 |
