1999 Lincoln Continental Owner Guide 1st Printing
1999 Lincoln Continental Manual
1999 Lincoln Continental manual content summary:
- 1999 Lincoln Continental | Owner Guide 1st Printing - Page 1
Instrumentation Controls and features Seating and safety restraints Starting and driving Starting Driving Roadside emergencies Servicing Maintenance and care Capacities and specifications translation in whole or part is not permitted without written authorization from Ford Motor Company. Copyright - 1999 Lincoln Continental | Owner Guide 1st Printing - Page 2
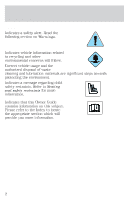
environment. Indicates a message regarding child safety restraints. Refer to Seating and safety restraints for more information. Indicates that this Owner Guide contains information on this subject. Please refer to the Index to locate the appropriate section which will provide you more information - 1999 Lincoln Continental | Owner Guide 1st Printing - Page 3
first 1 600 km (1 000 miles) of driving, vary speeds frequently. This is necessary to give the moving parts a chance to break in. INFORMATION ABOUT THIS GUIDE The information found in this guide was in effect at the time of printing. Ford may change the contents without notice and without incurring - 1999 Lincoln Continental | Owner Guide 1st Printing - Page 4
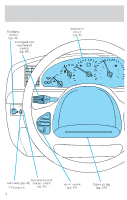
/washer control (pg. 48) Instrument cluster (pg. 6) 4 - + 5 ABS 6 7 40 60 60 80 100 80 120 140 160 180 200 TURN ON HEAD LAMPS T/C OFF F 3 2 20 40 20 km/h 100 E H 1 FILL ON RIGHT SERVICE ENGINE SOON 0 AIR BAG 0 NO RM RPMx1000 0 MPH 120 ! P C BRAKE HI LO OFF 0FF P LIGHTS - 1999 Lincoln Continental | Owner Guide 1st Printing - Page 5
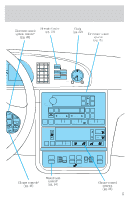
TAPE NEXT VOL MODE AM MUTE SEEK TUNE FM 1 REW 2 FF 3 SIDE 1 2 TEMP FAN FRONT EXT OFF AUTO MAX A/C HI 0 OFF BACK BOTH HEATED BACK 0 BOTH SEATS Climate controls* (pg. 49) Heated seat control* (pg. 94) N DTE ECON I E 000000.0 RESET T T N BASS SEL TREB BAL FADE EJ RDS - 1999 Lincoln Continental | Owner Guide 1st Printing - Page 6
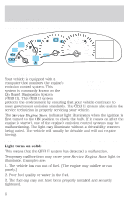
Instrumentation WARNING LIGHTS AND CHIMES 4 - + 5 ABS 6 7 40 60 60 80 100 80 120 140 160 180 200 TURN ON HEAD LAMPS T/C OFF F 3 2 20 40 20 km/h 100 E H 1 FILL ON RIGHT SERVICE ENGINE SOON 0 AIR BAG 0 NO RM RPMx1000 0 MPH 120 000000.0 ! P C BRAKE Service engine soon Your - 1999 Lincoln Continental | Owner Guide 1st Printing - Page 7
Instrumentation These temporary malfunctions can be corrected by filling the fuel tank with good quality fuel and/or properly installing and securely tightening the gas cap. After three driving cycles without these or any other temporary malfunctions present, the Service Engine Soon light should - 1999 Lincoln Continental | Owner Guide 1st Printing - Page 8
ABS and the engine is off. If the light remains on, continues to flash or fails to illuminate, have the system serviced immediately. With the ABS light on, the anti-lock brake system is disabled and normal braking is still effective unless the brake warning light also remains illuminated with - 1999 Lincoln Continental | Owner Guide 1st Printing - Page 9
Instrumentation Charging system Illuminates when the ignition is turned to the ON position and the engine is off. The light also illuminates when the battery is not charging properly, requiring electrical system service. Engine oil pressure Momentarily illuminates when the ignition is turned to the - 1999 Lincoln Continental | Owner Guide 1st Printing - Page 10
20 40 20 100 H NO RM 1 FILL ON RIGHT SERVICE ENGINE SOON 0 AIR BAG 0 RPMx1000 0 MPH 120 000000.0 ! P C BRAKE Fuel gauge Displays approximately how much F fuel is in the fuel tank (when the key is in the ON position). The fuel gauge may vary slightly when the vehicle is in motion. The - 1999 Lincoln Continental | Owner Guide 1st Printing - Page 11
Pressing the E/M control will alternate between English (miles) and Metric (kilometers) measurements. Tachometer Indicates the engine speed in revolutions per minute. Driving with your tachometer pointer in the red zone may damage the engine. 4 3 2 1 0 AIR BAG 5 ABS 6 7 RPMx1000 Engine coolant - 1999 Lincoln Continental | Owner Guide 1st Printing - Page 12
Instrumentation Never remove the coolant reservoir cap while the engine is running or hot. This gauge indicates the temperature of the engine coolant, RESET using the message center controls located to the right of the instrument cluster. You will hear a tone when you press one of these controls. - 1999 Lincoln Continental | Owner Guide 1st Printing - Page 13
• oil level • engine coolant level • washer fluid level • doors closed (driver and passenger side). This message can only be reset by closing the door(s). If the RESET control is pressed, PLEASE CLOSE DOOR will be displayed. • trunk closed • exterior lamps (front turn, brake and tail) • fuel level - 1999 Lincoln Continental | Owner Guide 1st Printing - Page 14
message. Door Ajar Driver's Door Ajar Check Engine Temp Transmission Overheat Check Transmission Low Oil Level Check Charging System Low Fuel Level Low Engine Coolant Low Tire Pressure (if equipped) Gear Display Data ERR Brake Lamp Out Check Traction Control Check Ride Control Trunk Ajar Check - 1999 Lincoln Continental | Owner Guide 1st Printing - Page 15
Instrumentation conditions still exist within the vehicle. TRIP Press this control to display the first of two trip odometers. Press battery is disconnected. If the FUEL LEVEL ERROR message is displayed, there is a problem with the fuel indication system and you should contact your dealer for service - 1999 Lincoln Continental | Owner Guide 1st Printing - Page 16
to set vehicle comfort settings for up to two drivers. Seat and mirror position and vehicle handling characteristics can be set with this control. E/M DRIVER ID RESET Press this control to reset: RESET • warnings • average fuel economy • trip odometers The other selectable features are unaffected - 1999 Lincoln Continental | Owner Guide 1st Printing - Page 17
adjustment is made using the message center MENU/SELECT controls. (Defults to ON at each start-up.) Refer to Traction Control for more information. MEMORY PROFILE The Memory Profile allows for two primary drivers to save their individual seat and outside rearview mirror position preferences. The - 1999 Lincoln Continental | Owner Guide 1st Printing - Page 18
features: • Express window • Auto door locks • Horn chirp • Easy entry/exit seat access • Reverse mirrors • Adjustable ride (Driver Select System only) • Adjustable steering • Autolamp on/delay time • Instrument panel dim control • Driver's seat position • Outside mirror position Basic operation of - 1999 Lincoln Continental | Owner Guide 1st Printing - Page 19
for desired programming: • The MENU control will display options for the Express Window, Auto Door Locks, Horn Chirp, Easy Entry/Exit Seat Access and Reverse Mirror features which can be set by using the SELECT control. • The VEHICLE HANDLING control will display options for Adjustable Steering and - 1999 Lincoln Continental | Owner Guide 1st Printing - Page 20
Instrumentation • The DRIVER ID control will display the option of selecting Driver 1, Driver 2 or OFF (Driver Select System only). Memory profile features Express window using: Message Center-MENU/SELECT controls Auto door using: Message Center-MENU/SELECT controls Easy entry/exit seat access • - 1999 Lincoln Continental | Owner Guide 1st Printing - Page 21
Instrumentation • Vehicle with optional Driver Select System, setting may be saved to either the DRIVER MEMORY 1 or 2 personalized profiles or as a vehicle setting. • Settings-ON or OFF • Original setting-ON • Setting adjustment made using: Message Center-MENU/SELECT controls Reverse mirrors • - 1999 Lincoln Continental | Owner Guide 1st Printing - Page 22
• Settings-variable • Original setting-maximum • Setting adjustment made using: Lighting Control Module-panel dim control. For information on instrument panel dim control see Panel dimmer control in the Control and features section. Driver's seat position • Setting may be saved to either the DRIVER - 1999 Lincoln Continental | Owner Guide 1st Printing - Page 23
Instrumentation • Settings-8-way adjustment • Original setting-N/A • Setting adjustment made using: driver seat control Outside mirror position • Setting may be saved to either the DRIVER MEMORY 1 or 2 personalized profiles or as a vehicle setting. • Vehicle with optional Driver Select System, - 1999 Lincoln Continental | Owner Guide 1st Printing - Page 24
lamps will illuminate when the ignition is ON and the windshield wiper control is in the interval, LO or HI position. The instrument panel lighting will dim noticeably approximately 15 seconds after the wipers are turned on. The lights will remain in this state until 30 seconds after the wipers are - 1999 Lincoln Continental | Owner Guide 1st Printing - Page 25
HI LO F S OFF PANEL DIMMER CONTROL Use to adjust the brightness of the instrument panel during headlight and parklamp operation. • Push up to brighten. • Push down to dim. PANEL DIM AUTOLAMP CONTROL The autolamp system provides light AUTO sensitive automatic on-off control of LAMP the exterior - 1999 Lincoln Continental | Owner Guide 1st Printing - Page 26
wheel controls (if equipped) are pressed. When in AUTO and weather conditions require heat, air will be sent to the floor. However, if the engine is not warm enough to provide heat, the fan will not operate. In 31⁄2 minutes or less, the fan speed will start to increase and the airflow location - 1999 Lincoln Continental | Owner Guide 1st Printing - Page 27
manual override controls allow you to select airflow locations and the fan control allows you to adjust fan speed as necessary. Temperature selection The display window indicates the selected temperature, function (AUTO or one of the override controls) and manual control of fan ) if automatic fan - 1999 Lincoln Continental | Owner Guide 1st Printing - Page 28
conditioner removes considerable moisture from the air during operation, it is normal if clear water drips on the ground under the air conditioner drain while the system is working and even after you have stopped the vehicle. Under normal conditions, your vehicle's climate control system should be - 1999 Lincoln Continental | Owner Guide 1st Printing - Page 29
controls. MAX A/C is noisier than normal A/C but more economical and will cool the inside of the vehicle faster. Airflow is from the instrument panel registers. This mode can also be used to prevent undesirable odors from entering the vehicle. • -Distributes outside air through the instrument panel - 1999 Lincoln Continental | Owner Guide 1st Printing - Page 30
return to the window. If a manual override function differences in vehicle and station locations. Operating tips • In control system in the OFF position. • Don't put objects under the front seat that will interfere with the airflow to the back seats. • Remove any snow, ice or leaves from the air - 1999 Lincoln Continental | Owner Guide 1st Printing - Page 31
that the cabin air filter (if equipped) needs to be replaced. • When placing objects on top of your instrument panel, be careful to control system. REAR WINDOW DEFROSTER The rear defroster control is located on the instrument panel. FRONT Press the rear defroster control to REAR clear the rear window - 1999 Lincoln Continental | Owner Guide 1st Printing - Page 32
are illuminated. During the operation of any selected mode, lighting for the individual function controls will either illuminate or turn off. Those controls which have a function for the specific mode of operation selected will be lit, while the controls which have no function for that mode will be - 1999 Lincoln Continental | Owner Guide 1st Printing - Page 33
CD TAPE DOLBY B NR EJ RDS MUTE SEEK TUNE SCAN AUTO AM FM 1 REW 2 FF 3 SIDE 1-2 4 5 COMP 6 SHUFF Premium AM/FM Stereo/Cassette/Alpine Audio System (Radio Controlled CD Changer Compatible) BASS SEL VOL PUSH ON CD TAPE EJ TREB BAL FADE RDS DSP MUTE SEEK TUNE SCAN AUTO AM - 1999 Lincoln Continental | Owner Guide 1st Printing - Page 34
to continue playing up to 10 minutes after the ignition has been turned off, or until a door is opened. Volume/power control Press the control to turn the audio system on or off. VOL PUSH ON Turn the control to raise or lower volume. VOL PUSH ON If the volume is set above a certain - 1999 Lincoln Continental | Owner Guide 1st Printing - Page 35
if equipped). Tune adjust in radio mode • Press to move to the next TUNE frequency down the band (whether or not a listenable station is located there). Hold the control to move through the frequencies quickly. to move to the next frequency up the band (whether or not • Press a listenable station is - 1999 Lincoln Continental | Owner Guide 1st Printing - Page 36
continue reversing through the disc. • Press to select the next disc in the CD changer. Hold the control to fast-forward through the remaining discs. Seek function The seek function control works in radio, tape or CD mode (if equipped). Seek function in radio mode • Press to find the next listenable - 1999 Lincoln Continental | Owner Guide 1st Printing - Page 37
first track at the end of the CD.) To stop on a particular selection, press the control again. Radio station memory preset The radio is equipped with four or six station memory preset controls. These controls can be used to select up to four or six preset AM stations and eight or twelve FM stations - 1999 Lincoln Continental | Owner Guide 1st Printing - Page 38
stations without losing your original manually set preset stations. This feature is helpful on trips when you travel between cities with different radio stations. Starting autoset memory preset 1. Select a frequency using the AM/FM select controls. 2. Press the control. 3. When the first six strong - 1999 Lincoln Continental | Owner Guide 1st Printing - Page 39
adjust Speaker sound can be adjusted between the front and rear speakers. FADE SEL Tape/CD select (if equipped) • To begin tape play (with a tape TAPE loaded into the audio system) while in the radio or CD mode, press the TAPE control. Press the button during rewind or fast forward to stop - 1999 Lincoln Continental | Owner Guide 1st Printing - Page 40
seconds results in fast forward action. Tape direction select Press SIDE 1-2 to play the alternate side of a tape. Eject function Press the control to stop and eject a tape. 3 SIDE 1-2 4 EJ Dolbyா noise reduction Dolby noise reduction operates 3 4 only in tape mode. Dolby reduces SIDE 1-2 the - 1999 Lincoln Continental | Owner Guide 1st Printing - Page 41
are played. Press the SHUFFLE control to start this feature. Random order play will continue until the SHUFFLE control is pressed again. Radio data system RDS control until TRAFFIC is displayed. RDS • Use the SEL control to select ON or OFF. With the feature on, use the SEEK or SCAN control to - 1999 Lincoln Continental | Owner Guide 1st Printing - Page 42
Show • RDS sends information with the FM broadcast: station name, station type, and/or radio text. • With RDS activated, press the RDS control until SHOW is displayed. • Use the SEL control to select TYPE, NAME or NONE. RDS SEL RDS clock feature Refer to Setting the clock for information. 42 - 1999 Lincoln Continental | Owner Guide 1st Printing - Page 43
a high vault. • STADIUM-outdoor stadium with a capacity of about 30 000. • NEWS-"voice-only" type of sound with a limited audio band. Press the DSP control until one of the following appears: DSP • ALL SEATS • DRIVER SEAT • REAR SEATS Use the SELECT control to change the equalization to the desired - 1999 Lincoln Continental | Owner Guide 1st Printing - Page 44
Controls and features CD changer (if equipped) Your CD changer is either located in the passenger's footwell area or in the center console. Slide the door to access the CD changer magazine. Press to eject the magazine. Make sure only one disc is inserted in each slot. Each disc must be - 1999 Lincoln Continental | Owner Guide 1st Printing - Page 45
in the changer. The magazine may be stored in the glove compartment when not being used. The CD magazine may be inserted or ejected with the radio power off. Troubleshooting the CD changer (if equipped) The laser beam used in the compact disc player is harmful to the eyes. Do not attempt to - 1999 Lincoln Continental | Owner Guide 1st Printing - Page 46
player Clean the tape player head with a cassette cleaning cartridge after ten to twelve hours of play in order to maintain the best sound and operation. Cassette and cassette player care • Use only cassettes that are 90 minutes long or less. • Do not expose tapes to direct sunlight, high humidity - 1999 Lincoln Continental | Owner Guide 1st Printing - Page 47
, locks the steering wheel, 2 automatic transmission gearshift lever and allows key removal. 1 3. OFF, shuts off the engine and all accessories without locking the steering wheel. 4. ON, all electrical circuits operational. Warning lights illuminated. Key position when driving. 5. START, cranks the - 1999 Lincoln Continental | Owner Guide 1st Printing - Page 48
after ten seconds of continuous use. HI LO F S OFF HI LO F S OFF Windshield wiper/washer features The exterior lamps will illuminate when the ignition is ON and the windshield wiper control is in the interval, LO or HI position. The instrument panel lighting will dim noticeably approximately - 1999 Lincoln Continental | Owner Guide 1st Printing - Page 49
considerably if the Lighting Control Module detects a left or right turn lamp bulb (front or rear) is burned out. STEERING WHEEL CONTROLS (IF EQUIPPED) Radio control features • Press the volume. Climate control features • Press TEMP up or down to adjust temperature. • Press FAN up or down to adjust - 1999 Lincoln Continental | Owner Guide 1st Printing - Page 50
" will appear for 5 seconds in your message center. Do not use the speed control in heavy traffic or on roads that are winding, slippery, or unpaved. Do not shift the gearshift lever into N (Neutral) with the speed control on. To turn speed control off • Press OFF or • Turn off the vehicle ignition - 1999 Lincoln Continental | Owner Guide 1st Printing - Page 51
on a downhill, you may want to shift to the next lower gear or apply the brakes to reduce your vehicle speed. If control will disengage. "SPEED CONTROL CANCELED" will appear for 5 seconds in your message center. This is normal. Pressing RES/RSM/RESUME will re-engage it. Do not use the speed control - 1999 Lincoln Continental | Owner Guide 1st Printing - Page 52
SET" will appear for 5 seconds in your message center. RES SET ACCEL COAST RES SET ACCEL COAST To disengage speed control • Depress the brake pedal. When the brake pedal is depressed, the message "SPEED CONTROL CANCELED" will appear for 5 seconds in your message center. Disengaging the speed - 1999 Lincoln Continental | Owner Guide 1st Printing - Page 53
km/h (30 mph). When the RESUME control is pressed, the message "SPEED CONTROL SET" will appear for 5 seconds in your message center. TILT STEERING Pull the tilt steering control toward you to move the steering wheel up or down. Hold the control while adjusting the wheel to the desired position, then - 1999 Lincoln Continental | Owner Guide 1st Printing - Page 54
. If equipped with a moon roof, the map lamps are located on the rearview mirror. Press the control next to the map lamp to illuminate the lamp. Rear courtesy/reading lamps The courtesy lamp lights when: • any door is opened. • the instrument panel dimmer switch is held up until the courtesy lamps - 1999 Lincoln Continental | Owner Guide 1st Printing - Page 55
Controls and features LINCOLN RESCU SYSTEM (IF EQUIPPED) Lincoln RESCU runs a self-test when you start your vehicle. During this test, the Lincoln RESCU warning light (located in the overhead console) will illuminate for several seconds. If a problem is detected during the self-check, the light will - 1999 Lincoln Continental | Owner Guide 1st Printing - Page 56
and plugged into the vehicle interface. • Information or emergency assistance can be requested whenever your key is in the RUN/START position and for six minutes after the vehicle is turned off. • An assistance request is initiated by pressing either the Information or Emergency control located in - 1999 Lincoln Continental | Owner Guide 1st Printing - Page 57
voice contact with the Lincoln Security Response Center. Two controls in the overhead console will activate the system: An Information icon is provided for customer information, such as points of interest near your current location, route assistance and other INFO services as they become available - 1999 Lincoln Continental | Owner Guide 1st Printing - Page 58
current location, route assistance and other INFO services as they become available. There may be charges incurred for certain services. i Emergency (S.O.S) icon (emergency assistance) The Emergency (S.O.S) control should be selected if emergency assistance is required. This feature should be used - 1999 Lincoln Continental | Owner Guide 1st Printing - Page 59
and features Activation and deactivation When either of the two Lincoln RESCU controls are pressed, or the air bags are deployed (this will activate the system as an emergency automatically), a warning light, located in the overhead console, will begin to flash and status messages will be displayed - 1999 Lincoln Continental | Owner Guide 1st Printing - Page 60
Controls and features Message center interface During an activation, Lincoln order in which they would appear: • INFO REQUEST or S.O.S REQUEST • CALL IN PROGRESS • RINGING RESPONSE CENTER • SENDING LOCATION connection is weak or noisy. If the transmission of the message is unsuccessful, the data - 1999 Lincoln Continental | Owner Guide 1st Printing - Page 61
voice communication with an operator will be restored. During redial calls, full control of the cellular phone is returned to you. Pressing either PWR or END request and reset the system. Location data retransmit capability During an activation, the Lincoln Security Response Center operator has the - 1999 Lincoln Continental | Owner Guide 1st Printing - Page 62
depend on you to provide verbal information regarding vehicle location. • Positioning capability temporarily degraded after battery reconnect When your vehicle is started, the Lincoln RESCU GPS receiver begins the process of determining vehicle location. The receiver will search the sky and attempt - 1999 Lincoln Continental | Owner Guide 1st Printing - Page 63
Controls and features system will operate but the response center will not be able to identify your location. In this situation, the operator will depend on you to provide verbal information regarding vehicle location. • Inoperative if cellular signal marginal or unavailable Since the Lincoln service - 1999 Lincoln Continental | Owner Guide 1st Printing - Page 64
Controls and features • Incompatible or performance limited with certain cellular providers features Some cellular carriers offer customers various optional features with their cellular services. Several of these features are not compatible or could potentially limit the performance of your Lincoln - 1999 Lincoln Continental | Owner Guide 1st Printing - Page 65
All aspects of your service will be identical regardless vehicle location (this could be very useful in control. When voice communication is established with the Lincoln Security Response Center, indicate that you are a new user and the operator will follow special acquaintance period support - 1999 Lincoln Continental | Owner Guide 1st Printing - Page 66
the Lincoln Security Response Center at 1-800-334-1327 and cancel your security service. Personal information provided to the response center at the time of your registration will be removed from the vehicle's file. MOON ROOF (IF EQUIPPED) To open the moon roof: • Press and hold the control forward - 1999 Lincoln Continental | Owner Guide 1st Printing - Page 67
lamps, lift the mirror cover. Adjust the amount of light by sliding the control. To turn on the RH visor mirror lamps, lift the mirror cover. HOMELINKா UNIVERSAL TRANSCEIVER (IF EQUIPPED) The HomeLink Universal Transceiver, located on the driver's visor, provides a convenient way to replace up to - 1999 Lincoln Continental | Owner Guide 1st Printing - Page 68
Controls and features Programming 1. Prepare for programming the HomeLink Universal Transceiver by erasing the three factory default codes by holding down the two outside buttons until the red light Transceiver surface (located on your visor) while keeping the red light in view. 3. Using both hands - 1999 Lincoln Continental | Owner Guide 1st Printing - Page 69
the garage door motor head unit. Refer to the garage door opener manual or call 1-800-355-3515 or on the Internet at HomeLink.jci.com. if there is difficulty locating the training button. 2. Press the training button on the garage door motor head unit (which will activate the "training" light.) 69 - 1999 Lincoln Continental | Owner Guide 1st Printing - Page 70
programmed buttons: 1. Hold down the two outside buttons until the red light begins to flash after 20 seconds. 2. Release both buttons. Reprogramming a single HomeLinkா button To program a device to HomeLink using a HomeLink button previously trained, follow these steps: 1. Press and hold the - 1999 Lincoln Continental | Owner Guide 1st Printing - Page 71
Controls and features normal conditions. If the compass still appears to be inaccurate, a manual calibration may be necessary. Refer to Compass calibration adjustment. Most Determine which magnetic zone you are in for your geographic location by referring to the zone map. 1 2 3 13 4 12 5 6 7 8 - 1999 Lincoln Continental | Owner Guide 1st Printing - Page 72
voltage lines. For optimum calibration, turn off all electrical accessories (heater/air conditioning, wipers, etc.) and make sure all vehicle doors are shut. 1. Start the vehicle. 2. Locate the compass module mounted on the base of mirror. 3. Insert an appropriate diameter rod (paperclip) into the - 1999 Lincoln Continental | Owner Guide 1st Printing - Page 73
state when bright lights (glare) reach the mirrors. When the inside rear view mirror detects bright light from in front of or behind the vehicle, the inside and driver side outside rear view mirrors will automatically adjust (darken) to minimize glare. Press the control to turn the mirror on or off - 1999 Lincoln Continental | Owner Guide 1st Printing - Page 74
, and either the driver's or passenger's door open, the doors cannot be locked using the front door lock switches. While the key is in the ignition, the vehicle can be locked by manually pressing down the lock control or with remote entry transmitter. POWER WINDOWS Press and hold the rocker switches - 1999 Lincoln Continental | Owner Guide 1st Printing - Page 75
the window controls except for the driver's press the right side of the control. Press the left side to restore the window controls. Accessory delay With accessory delay, the window switches may be used for up to ten minutes after the ignition switch is turned to the OFF position or until any door - 1999 Lincoln Continental | Owner Guide 1st Printing - Page 76
adjust the right mirror. MIRRORS L R 2. Move the control in the direction you wish to tilt the mirror. MIRRORS L R 3. Return to the center position to lock mirrors in place. Heated outside mirrors Both mirrors are heated automatically to remove ice, mist and fog when the rear window defrost is - 1999 Lincoln Continental | Owner Guide 1st Printing - Page 77
set the lock for both doors. Move lock control up to engage the lock. Move control down to disengage childproof locks. TRUNK REMOTE CONTROL The remote trunk release control is located on the driver's door trim panel and can be operated at any time. TRUNK FUEL LOCKED VERROUILLEE CHILD LOCK ABOVE - 1999 Lincoln Continental | Owner Guide 1st Printing - Page 78
RELEASE Your vehicle is equipped with a locking fuel door. To open the door, press the control located on the door. TRUNK FUEL Fuel filler door override release If the remote release is inoperative, open the trunk, then pull the override release handle located inside the trunk on the passenger side - 1999 Lincoln Continental | Owner Guide 1st Printing - Page 79
Controls and features Mini console (if equipped) The mini console is available in the six passenger vehicle only, and consists of the: • cupholder • compact disc changer (if equipped) • ashtray and lighter Use brake pedal. To remove the floor mat, reverse the installation procedure. PERIMETER ALARM - 1999 Lincoln Continental | Owner Guide 1st Printing - Page 80
time to lock the doors (doors opened or closed). • Open a door and press the power door lock control to lock the doors. 1 2 3 4 5 6 7 8 9 0 If a door is open, the system is prearmed and is waiting for the door to close. The anti-theft indicator on the instrument panel will be lit continuously - 1999 Lincoln Continental | Owner Guide 1st Printing - Page 81
Controls and features • Unlock the doors by using your keyless entry keypad. 1 2 3 4 5 6 7 8 9 0 • Unlock the doors with a key. Turn the key full travel (toward the front of the vehicle) to make sure the alarm disarms. • Turn ignition to ACC or ON. REMOTE ENTRY SYSTEM The remote entry system allows - 1999 Lincoln Continental | Owner Guide 1st Printing - Page 82
may cause objects to fall out of the trunk or block the rear view. Sounding a panic alarm Press this control to activate the alarm. To deactivate the alarm, press the control again or turn the ignition to ACC or ON. This device complies with part 15 of the FCC rules and with RS-210 of Industry - 1999 Lincoln Continental | Owner Guide 1st Printing - Page 83
key ring. DO NOT TAKE THE FRONT PART OF THE TRANSMITTER APART. 2. Place the positive (+) side of new battery in the same orientation. Refer to the diagram inside the transmitter unit. 3. Snap the two halves back together. Replacement of the battery will not cause the remote transmitter to become - 1999 Lincoln Continental | Owner Guide 1st Printing - Page 84
is used to unlock the door(s) or sound the personal alarm. lights will not turn off if: • they have been turned on with the dimmer control or • any door is open. The battery saver will shut off the interior lamps 40 minutes after the ignition has been turned to the OFF position. Memory seat/mirrors - 1999 Lincoln Continental | Owner Guide 1st Printing - Page 85
control in the vehicle. • transmitter #1 will recall memory profile position #1. • transmitter #2 will recall memory profile position #2. • If a third or fourth transmitter is added, it will not recall a memory position. Memory seat doors without using the key. • arm and disarm the perimeter alarm - 1999 Lincoln Continental | Owner Guide 1st Printing - Page 86
located: • on the owner's wallet card in the glove compartment • taped to the computer module • in the interior of the trunk When pressing the controls personality All of the vehicle doors will lock and unlock to same number or presents them in sequential order. Thieves can easily figure out these - 1999 Lincoln Continental | Owner Guide 1st Printing - Page 87
-set code or personal code (driver door unlocks) and press 5/6 within 5 seconds. 1 2 3 4 5 6 7 8 9 0 After the factory-set code or personal code has been entered, you can unlock all doors (press 3/4) and release the trunk (press 5/6) as long as the controls are pressed within 5 seconds of each - 1999 Lincoln Continental | Owner Guide 1st Printing - Page 88
Controls and features Locking doors with the keyless entry system It is not necessary to enter the factory-set code prior to locking all doors. To lock the doors: 1. Press 7/8 and 9/0 at the same time. 1 2 3 4 5 6 7 8 9 0 Autolock The autolock feature will lock all of the doors by using the feature - 1999 Lincoln Continental | Owner Guide 1st Printing - Page 89
. These objects and devices cannot damage the SecuriLock key, but can cause a momentary problem if they are too close to the key when starting the engine. If a problem occurs. turn ignition off and restart the engine with all other objects on the key ring held away from the SecuriLock ignition key - 1999 Lincoln Continental | Owner Guide 1st Printing - Page 90
or START, the theft indicator will light for 3 seconds and then go out. If the theft indicator stays on for an extended period of time or flashes rapidly, have the system serviced it yourself using the following vehicle's engine). remove the first SecuriLock key from the ignition. 90 - 1999 Lincoln Continental | Owner Guide 1st Printing - Page 91
Controls second but no more than 5 seconds). 4. Turn the ignition to OFF and remove the second SecuriLock key from the ignition. 5. Within 10 seconds of turning SecuriLock key(s) will start the vehicle's engine. The theft indicator (located on the instrument cluster) will light for three seconds and - 1999 Lincoln Continental | Owner Guide 1st Printing - Page 92
. The head restraints can be moved up and down. Push control to lower head restraint. Adjusting the power front seats - door mounted controls The controls for the power seats are located on the inside of each front door. Never adjust the driver's seat or seatback when the vehicle is moving. 92 - 1999 Lincoln Continental | Owner Guide 1st Printing - Page 93
Do not pile cargo higher than the seatbacks to avoid injuring people in a collision or sudden stop. Always drive and ride with your seatback upright and the lap belt snug and low across the hips. Press the control to recline the seatback forward or backward. Press to move the seat forward or - 1999 Lincoln Continental | Owner Guide 1st Printing - Page 94
heat up to the selected temperature level each time the vehicle is started. Using the power lumbar support The power lumbar control is located on the outboard side of the seat. Press one side of the control to adjust firmness. Press the other side of the control to adjust softness. 94 HI O OFF - 1999 Lincoln Continental | Owner Guide 1st Printing - Page 95
driver's seat backward when: • the transmission is in N (Neutral) or P (Park) • the key is removed from the ignition cylinder The seat will should always properly wear their safety belts, even when an air bag SRS is provided. It is extremely dangerous to ride in a cargo area, inside or outside of - 1999 Lincoln Continental | Owner Guide 1st Printing - Page 96
and safety restraints Each seating position in your vehicle has a specific safety belt assembly which is made up of one buckle and one tongue that are designed to be used as a pair. 1) Use the shoulder belt on the outside shoulder only. Never wear the shoulder belt under the arm. 2) Never swing - 1999 Lincoln Continental | Owner Guide 1st Printing - Page 97
locking mode is not available on the driver safety belt. When to use the automatic locking mode • When a tight lap/shoulder fit is desired. • Anytime a child safety seat is installed in a passenger front or outboard rear seating position (if equipped). Refer to Safety Restraints for Children - 1999 Lincoln Continental | Owner Guide 1st Printing - Page 98
middle of your shoulder. Failure to adjust the safety belt properly could reduce the effectiveness of the safety belt and increase the risk of injury in a collision. Lap belts Adjusting the front center seat lap belt (if equipped) The lap belt does not adjust automatically. Adjust to fit snugly and - 1999 Lincoln Continental | Owner Guide 1st Printing - Page 99
added to the safety belt assembly by adding a safety belt extension assembly (part number 611C22). Safety belt extension assemblies can be obtained from your dealer at no cost. Use only extensions manufactured by the same supplier as the safety belt. Manufacturer identification is located at the end - 1999 Lincoln Continental | Owner Guide 1st Printing - Page 100
and safety restraints Safety belt warning light and indicator chime The seat belt warning light illuminates in the instrument cluster and a chime sounds to remind the occupants to fasten their safety belts. Conditions of operation If...The driver's safety belt is not buckled before the ignition - 1999 Lincoln Continental | Owner Guide 1st Printing - Page 101
to the trim covering the air bag module. All occupants of the vehicle including the driver should always properly wear their safety belts even when air bag SRS is provided. Always transport children 12 years old and under in the back seat and always use appropriate child restraints. N DTE ECON - 1999 Lincoln Continental | Owner Guide 1st Printing - Page 102
injury. Do not attempt to service, repair, or modify the Air Bag Supplemental Restraint System or its fuses. See your Ford or Lincoln-Mercury dealer. Children and air bags For additional important safety information, read all information on safety restraints in this guide. Children must always be - 1999 Lincoln Continental | Owner Guide 1st Printing - Page 103
restraints Air bags can kill or injure a child in a child seat. NEVER place a rear-facing child seat in front of an active air bag. If you must use a forward-facing child seat in the front seat, move the seat all the way back. How does the air bag supplemental restraint system work? The air bag SRS - 1999 Lincoln Continental | Owner Guide 1st Printing - Page 104
the air bag is not replaced, the unrepaired area will increase the risk of injury in a collision. The SRS consists of: • driver and passenger air bag modules (which include the inflators and air bags), • one or more impact and safing sensors, • a readiness light and tone • and the electrical wiring - 1999 Lincoln Continental | Owner Guide 1st Printing - Page 105
Seating and safety restraints Determining if the system is operational The SRS uses a readiness light in the instrument cluster or a tone to indicate the condition of the system. Refer to the Air bag readiness section in the Instrumentation chapter. Routine maintenance of the air bag is not required - 1999 Lincoln Continental | Owner Guide 1st Printing - Page 106
(air bag) with a gas generator concealed behind the outboard bolster of the driver and front passenger seatbacks. • A special seat cover designed to allow airbag deployment. • The same warning light, electronic control and diagnostic unit as used for the front air bags. • Two crash sensors located - 1999 Lincoln Continental | Owner Guide 1st Printing - Page 107
technician in accordance with the vehicle service manual. If the air bag is not replaced, the unrepaired area will increase the risk of injury in a collision. Determining if the system is operational The SRS uses a readiness light in the instrument cluster or a tone to indicate the condition - 1999 Lincoln Continental | Owner Guide 1st Printing - Page 108
Seating and safety restraints SAFETY RESTRAINTS FOR CHILDREN See the following sections for directions on how to properly use safety restraints for children. Also see Air Bag Supplemental Restraint System (SRS) in this chapter for special instructions about using air bags. Important child restraint - 1999 Lincoln Continental | Owner Guide 1st Printing - Page 109
the child is the proper size, restrain the child in a safety seat. Children who are too large for child safety seats (as specified by your child safety seat manufacturer) should always wear safety belts. Follow all the important safety restraint and air bag precautions that apply to adult passengers - 1999 Lincoln Continental | Owner Guide 1st Printing - Page 110
the manufacturer's instructions with the safety seat you put in your vehicle. If you do not install and use the safety seat properly, the child may be injured in a sudden stop or collision. When installing a child safety seat: • Review and follow the information presented in the Air Bag Supplemental - 1999 Lincoln Continental | Owner Guide 1st Printing - Page 111
safety seat in a seat with a combination lap and shoulder belt. An air bag can kill or injure a child in a child seat. If you must use a forward-facing child seat in the front seat, move seat all the way back. Children 12 and under should be properly restrained in the rear seat whenever possible - 1999 Lincoln Continental | Owner Guide 1st Printing - Page 112
Pull down on the shoulder belt and then grasp the shoulder belt and lap belt together. 3. While holding the shoulder and lap belt portions together, route the tongue through the child seat according to the child seat manufacturer's instructions. Be sure the belt webbing is not twisted. 4. Insert - 1999 Lincoln Continental | Owner Guide 1st Printing - Page 113
down with your knee on the child seat. 8. Allow the safety belt to retract to remove any slack in the belt. 9. Before placing the child in the seat, forcibly tilt the seat forward and back to make sure the seat is securely held in place. 10. Try to pull the belt out of the retractor to make sure - 1999 Lincoln Continental | Owner Guide 1st Printing - Page 114
at no charge from any Ford or Lincoln-Mercury dealer. The tether strap anchorage bracket for the rear center seating position was factory installed and is located directly beneath the rear window trim panel, which is behind the rear seat back. To use this anchorage, do the following: 1. Open the - 1999 Lincoln Continental | Owner Guide 1st Printing - Page 115
starting is controlled by the ignition system. This system meets all Canadian Interference-Causing Equipment standard requirements regulating the impulse electrical field strength of radio noise. When starting a fuel-injected engine, avoid pressing the accelerator before or during starting. Only use - 1999 Lincoln Continental | Owner Guide 1st Printing - Page 116
Starting 2. Make sure the headlamps and vehicle accessories are off. • Make sure the parking brake is set. BRAKE RELEASE HOOD • Make sure the gearshift is in P (Park). 3. Turn the key to 4 (ON) without turning the key to 5 (START). 4 3 5 2 1 116 - 1999 Lincoln Continental | Owner Guide 1st Printing - Page 117
SERVICE ENGINE SOON 0 AIR BAG 0 NO RM RPMx1000 0 MPH 120 000000.0 ! P C BRAKE P R N D 3 1 Make sure the corresponding lights illuminate briefly. If a light fails to illuminate, have the vehicle serviced. • If the driver's safety belt is fastened, the light will not illuminate. STARTING - 1999 Lincoln Continental | Owner Guide 1st Printing - Page 118
engine, so the heater can be plugged in the night before starting the vehicle. To prevent electrical shock, do not use your heater with ungrounded electrical is raised for service. • the sound of the exhaust system changes. • the vehicle has been damaged in a collision. Engine exhaust, some of - 1999 Lincoln Continental | Owner Guide 1st Printing - Page 119
Starting Important ventilating information If the engine is idling while the vehicle is stopped in an open area for long periods of time, open the windows at least 2.5 cm (one inch). Adjust the heating or air conditioning (if equipped) to bring in fresh air. Improve vehicle ventilation by keeping - 1999 Lincoln Continental | Owner Guide 1st Printing - Page 120
mph) after you start the engine and begin to drive away. A brief mechanical noise may be heard during this test. This is normal. If a malfunction is found, the ABS warning light will come on. If the vehicle has continuous vibration or shudder in the steering wheel while braking, the vehicle should - 1999 Lincoln Continental | Owner Guide 1st Printing - Page 121
lamp in the instrument cluster momentarily illuminates when the ignition is turned on and the engine is off. If the light does not illuminate momentarily at start up, remains on or continues to flash, the ABS needs to be serviced. With the ABS light on, the anti-lock ! P brake system is disabled - 1999 Lincoln Continental | Owner Guide 1st Printing - Page 122
you shift into reverse). The brake pedal must remain pressed while the gearshift is moved. If the parking brake fails to release after completing this procedure, use the manual parking brake release HOOD lever. Pull the lever to manually release the parking brake. BRAKE RELEASE TRACTION CONTROL - 1999 Lincoln Continental | Owner Guide 1st Printing - Page 123
center in the Instrumentation chapter. If the Traction Control system is cycled excessively, the brake portion of the system will shut down to prevent the front brakes from overheating. A limited Traction Control function using only engine torque reduction will still control wheels from over - 1999 Lincoln Continental | Owner Guide 1st Printing - Page 124
by your dealer or a qualified service technician. AIR SUSPENSION SYSTEM The air suspension system is designed to improve ride, handling and general vehicle performance during: • certain road conditions • steering maneuvers • braking • accelerations This system keeps the rear of your vehicle at - 1999 Lincoln Continental | Owner Guide 1st Printing - Page 125
, turn ignition key to LOCK, then remove the key. 2. Insert the key and turn it to OFF. Apply the brake pedal and shift to N (Neutral). 3. Start the vehicle. If it is necessary to use the above procedure to move the gearshift, it is possible that a fuse has blown or the vehicle's brakelamps are not - 1999 Lincoln Continental | Owner Guide 1st Printing - Page 126
by shifting from forward and reverse gears in a steady pattern. Press lightly on shift selector in D (Overdrive) gives the best fuel economy for normal driving conditions. For manual control start in 1 (First) and then shift manually. To put your vehicle in gear, start the engine, depress the brake - 1999 Lincoln Continental | Owner Guide 1st Printing - Page 127
gearshift positions P (Park) Always come to a complete stop before shifting into P (Park). Make sure the gearshift is securely latched in P (Park). This locks the transaxle and prevent the front wheels from rotating. Always set the parking brake fully and make sure the gearshift is securely latched - 1999 Lincoln Continental | Owner Guide 1st Printing - Page 128
the N (Neutral) position, the vehicle can be started and is free to roll. Hold the brake pedal down while in this position. D (Overdrive) increase your fuel economy when you travel at cruising speeds. Overdrive may not be appropriate for certain terrains. If the transaxle shifts back and forth - 1999 Lincoln Continental | Owner Guide 1st Printing - Page 129
do when driving on hilly terrain. It also gives more engine braking than overdrive to slow your vehicle on downgrades. 1 (First) Use 1 (First) for when added engine braking is desired when descending steep hills. The automatic transaxle will shift to the proper gear to ascend any grade without any - 1999 Lincoln Continental | Owner Guide 1st Printing - Page 130
Do not drive quickly through standing water, especially if the depth is unknown. Traction or brake capability may be limited and if the ignition system gets wet, your engine may stall. Water may also enter your engine's air intake and severely damage your engine. If driving through deep or standing - 1999 Lincoln Continental | Owner Guide 1st Printing - Page 131
to figure in the tongue load of your loaded trailer when figuring the total weight. Do not exceed the GVWR or the GAWR specified on the Safety Compliance Certification Label. Do not use replacement tires with lower load carrying capacities than the originals because they may lower the vehicle - 1999 Lincoln Continental | Owner Guide 1st Printing - Page 132
Do not tow a trailer until your vehicle has been driven at least 3 200 km (2 000 miles). Towing a trailer places an additional load on your vehicle's engine, transmission, brakes, tires and suspension. Inspect these components carefully after towing. Do not tow a trailer when using a temporary spare - 1999 Lincoln Continental | Owner Guide 1st Printing - Page 133
use a rental trailer, follow the instructions that the rental agency gives to you. Do not attach safety chains to the bumper. Trailer brakes Electric brakes and manual, automatic or surge-type brakes are safe if installed properly and adjusted to the manufacturer's specifications. The trailer brakes - 1999 Lincoln Continental | Owner Guide 1st Printing - Page 134
weight. • After you have traveled 80 km (50 miles), thoroughly check your hitch, electrical connections and trailer wheel lug nuts. • When stopped in traffic for long periods of time in hot weather, place the gearshift in P (Park) and increase idle speed. This aids engine cooling and air conditioner - 1999 Lincoln Continental | Owner Guide 1st Printing - Page 135
hazard lights control is located on top of the steering column. • Depress hazard lights control to activate all hazard flashers simultaneously. • Depress control again to turn the flashers off. FUEL PUMP SHUT-OFF SWITCH After a collision, if the engine cranks but does not start, the fuel pump shut - 1999 Lincoln Continental | Owner Guide 1st Printing - Page 136
wire within the fuse. Check the appropriate fuses before replacing any electrical components. 15 Always replace a fuse with one that has the specified amperage rating. Using a fuse with a higher amperage rating can cause severe wire damage and could start a fire. Standard fuse amperage rating and - 1999 Lincoln Continental | Owner Guide 1st Printing - Page 137
Roadside emergencies Passenger compartment fuse panel The fuse panel is located below and to the left of the steering wheel by the brake pedal. Remove the panel cover to access the fuses. To remove a fuse use the fuse puller tool provided on the fuse panel cover. 1 2 3 4 5 6 7 8 9 10 11 - 1999 Lincoln Continental | Owner Guide 1st Printing - Page 138
Electronic Day/Night Mirror 5 10A Virtual Image Instrument Cluster, Lighting Control Module (LCM RUN/START Sense), Autolamp Light Sensor 6 10A Virtual Image Instrument Cluster, RF Park/Turn Lamp 7 20A Power Point 8 20A Fuel Filler Door Release Switch, Trunk Lid Relay 9 10A Air Bag Diagnostic Monitor - 1999 Lincoln Continental | Owner Guide 1st Printing - Page 139
Signal 25 10A Lighting Control Module (LCM): Right Headlamp 26 10A Virtual Image Instrument Cluster, EATC Module 27 - Not Used 28 10A Shift Lock Actuator, Vehicle Dynamic Module, Virtual Image Instrument Cluster, Rear Window Defrost, Heated Seat Switch Assembly, Low Tire Pressure Module, RESCU 29 - 1999 Lincoln Continental | Owner Guide 1st Printing - Page 140
/Night Mirror, RH and LH Courtesy Lamp, Door Courtesy Lamps, RH and LH Map Lamps, RR and LR Reading Lamps, RH and LH Visor Lamps, Storage Bin Lamps, Trunk Lid Lamp, Glove Box Lamp, Light Sensor Amplifier 32 15A Speed Control DEAC. Switch, Brake On/Off (BOO) Switch 33 - Not Used 34 15A Console Shift - 1999 Lincoln Continental | Owner Guide 1st Printing - Page 141
Regulator Driver's Seat Module Passenger's Seat Module Ignition Switch Ignition Switch Driver Window Low Speed Cooling Fan Powertrain Control Module Rear Window Defrost Control I/P Fuse Panel Lighting Control Module Compressor Relay Anti-Lock Brake Control Module Blower Motor High Speed Cooling - 1999 Lincoln Continental | Owner Guide 1st Printing - Page 142
Fuses Description PCM ALT SENSE Right Rear Passenger Window Air Suspension Not Used Horns High Beam Right Front Passenger Window A/C Diode PCM Diode Auxiliary relay box The auxiliary relay box is located in the engine compartment. The auxiliary relay box contains the high and low speed cooling fan - 1999 Lincoln Continental | Owner Guide 1st Printing - Page 143
3. Remove the spare tire, jack and lug wrench. 4. Locate pry off notch (if equipped) and remove the center ornament from the aluminum wheel with the tapered end of the wheel nut wrench that came with your vehicle. Insert and twist the handle, then pry against the wheel. 5. Loosen each wheel lug - 1999 Lincoln Continental | Owner Guide 1st Printing - Page 144
injury, do not put any part of your body under the vehicle while changing a tire. Do not start the engine when your vehicle is on the jack. The jack is only meant for changing the tire. 7. Remove the lug nuts with the lug wrench. Replace the flat tire with the spare tire, making sure the valve stem - 1999 Lincoln Continental | Owner Guide 1st Printing - Page 145
wrench away. 11. If using a mini-spare tire, turn off the traction control switch. 12. Turn on the air suspension switch. 1 3 4 5 2 Anti-theft lug nuts (if equipped) If your vehicle is equipped with this feature, one of the lug nuts on each wheel must be removed and replaced with a special key - 1999 Lincoln Continental | Owner Guide 1st Printing - Page 146
the vehicle's electrical system. 3. Park the booster vehicle close to the hood of the disabled vehicle making sure the two vehicles do not touch. Set the parking brake on both vehicles and stay clear of the engine cooling fan and other moving parts. 4. Check all battery terminals and remove any - 1999 Lincoln Continental | Owner Guide 1st Printing - Page 147
jumper cables 1. Connect the positive (+) booster cable to the positive (+) terminal of the discharged battery. Note: In the illustrations, lightning bolts are used to designate the assisting (boosting) battery. 2. Connect the other end of the positive (+) cable to the positive (+) terminal of the - 1999 Lincoln Continental | Owner Guide 1st Printing - Page 148
cable to an exposed metal part of the stalled vehicle's engine, away from the battery and the carburetor. The preferred locations of an exposed metal part (to ground the circuit) are the alternator mounting brackets or an engine lifting eye. Do not use fuel lines, engine rocker covers or the intake - 1999 Lincoln Continental | Owner Guide 1st Printing - Page 149
vehicle. 3. Once the disabled vehicle has been started, run both engines for a further three minutes before disconnecting the jumper cables. Removing the jumper cables Remove the jumper cables in the reverse order that they were connected. 1. Remove the jumper cable from the ground metal surface - 1999 Lincoln Continental | Owner Guide 1st Printing - Page 150
(+) terminal of the booster vehicle's battery. 4. Remove the jumper cable from the positive (+) terminal of the disabled vehicle's battery. After the disabled vehicle has been started and the jumper cables removed, allow it to idle for several minutes so the engine computer can relearn its idle - 1999 Lincoln Continental | Owner Guide 1st Printing - Page 151
hook or slingbelt towing procedure. Before your vehicle can be towed, the air suspension control in the luggage compartment must be turned to the OFF position (if equipped). A towing manual is available from Ford Motor Company for all authorized tow truck operators. Have your tow truck driver refer - 1999 Lincoln Continental | Owner Guide 1st Printing - Page 152
for easy location. • We provide a Scheduled Maintenance Guide which makes tracking routine service easy. If your vehicle requires professional service, your dealership can provide necessary parts and service. Check your "Warranty Guide" to find out which parts and services are covered. Use only - 1999 Lincoln Continental | Owner Guide 1st Printing - Page 153
Maintenance and care Do not start your engine with the air cleaner removed and do not remove it while the engine is running. OPENING THE HOOD 1. Inside the vehicle, pull the hood release handle located under the bottom of the instrument panel. 2. Go to the front of the vehicle and release the - 1999 Lincoln Continental | Owner Guide 1st Printing - Page 154
Brake fluid reservoir 3. Battery 4. Air filter assembly 5. Engine oil dipstick 6. Engine oil filler cap 7. Power steering fluid reservoir 8. Windshield washer fluid reservoir 9. Engine coolant reservoir 10. Cabin air filter ENGINE OIL Checking the engine oil Refer to the Scheduled Maintenance Guide - 1999 Lincoln Continental | Owner Guide 1st Printing - Page 155
fully seated. Adding engine oil 1. Check the engine oil. For instructions, refer to Checking the engine oil in this chapter. 2. If the engine oil level is not within the MIN and MAX ranges, add only certified engine oil of the recommended viscosity. Remove the engine oil filler cap and use a funnel - 1999 Lincoln Continental | Owner Guide 1st Printing - Page 156
the appropriate schedule listed in the Scheduled Maintenance Guide. Ford production and aftermarket (Motorcraft) oil filters are designed for added engine protection and long life. If a replacement oil filter is used that does not meet Ford material and design specifications, startup engine noises - 1999 Lincoln Continental | Owner Guide 1st Printing - Page 157
Scheduled Maintenance Guide for the service interval schedules: 1. Clean the reservoir cap before removal to prevent dirt or water from entering the reservoir. 2. Visually inspect the fluid level. 3. If necessary, add brake fluid until the level reaches MAX. Do not fill MAX above this line. 4. Use - 1999 Lincoln Continental | Owner Guide 1st Printing - Page 158
the container for the windshield washer fluid. ENGINE COOLANT Check the level of the engine coolant in the reservoir. Refer to the Scheduled Maintenance Guide for service interval schedules. Be sure to read and understand Precautions when servicing your vehicle in this chapter. COLD FILL LEVEL 158 - 1999 Lincoln Continental | Owner Guide 1st Printing - Page 159
it difficult to see through the windshield. When the engine is cool, add a 50/50 mixture of engine coolant and water to the engine coolant reservoir-DO NOT ADD DIRECTLY TO THE RADIATOR. Add straight water only in an emergency, but you should replace it with a 50/50 mixture of coolant and distilled - 1999 Lincoln Continental | Owner Guide 1st Printing - Page 160
you are sure that all the pressure has been released, use the cloth to turn it counterclockwise and remove the cap. Change your engine coolant according to the appropriate schedule listed in the Scheduled Maintenance Guide. Before adding engine coolant, check the color of the coolant in your vehicle - 1999 Lincoln Continental | Owner Guide 1st Printing - Page 161
engine coolant and water in your vehicle year-round in non-extreme climates. CHECKING AND ADDING POWER STEERING FLUID Check the power steering fluid. Refer to the Scheduled Maintenance Guide for the service interval schedules. If adding fluid is necessary, use only MERCON ATF. 1. Start the engine - 1999 Lincoln Continental | Owner Guide 1st Printing - Page 162
reaches the range between the MIN and MAX lines. Be sure to put the cap back on the reservoir. TRANSMISSION FLUID Checking automatic transmission fluid Refer to your Scheduled Maintenance Guide for scheduled intervals for fluid checks and changes. Your transaxle does not consume fluid. However, the - 1999 Lincoln Continental | Owner Guide 1st Printing - Page 163
overheating condition. Adjusting automatic transmission fluid levels Before adding any fluid, make sure the correct type is used. The type of fluid used is normally indicated on the dipstick and/or dipstick handle and also in the Lubricant specifications section in the Capacities and specifications - 1999 Lincoln Continental | Owner Guide 1st Printing - Page 164
the Scheduled Maintenance Guide for the service interval schedules. Keep the electrolyte level in each cell up to the "level indicator". Do not overfill the battery cells. If the electrolyte level in the battery is low, you can add plain tap water to the battery, as long as you do not use hard water - 1999 Lincoln Continental | Owner Guide 1st Printing - Page 165
a computer, some control conditions are maintained by power from the battery. When the battery is disconnected or a new battery is installed, the engine must relearn its idle and fuel trim strategy for optimum driveability and performance. To begin this process: 1. Set your parking brake. 2. Put the - 1999 Lincoln Continental | Owner Guide 1st Printing - Page 166
CABIN AIR FILTER The cabin air filter restricts the entry of airborne dust and pollen particles. The filter is located just in front of the windshield under the cowl vent screen on the passenger side of the vehicle. To replace the filter, perform the following procedure: 1. In order to gain - 1999 Lincoln Continental | Owner Guide 1st Printing - Page 167
Maintenance and care 2. Release and open the hood. BRAKE RELEASE HOOD 3. Pull the rubber cowl seal (number 1 in figure) away from the cowl vent screen. Remove Remove the water shield (number 3 in figure) by disengaging the two water shield locking tabs (number 4 in figure), then sliding the water - 1999 Lincoln Continental | Owner Guide 1st Printing - Page 168
mild detergent. Rinse thoroughly with clean water. To avoid damaging the blades, do not use fuel, kerosene, paint thinner or other solvents. Changing the wiper blades To replace the wiper blades: 1. Pull the wiper arm away from the windshield and lock into the service position. 2. Turn the blade at - 1999 Lincoln Continental | Owner Guide 1st Printing - Page 169
, check the pressure in your tires as soon as possible and adjust any tire that is low to the recommended air pressure level. If the warning remains on after you have adjusted the tires to the recommended air pressure levels, take your vehicle to an authorized Lincoln/Mercury dealer for service. 169 - 1999 Lincoln Continental | Owner Guide 1st Printing - Page 170
used until your SecuriTire has been repaired. It is recommended that you always have your SecuriTires serviced by an authorized Michelin tire dealer. Each SecuriTire is equipped with a pressure sensor around the wheel rim. This sensor could be damaged when removing and installing the tire. Servicing - 1999 Lincoln Continental | Owner Guide 1st Printing - Page 171
Maintenance and care Tire Quality Grades apply to new pneumatic tires for use on passenger cars. They do not apply to deep tread, winter-type snow tires, space-saver or temporary use spare tires, tires with nominal rim diameters of 10 to 12 inches or limited production tires as defined in Title 49 - 1999 Lincoln Continental | Owner Guide 1st Printing - Page 172
. SERVICING YOUR TIRES Checking the tire pressure • Use an accurate tire pressure gauge. • Check the tire pressure when tires are cold, after the vehicle has been parked for at least one hour or has been driven less than 5 km (3 miles). • Adjust tire pressure to recommended specifications found - 1999 Lincoln Continental | Owner Guide 1st Printing - Page 173
Maintenance and care • Four tire rotation Replacing the tires Replace the tires when the wear band is visible through the tire treads. Failure to follow these precautions may adversely affect the handling of the vehicle and make it easier for the driver to lose control and roll over. Tires that - 1999 Lincoln Continental | Owner Guide 1st Printing - Page 174
may need to use snow tires. WHAT YOU SHOULD KNOW ABOUT AUTOMOTIVE FUELS Important safety precautions Do not overfill the fuel tank. The pressure in an overfilled tank may cause leakage and lead to fuel spray and fire. If you do not use the proper fuel cap, the pressure in the fuel tank can damage - 1999 Lincoln Continental | Owner Guide 1st Printing - Page 175
can also be harmful if absorbed through the skin. If fuel is splashed on the skin and/or clothing, promptly remove contaminated clothing and wash skin thoroughly with soap and water. Repeated or prolonged skin contact with fuel liquid or vapor causes skin irritation. • Be particularly careful if - 1999 Lincoln Continental | Owner Guide 1st Printing - Page 176
"Service Engine Soon/Check Engine " indicator comes on and stays on when you start the engine, the fuel filler cap may not be properly installed. Turn off the engine, remove the fuel filler cap and reinstall it being careful to align the cap properly. If you must replace the fuel filler cap, replace - 1999 Lincoln Continental | Owner Guide 1st Printing - Page 177
idle or hesitation driveability problems during a cold start, try a different brand of "Premium" unleaded gasoline. If the problems persist, see your dealer or a qualified service technician. The American Automobile Manufacturers Association (AAMA) issued a fuel specification to provide information - 1999 Lincoln Continental | Owner Guide 1st Printing - Page 178
on the "Service Engine Soon" light, refer to the Instrumentation chapter. Fuel Filter Your vehicle is equipped with a fuel filter that is mounted on the underbody. For fuel filter replacement, see your dealer or a qualified service technician. Refer to the Scheduled Maintenance Guide for the - 1999 Lincoln Continental | Owner Guide 1st Printing - Page 179
Maintenance and care The advertised fuel capacity of the fuel tank on your vehicle is equal to the rated refill capacity of the fuel tank as listed in the Refill Capacities chart in this "Owner Guide." The advertised capacity is the amount of the Indicated Capacity and the Empty Reserve combined. - 1999 Lincoln Continental | Owner Guide 1st Printing - Page 180
. • Warming up a vehicle on cold mornings is not required and may reduce fuel economy. • Resting your foot on the brake pedal while driving may reduce fuel economy. • Combine errands and minimize stop-and-go driving. Maintenance • Keep tires properly inflated and use only recommended size. 180 - 1999 Lincoln Continental | Owner Guide 1st Printing - Page 181
with the wheels out of alignment will reduce fuel economy. • Use recommended engine oil. Refer to Lubricant Specifications. • Perform all regularly scheduled maintenance items. Follow the recommended maintenance schedule and owner maintenance checks found in your vehicle Scheduled Maintenance Guide - 1999 Lincoln Continental | Owner Guide 1st Printing - Page 182
items listed in the Scheduled Maintenance Guide are essential to the life and performance of your vehicle and to its emissions system. If other than Ford, Motorcraft or Ford-authorized parts are used for maintenance replacements or for service of components affecting emission control, such non-Ford - 1999 Lincoln Continental | Owner Guide 1st Printing - Page 183
the Vehicle Emission Control Information Decal located on or near the engine. This decal identifies engine displacement and gives some tune up specifications. Please consult your "Warranty Guide" for complete emission warranty information. Readiness for inspection/maintenance (I/M) testing In some - 1999 Lincoln Continental | Owner Guide 1st Printing - Page 184
plastic base and do not touch the glass. The oil from your hand could cause the bulb to break the next time the headlamps are operated. To remove the headlamp bulb: 1. Make sure headlamp switch is in OFF position. 2. Lift the hood and remove the protective cover from the top of the headlamps by - 1999 Lincoln Continental | Owner Guide 1st Printing - Page 185
Maintenance and care 5. Release clip and disconnect the electrical connector from the bulb. 6. Remove the bulb retaining ring by rotating it counterclockwise. 7. Remove the old bulb from the lamp assembly by pulling it straight out of the lamp assembly. To install the new bulb: 1. Install the new - 1999 Lincoln Continental | Owner Guide 1st Printing - Page 186
Maintenance the cover tabs are fully seated under the grille molding. 8. Turn the Replacing front parking lamp/turn signal/cornering lamp bulbs 1. Make sure the headlamp control is in the OFF position. 2. Open the hood and remove counterclockwise about 1⁄4 turn and remove from lamp assembly. 5. - 1999 Lincoln Continental | Owner Guide 1st Printing - Page 187
turn lamp (front) License plate lamp Luggage compartment lamp (decklid ajar) Side marker (front) Side marker (rear) Stoplamp and tail lamp Redundant turn lamp (rear) Glovebox lamp Ash receptacle Ash tray (rear) Cigar lighter (console) Door mounted lamp (front) Trade Number 9007 3156K 3457K 912 3157K - 1999 Lincoln Continental | Owner Guide 1st Printing - Page 188
Maintenance and care Function Trade Number Illuminated visor mirror 74 Overhead console reading lamp (without moon roof) 912 Passenger assist handle (rear seat) 211-2 To replace all instrument panel lights - see your dealer. AIMING THE HEADLAMPS Your vehicle is equipped with a Vehicle Headlamp Aim - 1999 Lincoln Continental | Owner Guide 1st Printing - Page 189
(as shown) when viewed directly from above. Turning the horizontal adjusting screw in the direction of the arrow changes the horizontal aim as shown. Vertical aim adjustment 1. Park the vehicle on a level surface. 2. With the hood open, remove the protective cover, then locate the bubble level and - 1999 Lincoln Continental | Owner Guide 1st Printing - Page 190
regularly with cold or lukewarm water. Never use strong detergents or soap. If your vehicle is particularly dirty, use a quality car wash detergent. Always use a clean sponge, washing glove or similar device and plenty of water for best results. To avoid spots, avoid washing when the hood is still - 1999 Lincoln Continental | Owner Guide 1st Printing - Page 191
the body of your vehicle. Do not use acid-based or alcohol-based wheel cleaners, steel wool, fuel or strong detergents. Never use abrasives that will damage the finish of special wheel surfaces. Use a tar remover to remove grease and tar. Cleaning the engine Engines are more efficient when they are - 1999 Lincoln Continental | Owner Guide 1st Printing - Page 192
water damage when cleaning the engine. • Never wash or rinse the engine while it is running; water in the running engine may cause internal damage. Cleaning plastic exterior parts Use vinyl cleaner for routine cleaning. Clean with a tar remover the blades, do not use fuel, kerosene, paint thinner or - 1999 Lincoln Continental | Owner Guide 1st Printing - Page 193
cover with upholstery cleaner. Do not use chemical solvents or strong detergents when cleaning the seat mounted side air bag. Such products could contaminate the side air bag system and affect performance of the side air bag in a collision. Cleaning the instrument panel Clean with a damp cloth, then - 1999 Lincoln Continental | Owner Guide 1st Printing - Page 194
Maintenance and care Cleaning leather seats (if equipped) To clean, simply use a soft cloth dampened with water and a mild soap. Wipe the leather again with a damp cloth to remove soap residue. Dry with a soft cloth. For tougher soiling concerns, Ford recommends using the leather cleaning kit F8AJ- - 1999 Lincoln Continental | Owner Guide 1st Printing - Page 195
Capacities and specifications MOTORCRAFT PART NUMBERS Component Air filter Cabin air filter Fuel filter Battery Oil filter PCV valve Spark plugs* 4.6L DOHC V8 engine FA-1615 FP-5 FG-800A BXT-65-750 FL-820-S EV-111 AWSF-32E * Refer to Vehicle Emissions Control Information (VECI) decal for spark plug - 1999 Lincoln Continental | Owner Guide 1st Printing - Page 196
Performance DOT 3 Motor Vehicle Brake Fluid1 Multi-Purpose Grease Ford Part Number C6AZ-19542-AB Ford Specification ESA-M6C25-A and DOT 3 2 Item Brake fluid Hinges, latches, stricker plates, fuel filler door hinge and seat tracks Lock cylinders Automatic transaxle (AX4N) Engine oil DOAZ19584-AA - 1999 Lincoln Continental | Owner Guide 1st Printing - Page 197
. However, if DOT 3 is not available, DOT 4 fluid meeting Ford specification SAE J 1704 DOT 4 can be used. ENGINE DATA Engine Cubic inches Horsepower Torque Recommended fuel Firing order Spark plug gap Ignition system Compression ratio VEHICLE DIMENSIONS Vehicle dimensions (1) Overall length - 1999 Lincoln Continental | Owner Guide 1st Printing - Page 198
Capacities and specifications 4 1 3 5 2 198 - 1999 Lincoln Continental | Owner Guide 1st Printing - Page 199
LUGGAGE XX XXXKG/XXXXLB TIRE: XXXX/XXXXX XXX X XXXKG/XXXXLB PRESSURE (FR) XXX kPa/33 PSI COLD PRESSURE (RR) XXX kPa/33 PSI COLD TRAILER TOWING - SEE OWNER GUIDE EXT PNT: XXXXXX XXXXXX RC: XX DSO: XXXX F0000 BAR INT TR TP/PS R AXLE TR SPR T0000 X XX XXX X XX X XXXX UTC ∇FOHT-15294A10-GA 199 - 1999 Lincoln Continental | Owner Guide 1st Printing - Page 200
doors • the front and rear bumpers • the hood • the left and right rear quarter panels • the decklid • the liftgate (if equipped) AIR BAG XXXXXXXXXXXXXXXXX ENGINE NUMBER The engine number (the last eight numbers of the vehicle identification number) is stamped on the engine block, transmission - 1999 Lincoln Continental | Owner Guide 1st Printing - Page 201
, and if it finds that a safety defect exists in a group of vehicles, it may order a recall and remedy campaign. However, NHTSA cannot become involved in individual problems between you, your dealer or Ford Motor Company. To contact NHTSA, you may either call the Auto Safety Hotline toll-free at - 1999 Lincoln Continental | Owner Guide 1st Printing - Page 202
...159 refill capacities ...161 Defrost rear window ...31 Emission control system ...182 Engine coolant ...158 idle speed control ...164 service points ...153 starting after a collision ...135 Engine block heater ...118 Engine oil checking and adding ...155 dipstick ...154 specifications ...154,156 - 1999 Lincoln Continental | Owner Guide 1st Printing - Page 203
Turn signal) ...48 Lights, warning and indicator air bag ...7 anti-lock brakes (ABS) ...8 brake ...7 charging system ...9 oil pressure ...9 safety belt ...7 service engine soon ...6 traction control off ...9 turn signal indicator ...8 Locks childproof ...77 Lumbar support, seats ...94 Message center - 1999 Lincoln Continental | Owner Guide 1st Printing - Page 204
/easyout feature ...95 Servicing your vehicle ...152 Spark plugs, specifications ...195 Specification chart, lubricants ...196 Speed control ...50 Speedometer ...11 Starting your vehicle ...115,117 jump starting ...146,147,149 Steering wheel ...49 tilting ...53 Tachometer ...11 Tires ...168,169,170 - 1999 Lincoln Continental | Owner Guide 1st Printing - Page 205
205 - 1999 Lincoln Continental | Owner Guide 1st Printing - Page 206
206 - 1999 Lincoln Continental | Owner Guide 1st Printing - Page 207
207 - 1999 Lincoln Continental | Owner Guide 1st Printing - Page 208
Motorcraft change) 5W30 Super Premium Motor Oil, Ford specification WSS-M2C153-G. 1 Automatic transaxle fluid capacity 13.0L (13.7 quarts). Use Motorcraft MerconV ATF. Tire size and pressure Refer to Tire Pressure Decal on rear passenger side door panel. Hood release Pull handle under the left side
-
 1
1 -
 2
2 -
 3
3 -
 4
4 -
 5
5 -
 6
6 -
 7
7 -
8
-
9
-
10
-
11
-
12
-
13
-
14
-
15
-
16
-
17
-
18
-
19
-
20
-
21
-
22
-
23
-
24
-
25
-
26
-
27
-
28
-
29
-
30
-
31
-
32
-
33
-
34
-
35
-
36
-
37
-
38
-
39
-
40
-
41
-
42
-
43
-
44
-
45
-
46
-
47
-
48
-
49
-
50
-
51
-
52
-
53
-
54
-
55
-
56
-
57
-
58
-
59
-
60
-
61
-
62
-
63
-
64
-
65
-
66
-
67
-
68
-
69
-
70
-
71
-
72
-
73
-
74
-
75
-
76
-
77
-
78
-
79
-
80
-
81
-
82
-
83
-
84
-
85
-
86
-
87
-
88
-
89
-
90
-
91
-
92
-
93
-
94
-
95
-
96
-
97
-
98
-
99
-
100
-
101
-
102
-
103
-
104
-
105
-
106
-
107
-
108
-
109
-
110
-
111
-
112
-
113
-
114
-
115
-
116
-
117
-
118
-
119
-
120
-
121
-
122
-
123
-
124
-
125
-
126
-
127
-
128
-
129
-
130
-
131
-
132
-
133
-
134
-
135
-
136
-
137
-
138
-
139
-
140
-
141
-
142
-
143
-
144
-
145
-
146
-
147
-
148
-
149
-
150
-
151
-
152
-
153
-
154
-
155
-
156
-
157
-
158
-
159
-
160
-
161
-
162
-
163
-
164
-
165
-
166
-
167
-
168
-
169
-
170
-
171
-
172
-
173
-
174
-
175
-
176
-
177
-
178
-
179
-
180
-
181
-
182
-
183
-
184
-
185
-
186
-
187
-
188
-
189
-
190
-
191
-
192
-
193
-
194
-
195
-
196
-
197
-
198
-
199
-
200
-
201
-
202
-
203
-
204
-
205
-
206
-
207
-
208
 |
 |

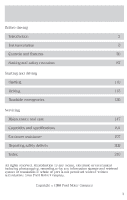
Before driving
Introduction
2
Instrumentation
3
Controls and features
20
Seating and safety restraints
87
Starting and driving
Starting
110
Driving
115
Roadside emergencies
130
Servicing
Maintenance and care
147
Capacities and specifications
191
Customer assistance
197
Reporting safety defects
209
Index
210
All rights reserved. Reproduction by any means, electronic or mechanical
including photocopying, recording or by any information storage and retrieval
system or translation in whole or part is not permitted without written
authorization from Ford Motor Company.
Copyright
°
1998 Ford Motor Company
Contents
1