AIWA NSX-Aj22 Operating Instructions - Page 7
Setting The Clock, Remote Control
 |
View all AIWA NSX-Aj22 manuals
Add to My Manuals
Save this manual to your list of manuals |
Page 7 highlights
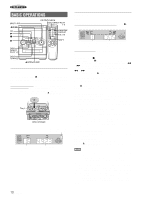
PREPARATIONS REMOTE CONTROL SETTING THE CLOCK Inserting batteries Detach the battery cover on the rear of the remote control and insert two R6 (size AA) batteries. When to replace the batteries The maximum operational distance between the remote control and the sensor on the main unit should be approximately 5 meters (16 feet). When this distance decreases, replace the batteries with new ones. To use SHIFT on the remote control Buttons 1 have two different functions. One of these functions is indicated on the button, and the other on the plate above the button. To use the function on the button, simply press the button. To use the function on the plate above the button, press the button while pressing SHIFT. To use FUNCTION on the remote control FUNCTION substitutes for the function buttons (TAPE DECK 1/2, TUNER BAND, VIDEO/AUX, CD) on the main unit. Each time FUNCTION is pressed, the next function is selected cyclically. When tapes are inserted in both decks, each deck is selected with FUNCTION. • "4" and "5" of DISC DIRECT PLAY on the remote control cannot be used on this system. • If the remote control is not going to be used for an extended period of time, remove the batteries to prevent possible electrolyte leakage. • The remote control may not operate correctly when: - The line of sight between the remote control and the remote sensor inside the display window is exposed to intense light, such as direct sunlight - Other remote controls are used nearby (those of a television, etc.) 1 Press CLOCK while pressing SHIFT on the remote control. When using the unit, press a while the power is off. The clock is displayed. (The ":" between the hours and minutes flashes.) 2 Within 4 seconds, turn MULTI JOG to designate the hour and the minute. Turning MULTI JOG changes both the hour and the minute. En f or g is also available in place of MULTI JOG. Holding these buttons down will vary the time rapidly. 3 Press ENTER or a. The clock starts from 00 seconds. To restore an original clock setting Press CLOCK while pressing SHIFT on the remote control before completing step 3 to restore the previous time setting. This cancels any new setting. To view the clock when another display is in the display Press CLOCK while pressing SHIFT on the remote control. The time is displayed for 4 seconds and then the original display reappears. However, the clock cannot be displayed during recording. To switch to the 24-hour standard Press CLOCK while pressing SHIFT on the remote control and then press s within 4 seconds. Repeat the same procedure to restore the 12-hour standard. In the 12-hour standard, "AM 12:00" indicates midnight and "PM12:00" indicates noon. If the clock display flashes If the display flashes when the clock is displayed, it indicates that the clock has stopped due to a power failure or the removal of the power cord. The current time needs to be reset. If the power-economizing mode (page 6) is on, the unit blacks out when the power is turned off. To view the clock, press CLOCK while pressing SHIFT on the remote control so that the time is displayed for 4 seconds. 7 ENGLISH
-
 1
1 -
 2
2 -
 3
3 -
 4
4 -
 5
5 -
 6
6 -
 7
7 -
 8
8 -
 9
9 -
 10
10 -
 11
11 -
 12
12 -
13
-
14
-
15
-
16
-
17
-
18
-
19
-
20
-
21
-
22
-
23
-
24
-
25
-
26
-
27
-
28
-
29
-
30
-
31
-
32
-
33
-
34
-
35
-
36
-
37
-
38
-
39
-
40
-
41
-
42
-
43
-
44
-
45
-
46
-
47
-
48
-
49
-
50
-
51
-
52
-
53
-
54
-
55
-
56
-
57
-
58
-
59
-
60
-
61
-
62
 |
 |
