AIWA TS-W45 Operating Instructions - Page 8
Operation - powered subwoofer
 |
View all AIWA TS-W45 manuals
Add to My Manuals
Save this manual to your list of manuals |
Page 8 highlights
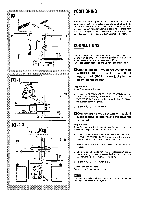
FRONT 3-) REAR I 1 (3 VOLUME OPERATION ADJUSTING THE VOLUME BALANCE ;g-:q ,&%~i Adjust the volume balance between the powered subwoofer and 1$ the left and right speakers of the connected stereo system. la-,gr.~+~,.s.:t 1 ,:6.& ..... !.-a,7 qj 2 3 Press the POWER button. The indicator above the button lights up. Start playback on the connected stereo system. Adjust the volume of the powered subwoofer. ~z!% ~.,... Moderate volume setting To get natural bass sounds, adjust the volume of the powered subwoofer according to its position and the graphic equalizer setting of the stereo system. Adjustment examples @ Set the VOLUME control to a little lower than the middle when the subwoofer is placed on the floor and the graphic equalizer is set to off. @ Set the VOLUME control to the middle when the subwoofer is positioned higher than the floor and the graphic equalizer is set to off. m q To avoid overloading the powered subwoofer, do not set the volume of the stereo system so high that the sound is distorted. q Low frequency sounds may be distorted when they are emphasized by the graphic equalizer on the stereo system. Adjust the VOLUME control on the powered subwoofer or the graphic equalizer on the stereo system. q If the powered subwoofer will not be used for a long period of time, press the POWER button to turn off the power, and unplug the AC cord from the wall outlet. CHANGING THE PHASE + u Depending upon the room or the characteristics of the right and left speakers, sound from the powered subwoofer may seem unnatural or unusually loud or soft. In this case, try changing the PHASE switch setting. Set to the NORMAL or REVERSE position, whichever sounds better. USINGTHE AUTO POWER FUNCTION+ u Before using this function, make sure the POWER button is set to ON. While the AUTO POWER switch is set to ON, the power is automatically turned on when receiving a signal input from either INPUT 1 or INPUT 2. The power is automatically turned off if no signal is input for a while and the indicator of the POWER button becomes dimmer, If input signal is too weak, this function does not effect. While the AUTO POWER switch is set to OFF, the power is turned on or off by pressing the POWER button. 8
-
 1
1 -
2
-
 3
3 -
 4
4 -
 5
5 -
 6
6 -
 7
7 -
 8
8 -
 9
9 -
 10
10 -
 11
11 -
 12
12
 |
 |
