ASRock 775XFire-RAID Quick Installation Guide
ASRock 775XFire-RAID Manual
 |
View all ASRock 775XFire-RAID manuals
Add to My Manuals
Save this manual to your list of manuals |
ASRock 775XFire-RAID manual content summary:
- ASRock 775XFire-RAID | Quick Installation Guide - Page 1
for backup purpose, without written consent of ASRock Inc. Products and corporate names appearing in this guide may or may not be registered trademarks or ASRock Website: http://www.asrock.com Published February 2006 Copyright©2006 ASRock INC. All rights reserved. 1 ASRock 775XFire-RAID Motherboard - ASRock 775XFire-RAID | Quick Installation Guide - Page 2
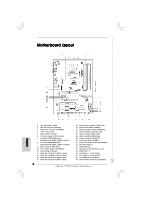
Panel Audio Header (HD_AUDIO1) 25 PCI Slots (PCI1- 3) 26 BIOS FWH Chip 27 AGI Express Slot (PCI Express x 4) 28 PCIEX1_EN1 - 5 29 PCI Express x 1 Slot (PCIE2) 30 PCI Express x 16 Slot (PCIE1) 31 SLI / XFIRE Power Connector 32 Internal Audio Connector: CD1 (Black) 2 ASRock 775XFire-RAID Motherboard - ASRock 775XFire-RAID | Quick Installation Guide - Page 3
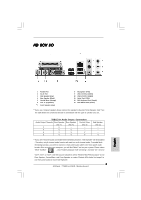
for connection details in accordance with the type of speaker you use. TABLE for Audio Output Connection Audio Output Channels Front Speaker Rear Speaker Central / Bass (No. 7) (No. 4) Audio 2nd output" to use front panel audio to share Side Speaker. 3 ASRock 775XFire-RAID Motherboard English - ASRock 775XFire-RAID | Quick Installation Guide - Page 4
modifications of this manual occur, the updated version will be available on ASRock website without further notice. You may find the latest VGA cards and CPU support lists on ASRock website as well. ASRock website http://www.asrock.com 1.1 Package Contents ASRock 775XFire-RAID Motherboard (ATX Form - ASRock 775XFire-RAID | Quick Installation Guide - Page 5
PS/2 Mouse Port - 1 x PS/2 Keyboard Port - 1 x Serial Port: COM1 - 1 x Parallel Port (ECP/EPP Support) - 4 x Ready-to-Use USB 2.0 Ports - 1 x RJ-45 Port - Audio Jack: Side Speaker/Rear Speaker/Central Bass/Line in/Front Speaker/Microphone (see CAUTION 6) English 5 ASRock 775XFire-RAID Motherboard - ASRock 775XFire-RAID | Quick Installation Guide - Page 6
Sensing - Chassis Temperature Sensing - CPU Overheat Shutdown to Protect CPU Life - CPU Fan Tachometer - Chassis Fan Tachometer - CPU Quiet Fan - Voltage Monitoring: +12V, +5V, +3.3V, Vcore - Microsoft® Windows® 2000/XP/XP 64-bit compliant - FCC, CE, WHQL English 6 ASRock 775XFire-RAID Motherboard - ASRock 775XFire-RAID | Quick Installation Guide - Page 7
modes. For audio output, this motherboard supports 2-channel, 4-channel, 6-channel, and 8-channel modes. Please check the table on page 3 for proper connection. 7. Power Management for USB 2.0 works fine under Microsoft® Windows® XP SP1 or SP2 / 2000 SP4. 7 ASRock 775XFire-RAID Motherboard English - ASRock 775XFire-RAID | Quick Installation Guide - Page 8
of the supported PCI Express VGA card list for AGI Express slot (PCI Express x 4), please visit our website for details. ASRock website: http://www.asrock.com/support/index.htm Note. It is not recommended to use Turbo cache PCI Express x 16 VGA cards. English 8 ASRock 775XFire-RAID Motherboard - ASRock 775XFire-RAID | Quick Installation Guide - Page 9
you insert the 775-LAND CPU into the socket, please check if the CPU surface is unclean or if there is any bent pin on the socket. Do not force to insert the CPU into the socket if above situation is found. Otherwise, the CPU will be seriously damaged. 9 ASRock 775XFire-RAID Motherboard English - ASRock 775XFire-RAID | Quick Installation Guide - Page 10
100 degrees. Step 2. Insert the 775-LAND CPU: Step 2-1. Hold the CPU by the edges where are marked with support the load plate edge, engage PnP cap with right hand thumb and peel the cap from the socket while pressing on center of PnP cap to assist in removal. 10 ASRock 775XFire-RAID Motherboard - ASRock 775XFire-RAID | Quick Installation Guide - Page 11
, the heatsink cannot be secured on the motherboard. Step 5. Step 6. Connect fan header with the CPU fan connector on the motherboard. Secure excess cable with tie-wrap to ensure cable does not interfere with fan operation or contact other components. 11 ASRock 775XFire-RAID Motherboard English - ASRock 775XFire-RAID | Quick Installation Guide - Page 12
Installation of Memory Modules (DIMM) 775XFire-RAID motherboard provides four 240-pin DDRII (Double Data Rate II) DIMM slots, and supports Dual Channel Memory Technology. For module into DDRII slot; otherwise, this motherboard and DIMM may be damaged. English 12 ASRock 775XFire-RAID Motherboard - ASRock 775XFire-RAID | Quick Installation Guide - Page 13
permanent damage to the motherboard and the DIMM if you force the DIMM into the slot at incorrect orientation. Step 3. Firmly insert the DIMM into the slot until the retaining clips at both ends fully snap back in place and the DIMM is properly seated. 13 ASRock 775XFire-RAID Motherboard English - ASRock 775XFire-RAID | Quick Installation Guide - Page 14
PCI Express expansion cards. For the information of the compatible PCI Express VGA cards, please refer to the "Supported PCI Express VGA Card List for AGI Express of Dual Graphics feature. Please refer to the table below for the correct jumper settings. 14 ASRock 775XFire-RAID Motherboard English - ASRock 775XFire-RAID | Quick Installation Guide - Page 15
Guide This motherboard supports CrossFireTM feature. CrossFireTM technology offers the most advantageous means available of combining multiple high performance Graphics supported with Windows XP with Service Pack 2; it may be supported with other OS in the future. 15 ASRock 775XFire-RAID Motherboard - ASRock 775XFire-RAID | Quick Installation Guide - Page 16
, Pin2 PCIEx1_EN5: Short Pin1, Pin2 Step 2. Connect to the system power supply. Please connect a hard disk power connector to SLI/XFIRE Power connector. It is recommended to use 500-Watt power supply or greater to perform the benefit of CrossFireTM feature. 16 ASRock 775XFire-RAID Motherboard - ASRock 775XFire-RAID | Quick Installation Guide - Page 17
standard Radeon (CrossFireTM Ready) graphics card. There are two DVI connectors on the standard Radeon (CrossFireTM Ready) graphics card. Please connect the DVI-DMS cable to the correct DVI connector; otherwise , the graphics card will not work. 17 ASRock 775XFire-RAID Motherboard English - ASRock 775XFire-RAID | Quick Installation Guide - Page 18
must have Microsoft .NET Framework installed prior to downloading and installing the CATALYST Control Center: http://www.microsoft.com/downloads/details.aspx? FamilyId=262D25E3-F589-4842-8157-034D1E7CF3A3&displaylang=en Step 9. Restart your computer. English 18 ASRock 775XFire-RAID Motherboard - ASRock 775XFire-RAID | Quick Installation Guide - Page 19
Radeon CrossFireTM Edition graphics card and one compatible standard Radeon (CrossFireTM Ready) graphics card to this motherboard but not two Radeon CrossFireTM Edition graphics cards, please as and to the owners' benefit, without intent to infringe. 19 ASRock 775XFire-RAID Motherboard English - ASRock 775XFire-RAID | Quick Installation Guide - Page 20
motherboard supports Surround Display upgrade. With the external add-on PCI Express VGA card, you can easily enjoy the benefits of Surround Display feature. For the detailed instruction, please refer to the document at the following path in the Support . English 20 ASRock 775XFire-RAID Motherboard - ASRock 775XFire-RAID | Quick Installation Guide - Page 21
instruction of your IDE device vendor for the details. Serial ATAI Connectors (SATA_0: see p.2, No. 15) (SATA_1: see p.2, No. 14) (SATA_2: see p.2, No. 12) (SATA_3: see p.2, No. 13) These four Serial ATA (SATA) connectors support on the motherboard. English 21 ASRock 775XFire-RAID Motherboard - ASRock 775XFire-RAID | Quick Installation Guide - Page 22
header is available to support 2 additional USB 2.0 ports card, or MPEG card. Front Panel Audio Header (9-pin HD_AUDIO1) (see p.2 No. 24) This is an interface for front panel audio cable that allows convenient connection and control of audio devices. English 22 ASRock 775XFire-RAID Motherboard - ASRock 775XFire-RAID | Quick Installation Guide - Page 23
connect a CPU fan cable to this connector and match the black wire to the ground pin. Please connect an ATX power supply to this connector. ATX 12V Connector Please connect an ATX 12V (4-pin ATX12V1) (see p.2 No. 2) power supply to this connector. 23 ASRock 775XFire-RAID Motherboard English - ASRock 775XFire-RAID | Quick Installation Guide - Page 24
the SATA data cable to the motherboard's SATA connector. STEP 4: Connect the other end of the SATA data cable to the SATA hard disk. It is not recommended to switch the "Configure SATA as" setting between AHCI, RAID, and IDE mode after OS installation. English 24 ASRock 775XFire-RAID Motherboard - ASRock 775XFire-RAID | Quick Installation Guide - Page 25
Swap Functions for SATA HDDs 775XFire-RAID motherboard supports Hot Plug and Hot Swap functions for SATA Devices. NOTE What is Hot Plug Function? If the SATA HDDs are NOT set for RAID configuration, it is called " still power-on and in working condition. 25 ASRock 775XFire-RAID Motherboard English - ASRock 775XFire-RAID | Quick Installation Guide - Page 26
to the mode you choose and the OS you install. You may select: "Intel(R) 82801FR SATA RAID Controller (Desktop ICH6R-Windows XP/ 2000)" for Windows XP/2000 or "Intel(R) 82801FR SATA RAID Controller (Desktop ICH6R-Windows XP64)" for Windows XP 64-bit. 26 ASRock 775XFire-RAID Motherboard English - ASRock 775XFire-RAID | Quick Installation Guide - Page 27
or "Intel(R) 82801FR SATA RAID Controller (Desktop ICH6R-Windows XP64)" for Windows XP 64-bit. 5. Finish the Windows installation and install all necessary drivers. 6. Install the Intel(R) Matrix Storage Manager software via the CD-ROM included with your motherboard or after downloading it from the - ASRock 775XFire-RAID | Quick Installation Guide - Page 28
to the mode you choose and the OS you install. You may select: "Intel(R) 82801FR SATA AHCI Controller (Desktop ICH6RWindows XP/2000)" for Windows XP/2000 or "Intel(R) 82801FR SATA AHCI Controller (Desktop ICH6R-Windows XP64)" for Windows XP 64-bit. 28 ASRock 775XFire-RAID Motherboard English - ASRock 775XFire-RAID | Quick Installation Guide - Page 29
CPU and motherboard damages caused by any improper handling. To see this Live Demo, you can run Microsoft® Media Player® to play the file. You may find this Live Demo in the motherboard's Support CD through the following path: ..\ MPEGAV \ LGA775INST.DAT 29 ASRock 775XFire-RAID Motherboard English - ASRock 775XFire-RAID | Quick Installation Guide - Page 30
30 ASRock 775XFire-RAID Motherboard - ASRock 775XFire-RAID | Quick Installation Guide - Page 31
® ® ® ® ® ® 31 ASRock 775XFire-RAID Motherboard - ASRock 775XFire-RAID | Quick Installation Guide - Page 32
- ® ® 32 ASRock 775XFire-RAID Motherboard - ASRock 775XFire-RAID | Quick Installation Guide - Page 33
33 ASRock 775XFire-RAID Motherboard - ASRock 775XFire-RAID | Quick Installation Guide - Page 34
34 ASRock 775XFire-RAID Motherboard - ASRock 775XFire-RAID | Quick Installation Guide - Page 35
35 ASRock 775XFire-RAID Motherboard - ASRock 775XFire-RAID | Quick Installation Guide - Page 36
36 ASRock 775XFire-RAID Motherboard - ASRock 775XFire-RAID | Quick Installation Guide - Page 37
37 ASRock 775XFire-RAID Motherboard - ASRock 775XFire-RAID | Quick Installation Guide - Page 38
DDRII_1 DDRII_2 DDRII_3 DDRII_4 ( )( )( )( ) (1) - - (2) - - (3) 38 ASRock 775XFire-RAID Motherboard - ASRock 775XFire-RAID | Quick Installation Guide - Page 39
39 ASRock 775XFire-RAID Motherboard - ASRock 775XFire-RAID | Quick Installation Guide - Page 40
" " 40 ASRock 775XFire-RAID Motherboard - ASRock 775XFire-RAID | Quick Installation Guide - Page 41
2.6 41 ASRock 775XFire-RAID Motherboard - ASRock 775XFire-RAID | Quick Installation Guide - Page 42
42 ASRock 775XFire-RAID Motherboard - ASRock 775XFire-RAID | Quick Installation Guide - Page 43
43 ASRock 775XFire-RAID Motherboard - ASRock 775XFire-RAID | Quick Installation Guide - Page 44
44 ASRock 775XFire-RAID Motherboard - ASRock 775XFire-RAID | Quick Installation Guide - Page 45
45 ASRock 775XFire-RAID Motherboard - ASRock 775XFire-RAID | Quick Installation Guide - Page 46
46 ASRock 775XFire-RAID Motherboard - ASRock 775XFire-RAID | Quick Installation Guide - Page 47
SATA_3 SATA_1 SATA_2 SATA_0 47 ASRock 775XFire-RAID Motherboard - ASRock 775XFire-RAID | Quick Installation Guide - Page 48
CD1 48 ASRock 775XFire-RAID Motherboard - ASRock 775XFire-RAID | Quick Installation Guide - Page 49
SLI/XFIRE_POWER1 49 ASRock 775XFire-RAID Motherboard - ASRock 775XFire-RAID | Quick Installation Guide - Page 50
50 ASRock 775XFire-RAID Motherboard - ASRock 775XFire-RAID | Quick Installation Guide - Page 51
51 ASRock 775XFire-RAID Motherboard - ASRock 775XFire-RAID | Quick Installation Guide - Page 52
52 ASRock 775XFire-RAID Motherboard - ASRock 775XFire-RAID | Quick Installation Guide - Page 53
53 ASRock 775XFire-RAID Motherboard - ASRock 775XFire-RAID | Quick Installation Guide - Page 54
54 ASRock 775XFire-RAID Motherboard - ASRock 775XFire-RAID | Quick Installation Guide - Page 55
® ® "LGA 775 CPU Installation Live Demo" 55 ASRock 775XFire-RAID Motherboard - ASRock 775XFire-RAID | Quick Installation Guide - Page 56
auf der ASRock-Website aufgelistet. ASRock-Website: http://www.asrock.com 1.1 Kartoninhalt ASRock 775XFire-RAID Motherboard (ATX-Formfaktor: 30.5 cm x 21.8 cm; 12.0 Zoll x 8.6 Zoll) ASRock 775XFire-RAID Schnellinstallationsanleitung ASRock 775XFire-RAID Support-CD (einschl. LGA 775 CPU Installation - ASRock 775XFire-RAID | Quick Installation Guide - Page 57
x PS/2 Keyboard Port - 1 x Serieller Port: COM 1 - 1 x Parallel Port (ECP/EPP Support) - 4 x Ready-to-Use USB 2.0 Ports - 1 x RJ-45 Port - Audio Jack: Side Speaker / Rear Speaker / Central/Bass / Line In / Front Speaker / Microphone (siehe VORSICHT 6) Deutsch -ASRock 775XFire-RAID Motherboard 57 - ASRock 775XFire-RAID | Quick Installation Guide - Page 58
- Systemshutdown - Drehzahlmessung für CPU-Lüfter - Drehzahlmessung für Gehäuselüfter - Spannungsüberwachung: +12V, +5V, +3.3V, Vcore Betriebssysteme - Unterstützt Microsoft® Windows® 2000 / XP / XP 64-Bit Zertifizierungen - FCC, CE, WHQL Deutsch 58 ASRock 775XFire-RAID Motherboard - ASRock 775XFire-RAID | Quick Installation Guide - Page 59
dieses Motherboards unterstützt 2-Kanal-, 4Kanal-, 6-Kanal- und 8-Kanal-Modi. Stellen Sie die richtige Verbindung anhand der Tabelle auf Seite 3 her. 7. Das Power Management für USB 2.0 arbeitet unter Microsoft® Windows® XP SP1; SP2/2000 SP4 einwandfrei. 59 ASRock 775XFire-RAID Motherboard Deutsch - ASRock 775XFire-RAID | Quick Installation Guide - Page 60
) 775-Pin Sockel Übersicht Bevor Sie die 775-Pin CPU in den Sockel sitzen, prüfen Sie bitte, ob die CPU-Oberfläche sauber ist und keine der Kontakte verbogen sind. Setzen Sie die CPU nicht mit Gewalt in den Sockel, dies kann die CPU schwer beschädigen. Deutsch 60 ASRock 775XFire-RAID Motherboard - ASRock 775XFire-RAID | Quick Installation Guide - Page 61
775-Pin Sockel 775-Pin CPU Um die CPU ordnungsgemäß einsetzen zu können, richten Sie die zwei Orientierungskerben der CPU mit den beiden Markierungen des Sockels aus. Schritt 2-3. Drücken Sie die CPU vorsichtig in vertikaler Richtung in den Sockel. 61 ASRock 775XFire-RAID Motherboard - ASRock 775XFire-RAID | Quick Installation Guide - Page 62
Schritt 2-4. Prüfen Sie, dass die CPU ordnungsgemäß im Sockel sitzt und die Orientierungskerben einwandfrei in den entsprechenden Auskerbungen sitzen. en Sie den Ladehebel. Schritt 4-3. Sichern Sie Ladehebel und Ladeplatte mithilfe des Hebelverschlusses. 62 ASRock 775XFire-RAID Motherboard Deutsch - ASRock 775XFire-RAID | Quick Installation Guide - Page 63
ordnungsgemäß am Motherboard befestigt. Schritt 5. Schließen Sie den Lüfter an den CPULüfteranschluss des Motherboards. Schritt 6. Befestigen Sie überschüssiges Kabel mit Band, um eine Störung des Lüfters oder Kontakt mit anderen Teilen zu vermeiden. Deutsch 63 ASRock 775XFire-RAID Motherboard - ASRock 775XFire-RAID | Quick Installation Guide - Page 64
2.3 Installation der Speichermodule (DIMM) Die Motherboards 775XFire-RAID bieten vier 240-pol. DDRII (Double Data Rate II) DIMM-Steckplä zulässig, DDR in einen DDRII Steckplatz zu installieren; andernfalls könnten Motherboard und DIMMs beschädigt werden. Deutsch 64 ASRock 775XFire-RAID Motherboard - ASRock 775XFire-RAID | Quick Installation Guide - Page 65
in die Steckplätze, so dass die Halteklammern an beiden Enden des Moduls einschnappen und das DIMM-Modul fest an Ort und Stelle sitzt. 65 ASRock 775XFire-RAID Motherboard Deutsch - ASRock 775XFire-RAID | Quick Installation Guide - Page 66
PCI Express-Erweiterungskarten. Für weitere Informationen bezüglich kompatibler PCI Express VGA-Karten, siehe „Liste unterstützter PCI Express VGA-Karten für AGI Express Steckplatz (PCI Express x 4)" auf Sie die Karte mit der Schraube aus Schritt 2. 66 ASRock 775XFire-RAID Motherboard Deutsch - ASRock 775XFire-RAID | Quick Installation Guide - Page 67
der Steckbrücken können Sie die Vorzüge der Dual Graphics-Funktionen genießen. In der nachstehenden Tabelle finden Sie die Windows XP mit Service Pack 2 unterstützt. Die anderen Betriebssysteme werden in der Zukunft möglicherweise auch diese Funktion unterstützen. 67 ASRock 775XFire-RAID Motherboard - ASRock 775XFire-RAID | Quick Installation Guide - Page 68
Sie die Jumper am Motherboard ein, um den AGI ExpressSteckplatz (PCI Express x 4) zu aktivieren. Schauen Sie sich die Bilder unten an, um die Jumper richtig einzustellen. Deutsch PCIEx1_EN1-4: Pol1 und Pol2 kurzschließen PCIEx1_EN5: Pol1 und Pol2 kurzschließen 68 ASRock 775XFire-RAID Motherboard - ASRock 775XFire-RAID | Quick Installation Guide - Page 69
vor. Verbinden Sie bitte einen Festplattenstromsteckverbinder mit dem SLI/XFIRE PowerAnschluss. Wir empfehlen Ihnen ein Netzteil mit 500 Watt Motherboard installieren, überspringen Sie bitte diesen Schritt.) Deutsch DVI-DMS-Kabel DMS-Anschluss DVI-Anschluss 69 ASRock 775XFire-RAID Motherboard - ASRock 775XFire-RAID | Quick Installation Guide - Page 70
üher installierten Catalyst-Treiber zu deinstallieren. Bitte besuchen Sie die folgende Website, um das Dienstprogramm herunterzuladen: http://support.ati.com/ics/support/DLRedirect.asp? fileIDExt=050553d40196ef109fff37cbb40aaf28&accountID=737&deptID=894 Deutsch 70 ASRock 775XFire-RAID Motherboard - ASRock 775XFire-RAID | Quick Installation Guide - Page 71
empfiehlt die Installation des windows XP service Pack 2 order dessen Nachfolger (Wenn Windows XP Service Pack 2 oder dessen Framework installiert werden: http://www.microsoft.com/downloads/details.aspx? FamilyId=262D25E3-F589-4842- aktivieren) an. 71 ASRock 775XFire-RAID Motherboard - ASRock 775XFire-RAID | Quick Installation Guide - Page 72
ein eingetragenes Warenzeichen der ATI Technologies Inc. und wird nur zur Identifizierung oder Erläuterung und zu Gunsten des Inhabers, ohne Rechtverletzungsabsicht, verwendet. Deutsch 72 ASRock 775XFire-RAID Motherboard - ASRock 775XFire-RAID | Quick Installation Guide - Page 73
BIOS-Parameter. Um die Systemparameter zu löschen und auf die Werkseinstellung zurückzusetzen, schalten Sie bitte den Computer ab und entfernen das Stromkabel. Benutzen Sie eine Jumperkappe, um die Pins an CLRCMOS1 für 3 Sekunden kurzzuschließen. Deutsch 73 ASRock 775XFire-RAID Motherboard - ASRock 775XFire-RAID | Quick Installation Guide - Page 74
diese Header und Anschlüsse. Wenn Sie Jumperkappen auf Header und Anschlüsse setzen, wird das Motherboard unreparierbar beschädigt! Anschluss für das Floppy-Laufwerk (33-Pin FLOPPY1) (siehe S.2 - No am Mainboard verbinden. SATA_3 SATA_1 SATA_2 SATA_0 Deutsch 74 ASRock 775XFire-RAID Motherboard - ASRock 775XFire-RAID | Quick Installation Guide - Page 75
, drahtloses Sendeund Empfangs-Infrarotmodul. Interne Audio-Anschlüsse (4-Pin CD1) (CD1: siehe S.2 - No. 32) CD1 Diese ermöglichen Ihnen Stereo-Signalquellen, wie z. B. CD-ROM, DVD-ROM, TV-Tuner oder MPEG-Karten mit Ihrem System zu verbinden. Deutsch 75 ASRock 775XFire-RAID Motherboard - ASRock 775XFire-RAID | Quick Installation Guide - Page 76
-Audioleiste angeschlossen werden. D. Rufen Sie das BIOS-Setup-Dienstprogramm auf. Wechseln Sie zu Erweiterte Windows-System auf. Klicken Sie auf das Symbol in der Taskleiste unten rechts, um den Realtek HD Audio-Manager aufzurufen. Klicken Sie auf "Audio Deutsch 76 ASRock 775XFire-RAID Motherboard - ASRock 775XFire-RAID | Quick Installation Guide - Page 77
Motherboard angeschlossen sind, verbinden Sie diesen Anschluss bitte mit einem Festplatten-Stromversorgungsstecker. Game-Anschluss (15-pin GAME1) (siehe S.2 - No. 23) Verbinden Sie ein Game-Kabel mit diesem Anschluss, wenn der Game-Anschlusshalter installiert ist. Deutsch 77 ASRock 775XFire-RAID - ASRock 775XFire-RAID | Quick Installation Guide - Page 78
RAID1 eingebaut sind, werden sie "HotSwap" genannt: Ein Einfügen und Entfernen von SATA-Festplatten, während das System in Betrieb ist und einwandfrei läuft. 78 ASRock 775XFire-RAID Motherboard Deutsch - ASRock 775XFire-RAID | Quick Installation Guide - Page 79
der Support-CD hinsichtlich der richtigen Komfiguration nachlesen. Bitte lesen Sie dazu das Dokument „Anleitung zur SATAFestplatteninstallation und RAID-Konfiguration", das sich in folgendem Ordner auf der Support-CD befindet: .. \ RAID Installation Guide 79 ASRock 775XFire-RAID Motherboard Deutsch - ASRock 775XFire-RAID | Quick Installation Guide - Page 80
die F6-Taste zur Installation eines Drittanbieter-SCSI- oder RAID-Treibers. Legen Sie die Diskette mit dem Intel RAID-Treiber ein, wenn Sie dazu aufgefordert werden. Nach dem Einlesen der Diskette wid der entsprechende Treiber angezeigt. Wählen Sie den zu 80 ASRock 775XFire-RAID Motherboard Deutsch - ASRock 775XFire-RAID | Quick Installation Guide - Page 81
Ihr System neu. Wenn Sie zu einem RAID 0-Volume migriert haben, benutzen Sie die Datenträgerverwaltung von Windows zum Partitionieren und Formatieren des freien Speicherplatzes, der durch die Kombination der beiden Festplatten entstanden ist. Sie können 81 ASRock 775XFire-RAID Motherboard Deutsch - ASRock 775XFire-RAID | Quick Installation Guide - Page 82
Sie den zu installierenden Treiber passend zum gewünschten Modus und zum Betriebssystem. Sie können wählen: "Intel(R) 82801FR SATA AHCI Controller (Desktop ICH6R-Windows XP/ 2000)" oder "Intel(R) 82801FR SATA AHCI Controller (Desktop ICH6R-Windows XP64)". 82 ASRock 775XFire-RAID Motherboard Deutsch - ASRock 775XFire-RAID | Quick Installation Guide - Page 83
der CPU oder Motherboards durch unsachgemäße Handhabung zu verringern. Öffnen Sie die Datei mit Microsoft Media Player, um das Live-Demo anzusehen. Sie finden das Live-Demo auf der Motherboard Support-CD in folgendem Verzeichnis: ..\ MPEGAV \ LGA775INST.DAT 83 ASRock 775XFire-RAID Motherboard - ASRock 775XFire-RAID | Quick Installation Guide - Page 84
les listes de prise en charge des cartes VGA et CPU également sur le site Web ASRock. Site web ASRock, http://www.asrock.com 1.1 Contenu du paquet Carte mère ASRock 775XFire-RAID (Facteur de forme ATX : 12.0 pouces x 8.6 pouces, 30.5 cm x 21.8 cm) Guide d'installation rapide ASRock 775XFire-RAID CD - ASRock 775XFire-RAID | Quick Installation Guide - Page 85
x port série: COM 1 - 1 x port parallèle: Support ECP/EPP - 4 x ports USB 2.0 par défaut - 1 x port RJ-45 - Prise Audio: Haut-parleur latéral / Haut-parleur arrière / Central /Basses / Entrée Ligne / Haut-parleur frontal / Microphone (voir ATTENTION 6) Français 85 ASRock 775XFire-RAID Motherboard - ASRock 775XFire-RAID | Quick Installation Guide - Page 86
re - Coupure du CPU en cas de surchauffe afin de protéger la durée de vie du CPU - Tachéomètre ventilateur CPU - Tachéomètre ventilateur châssis - Monitoring de la tension: +12V, +5V, +3.3V, Vcore - Microsoft® Windows® 2000/XP/XP 64-bit - FCC, CE, WHQL Français 86 ASRock 775XFire-RAID Motherboard - ASRock 775XFire-RAID | Quick Installation Guide - Page 87
mère supporte les modes 2-canaux, 4-canaux, 6-canaux et 8-canaux. Veuillez vous référer au tableau en page 3 pour effectuer la bonne connexion. 7. La gestion de l'alimentation pour l'USB 2.0 fonctionne bien sous Microsoft® Windows® XP SP1; SP2/2000 SP4. 87 ASRock 775XFire-RAID Motherboard Français - ASRock 775XFire-RAID | Quick Installation Guide - Page 88
processeur 775 broches : Etape 2-1. Tenez le processeur par ses bords là où se trouvent des lignes noires. Etape 2-2. Orientez le paquet avec le dissipateur thermique intégré (IHS) vers le haut. Repérez la broche 1 et les deux encoches d'orientation. 88 ASRock 775XFire-RAID Motherboard Ligne noire - ASRock 775XFire-RAID | Quick Installation Guide - Page 89
775 broches Socket 775 broches Pour une insertion correcte, veuillez vérifier que vous faites bien correspondre les deux encoches d'orientation sur le processeur avec les deux détrompeurs du socket renvoyez la carte mère pour service après vente. Français Etape ASRock 775XFire-RAID Motherboard - ASRock 775XFire-RAID | Quick Installation Guide - Page 90
reporter aux manuels d'instructions de votre ventilateur du dissipateur thermique pour un processeur 775 broches. (Appliquez le matériau mère) Etape 2. Placez le dissipateur thermique sur le socket. Vérifiez que les câbles du ventilateur sont orient ASRock 775XFire-RAID Motherboard Français - ASRock 775XFire-RAID | Quick Installation Guide - Page 91
modules m émoire [DIMM] La carte mère 775XFire-RAID dispose de quatre emplacements DIMM DDRII (Double Data Rate II) de 240-broches, et supporte la Technologie de Mémoire à Canal Double. Pour ; la carte mère et les DIMM pourraient être endommagés. Français 91 ASRock 775XFire-RAID Motherboard - ASRock 775XFire-RAID | Quick Installation Guide - Page 92
jusqu'à ce que les clips de maintien situés aux deux extrémités se ferment complètement et que le module DIMM soit inséré correctement. 92 ASRock 775XFire-RAID Motherboard - ASRock 775XFire-RAID | Quick Installation Guide - Page 93
Pour les informations concernant les cartes PCI Express VGA compatibles, veuillez vous reporter à la "Liste des cartes PCI Express VGA prises en charge pour l'emplacement AGI Express (PCI Express x 4)" 4. Fixez la carte sur le châssis à l'aide d'une vis. 93 ASRock 775XFire-RAID Motherboard Français - ASRock 775XFire-RAID | Quick Installation Guide - Page 94
avantage de la fonctionnalité Dual Graphics. Veuillez vous reporter à la 2.6 Guide de Fonctionnement CrossFireTM Cette carte mère supporte la fonction Windows XP avec le Service Pack 2; elle sera compatible avec d'autres systèmes d'exploitation dans le futur. 94 ASRock 775XFire-RAID Motherboard - ASRock 775XFire-RAID | Quick Installation Guide - Page 95
sur le marché à l'avenir, veuillez vous reporter aux manuels de cartes graphiques d'ATI pour le guide d'installation détaillé. Etape 1. Réglez les cavaliers sur la carte mère pour activer le slot AGI 2 PCIEx1_EN5: Court-circuiter la broche 1 et la broche 2 95 ASRock 775XFire-RAID Motherboard - ASRock 775XFire-RAID | Quick Installation Guide - Page 96
me. Veuillez connecter un connecteur d'alimentation pour disque dur sur le connecteur d'alimentation SLI/XFIRE. Il est recommandé d'utiliser une alimentation d'une puissance de 500-Watts ou plus étape.) Français Câble DVI-DMS Connecteur DMS Connecteur DVI 96 ASRock 775XFire-RAID Motherboard - ASRock 775XFire-RAID | Quick Installation Guide - Page 97
désinstaller les pilotes Catalyst précédemment installés avant l'installation. Veuillez visiter ce site web pour obtenir le pilote: http://support.ati.com/ics/support/DLRedirect.asp? fileIDExt=050553d40196ef109fff37cbb40aaf28&accountID=737&deptID=894 97 ASRock 775XFire-RAID Motherboard Français - ASRock 775XFire-RAID | Quick Installation Guide - Page 98
ATI: A. ATI recommande d'installer Windows XP Service Pack 2 ou plus (Si vous avez déja installé Windows XP Service Pack 2 ou plus sur votre CATALYST Control Center: http://www.microsoft.com/downloads/details.aspx? FamilyId=262D25E3-F589-4842-8157034D1E7CF3A3& ASRock 775XFire-RAID Motherboard - ASRock 775XFire-RAID | Quick Installation Guide - Page 99
Technologies Inc., et est utilisé uniquement à des fins d'identification ou d'explication et pour les bénéfices de l'utilisateur sans aucune intention de violation. Français 99 ASRock 775XFire-RAID Motherboard - ASRock 775XFire-RAID | Quick Installation Guide - Page 100
supporte la mise à niveau de Surround Display. Avec la carte externe d'extension VGA PCI Express, vous pouvez facilement jouir des avantages de la caractéristique de l'affichage Surround. Pour les instructions avant après avoir restauré le CMOS. 100 ASRock 775XFire-RAID Motherboard Français - ASRock 775XFire-RAID | Quick Installation Guide - Page 101
disque dur Câble ATA 66/100 80 conducteurs Note: Veuillez vous reporter aux instructions du fabricant de votre IDE périphérique pour les détails. Connecteurs Série SATA sur le connecteur d'alimentation de l'unité d'alimentation électrique. ASRock 775XFire-RAID Motherboard 101 Français - ASRock 775XFire-RAID | Quick Installation Guide - Page 102
est capable de supporter 2 ports USB 2.0 supplémentaires. Cet en-tête supporte un module infrarouge instructions dans notre manuel et le manuel de châssis afin installer votre système. 2. Si vous utilisez le panneau audio AC'97, installez-le sur l'adaptateur audio du ASRock 775XFire-RAID Motherboard - ASRock 775XFire-RAID | Quick Installation Guide - Page 103
audio AC'97. D. Entrer dans l'utilitaire de configuration du BIOS. Saisir les Paramètres avancés puis sélectionner Configuration du jeu de puces. Définir l'option panneau de commande de [Auto] à [Activé]. E. Entrer dans le système Windows entête. Français ASRock 775XFire-RAID Motherboard 103 - ASRock 775XFire-RAID | Quick Installation Guide - Page 104
12V (ATX12V1 br.4) (voir p.2 No. 2) Connecteur d'alimentation SLI/XFIRE (SLI/XFIRE_POWER1 br. 31) (voir p.2 No. 31) SLI/ ") pour les Disques Durs SATA La Carte Mère 775XFire-RAID supporte la fonction "Hot Plug" pour les périphériques SATA. 104 ASRock 775XFire-RAID Motherboard Français - ASRock 775XFire-RAID | Quick Installation Guide - Page 105
toutes les données qui s'y trouvent ! Commencer à formater et à copier les fichiers [Y/N].) Veuillez insérez une disquette dans le lecteur de disquette, et appuyer sur . ASRock 775XFire-RAID Motherboard 105 Français - ASRock 775XFire-RAID | Quick Installation Guide - Page 106
pour le passage au niveau RAID 0 ou RAID 1 à une date ultérieure à l'aide de la fonction de migration de niveau RAID de la technologie de mémoire matricielle d'Intel. Les étapes suivantes décrivent la manière de construire un système Intel «RAID Ready». 106 ASRock 775XFire-RAID Motherboard - ASRock 775XFire-RAID | Quick Installation Guide - Page 107
2. Lancez Windows, installez le RAID à partir du lecteur de disque dur existant ») dans le menu Action. Cela activera l'assistant Créer un volume RAID à partir du lecteur de disque dur existant. Cliquez sur les boîtes de dialogues lorsque vous y êtes invité. Il est ASRock 775XFire-RAID Motherboard - ASRock 775XFire-RAID | Quick Installation Guide - Page 108
le système d'exploitation Windows 2000 / XP / XP 64 bits sur votre système. Après avoir configuré le BIOS, vous pouvez commencer à installer Windows 2000 / XP / XP Windows XP/2000)" ou "Intel 82801FR SATA AHCI Controller (Desktop ICH6R-Windows XP64)" . Français 108 ASRock 775XFire-RAID Motherboard - ASRock 775XFire-RAID | Quick Installation Guide - Page 109
le BIOS, veuillez consulter le Guide de l'utilisateur (fichier PDF) dans le CD technique. 4. Informations sur le CD de support Cette carte mère supporte divers systèmes d'exploitation Microsoft Windows: d'accès suivant : ..\ MPEGAV \ LGA775INST.DAT Français ASRock 775XFire-RAID Motherboard 109 - ASRock 775XFire-RAID | Quick Installation Guide - Page 110
775XFire-RAID (compreso il demo installazione CPU LGA 775 ) Un cavo IDE 80-pin Ultra ATA 66/100 Un cavo per floppy drive a 1,44 Mb Un cavo dati Serial ATA (SATA) (Opzionale) Un cavo alimentatore HDD Serial ATA (SATA) (Opzionale) Un HD 8CH I/O Shield Italiano 110 ASRock 775XFire-RAID Motherboard - ASRock 775XFire-RAID | Quick Installation Guide - Page 111
: COM 1 - 1 x Porta parallela: supporto ECP/EPP - 4 x porte USB 2.0 già integrate - 1 x Porta RJ-45 - Connettore Audio: cassa laterale / cassa posteriore / cassa centrale / bassi / ingresso linea / cassa frontale / microfono (vedi ATTENZIONE 6) Italiano ASRock 775XFire-RAID Motherboard 111 - ASRock 775XFire-RAID | Quick Installation Guide - Page 112
la CPU - Indicatore di velocità per la ventola del processore - Indicatore di velocità per la ventola di raffreddamento - Voltaggio: +12V, +5V, +3.3V, Vcore Compatibi- - Microsoft® Windows® 2000/XP/XP 64 bit lità SO Certificazioni- FCC, CE, WHQL Italiano 112 ASRock 775XFire-RAID Motherboard - ASRock 775XFire-RAID | Quick Installation Guide - Page 113
del Manuale dell ventolina CPU della Express VGA supportate dall' audio. Controllare la tavola a pagina 3 per eseguire il collegamento appropriato. 7. La Gestione Risorse per USB 2.0 funziona perfettamente con Microsoft® Windows® XP SP1; SP2/2000 SP4. Italiano ASRock 775XFire-RAID Motherboard - ASRock 775XFire-RAID | Quick Installation Guide - Page 114
. 5. Nell'usare i giraviti per fissare la scheda madre al telaio non serrare eccessivamente le viti! Altrimenti si rischia di danneggiare la scheda madre. Italiano 114 ASRock 775XFire-RAID Motherboard - ASRock 775XFire-RAID | Quick Installation Guide - Page 115
gradi la leva di carico per aprirla completamente. Fase 1-3. Ruotare di circa 100 gradi la piastra di carico per aprirla completamente. Fase 2. Inserire la CPU 775-Pin: Fase 2-1. Tenere la CPU dai bordi segnati con linee nere. Linea nera Linea nera Italiano ASRock 775XFire-RAID Motherboard 115 - ASRock 775XFire-RAID | Quick Installation Guide - Page 116
di orientamento Pin1 Dente di Tacca di allineamento orientamento Tacca di allineamento CPU da 775-Pin Socket da 775-Pin Per il corretto inserimento, verificare di far combaciare i due denti la leva di carico mentre si preme leggermente sulla piastra di carico. ASRock 775XFire-RAID Motherboard - ASRock 775XFire-RAID | Quick Installation Guide - Page 117
di alimentazione della ventola al connettore ventola della CPU sulla scheda madre. fissare il cavo in eccesso con fascette per assicurare che il cavo non interferisca con il funzionamento della ventola o che venga a contatto con gli altri componenti. ASRock 775XFire-RAID Motherboard 117 Italiano - ASRock 775XFire-RAID | Quick Installation Guide - Page 118
2.3 Installazione dei moduli di memoria (DIMM) La scheda madre 775XFire-RAID fornisce quattro alloggiamenti DIMM DDRII (Double Data Rate II) a 240 pin, e supporta la slot DDRII, altrimenti si possono danneggiare questa scheda madre e la DIMM. Italiano 118 ASRock 775XFire-RAID Motherboard - ASRock 775XFire-RAID | Quick Installation Guide - Page 119
la DIMM nello slot fino a far scattare completamente in posizione i fermagli di ritegno alle due estremità e fino ad installare correttamente la DIMM nella sua sede. ASRock 775XFire-RAID Motherboard 119 Italiano - ASRock 775XFire-RAID | Quick Installation Guide - Page 120
solamente l'alloggio AGI Express (PCI Express x 4). In altre parole, si possono regolare i jumper per godere dei benefici della funzione Dual Graphics. Si prega di fare riferimento alla tavola che segue per le corrette impostazioni dei jumper. 120 ASRock 775XFire-RAID Motherboard Italiano - ASRock 775XFire-RAID | Quick Installation Guide - Page 121
CrossFireTM offre i mezzi più vantaggiosi per combinare più GPU (Graphics Processing Unit) ad altre prestazioni in un singolo PC. Combinando una è supportata solo da Windows XP con Service Pack 2; in futuro potrebbe essere supportata da altri sistemi operativi. ASRock 775XFire-RAID Motherboard 121 - ASRock 775XFire-RAID | Quick Installation Guide - Page 122
mercato da ATI, o che immetterò sul mercato in futuro, fare riferimento al manuale della scheda video ATI per una guida dettagliata all'installazione. Regolare i jumper di questa 122 PCIEx1_EN1-4: Cortocircuitare Pin1 e Pin2 PCIEx1_EN5: Cortocircuitare Pin1 e Pin2 ASRock 775XFire-RAID Motherboard - ASRock 775XFire-RAID | Quick Installation Guide - Page 123
alimentazione. Collegare un connettore d'alimentazione disco rigido al connettore alimentazione SLI/XFIRE. Si raccomanda di usare alimentatori 500-Watt o superiori per beneficiare , saltare questo punto.) Italiano Cavo DVI-DMS Connettore DMS Connettore DVI ASRock 775XFire-RAID Motherboard 123 - ASRock 775XFire-RAID | Quick Installation Guide - Page 124
i driver Catalyst installati in precedenza, prima di eseguire l'installazione. Visitare il seguente sito per scaricare i driver: http://support.ati.com/ics/support/DLRedirect.asp? fileIDExt=050553d40196ef109fff37cbb40aaf28&accountID=737&deptID=894 Italiano 124 ASRock 775XFire-RAID Motherboard - ASRock 775XFire-RAID | Quick Installation Guide - Page 125
VGA sul sistema e riavviare il computer. Quindi sul desktop si troverà l'icona "ATI Catalyst Control Center" (la e versione del driver ATI Catalyst deve essere 5.10 o superiore). t Sul desktop si troverà l'icona "ATI Catalyst Control Center". Italiano ASRock 775XFire-RAID Motherboard 125 - ASRock 775XFire-RAID | Quick Installation Guide - Page 126
è un marchio registrato della ATI Technologies Inc., ed è usato solamente a scopo identificativo o esplicativo a beneficio del proprietario, senza alcuna intenzione di violare i diritti d'autore. Italiano 126 ASRock 775XFire-RAID Motherboard - ASRock 775XFire-RAID | Quick Installation Guide - Page 127
computer e scollegare l'alimentatore, poi collegare il jumper sul CLRCMOS1 per 3 secondi. Per favore ricordarsi di rimuovere il jumper cap dopo la pulizia della CMOS. Italiano ASRock 775XFire-RAID Motherboard 127 - ASRock 775XFire-RAID | Quick Installation Guide - Page 128
) Entrambe le estremità del cavo dati SATA possono collegarsi all'hard disk SATA o al connettore SATA sulla scheda madre. SATA_3 SATA_1 SATA_2 SATA_0 Italiano 128 ASRock 775XFire-RAID Motherboard - ASRock 775XFire-RAID | Quick Installation Guide - Page 129
moduli ad infrarossi optional per la trasmissione e la ricezione senza fili. Connettori audio interni (4-pin CD1) (CD1: vedi p.2 Nr. 32) CD1 Permettono di ricevere input stereo audio da fonti di suono come CD-ROM, DVD ROM,TV tuner, o schede MPEG. Italiano ASRock 775XFire-RAID Motherboard 129 - ASRock 775XFire-RAID | Quick Installation Guide - Page 130
ventolina CPU (4-pin CPU_FAN1) (vedi p.2 Nr. 6) Collegare il cavo della ventolina telaio a questo connettore e far combaciare il filo nero al pin terra. Collegare il cavo della ventolina CPU a questo connettore e far combaciare il filo nero al pin terra. 130 ASRock 775XFire-RAID Motherboard - ASRock 775XFire-RAID | Quick Installation Guide - Page 131
alimentazione SLI/XFIRE (4-pin SLI motherboard. 4° PASSO: Collegare l'altra estremità del cavo dati SATA all'hard disk SATA. Non si consiglia di cambiare l'impostazione "Configure SATA as" (Configura SATA come) sul modo AHCI, RAID e IDE dopo l'installazione OS. ASRock 775XFire-RAID Motherboard - ASRock 775XFire-RAID | Quick Installation Guide - Page 132
selezione dei dispositivi boot. Scegliere CD-ROM come dispositivo di boot . C. Quando sullo schermo compare il messaggio: "Do you want to generate Serial ATA driver diskette [Y/N]?" (Vuoi creare un dischetto di driver Serial ATA [Y/ N]?), premere . 132 ASRock 775XFire-RAID Motherboard Italiano - ASRock 775XFire-RAID | Quick Installation Guide - Page 133
alla documentazione nel CD di supporto, "Guide to Intel Matrix Storage Manager" (Guida alla gestione archivi Intel Matrix), che si trova sul seguente percorso: .. \ Intel Matrix Storage Manager Information (Informazioni gestione archivi Intel Matrix) Italiano ASRock 775XFire-RAID Motherboard 133 - ASRock 775XFire-RAID | Quick Installation Guide - Page 134
. 2. Avviare Windows, installare il software Intel Matrix Storage Manager, se non si trova installato con il pacchetto installativo del CD-ROM o scaricandolo da Internet. In tal modo, si installa Intel Storage Utility e si avviano i collegamenti al 1 3 4 menu. ASRock 775XFire-RAID Motherboard - ASRock 775XFire-RAID | Quick Installation Guide - Page 135
il driver. Selezionare il driver da installare in base al modo scelto e l'OS installato. Si può selezionare: "Intel 82801FR SATA AHCI Controller (Desktop ICH6R-Windows XP/2000)" o "Intel 82801FR SATA AHCI Controller (Desktop ICH6R-Windows XP64) ". 135 ASRock 775XFire-RAID Motherboard Italiano - ASRock 775XFire-RAID | Quick Installation Guide - Page 136
volte per visualizzare i menù. "LGA 775 CPU Installation Live Demo" Questa scheda madre è dotata di socket Intel LGA 775, si tratta di una nuova interfaccia socket per CPU rilasciata da Intel. Poichè è seguente indirizzo: ..\ MPEGAV \ LGA775INST.DAT Italiano 136 ASRock 775XFire-RAID Motherboard - ASRock 775XFire-RAID | Quick Installation Guide - Page 137
LGA 775) Una cinta de datos IDE de conducción 80 Ultra ATA 66/100 Una cinta de datos para una unidad de disco de 3,5" Un Cable de Datos Serial ATA (SATA) (Opcional) Un cable serie ATA (SATA) de alimentación de disco duro (Opcional) Una protección HD 8CH I/O Español ASRock 775XFire-RAID Motherboard - ASRock 775XFire-RAID | Quick Installation Guide - Page 138
serial: COM 1 - 1 x puerto paralelo: soporta ECP/EPP - 4 x puertos USB 2.0 predeterminados - 1 x puerto RJ-45 - Conexión de audio: Altavoz lateral / Altavoz trasero / Central/Bajos / Entrada de línea / Altavoz frontal / Micrófono (ver ATENCIÓN 6) Español 138 ASRock 775XFire-RAID Motherboard - ASRock 775XFire-RAID | Quick Installation Guide - Page 139
procesador para proteger el procesador - Taquímetros de los ventiladores del procesador y del chasis - Monitor de Voltaje: +12V, +5V, +3.3V, Vcore - En conformidad con Microsoft® Windows® 2000/XP/XP 64 bits - FCC, CE, WHQL Español ASRock 775XFire-RAID Motherboard 139 - ASRock 775XFire-RAID | Quick Installation Guide - Page 140
audio, este placa madre ofrece soporte para modos de 2 canales, 4 canales, 6 canales y 8 canales. Consulte la tabla en la página 3 para una conexión correcta. 7. Power Management para USB 2.0 funciona bien bajo Microsoft® Windows® XP SP1; SP2/2000 SP4. Español 140 ASRock 775XFire-RAID Motherboard - ASRock 775XFire-RAID | Quick Installation Guide - Page 141
de 775 agujas en el socket, compruebe que la superficie de la CPU se encuentra limpia y no hay ninguna aguja torcida en el socket. No introduzca la CPU en el socket por la fuerza si se produce la situación anterior. Si lo hace, puede producir daños graves en la CPU. ASRock 775XFire-RAID Motherboard - ASRock 775XFire-RAID | Quick Installation Guide - Page 142
CPU coinciden con las teclas de alineación del socket. 142 Step 2-3. Coloque con cuidado la CPU en el socket con un movimiento totalmente vertical. Step 2-4. Compruebe que la CPU se encuentra en el socket y la orientación coincide con la indicada por las muescas. ASRock 775XFire-RAID Motherboard - ASRock 775XFire-RAID | Quick Installation Guide - Page 143
la CPU. A continuación se ofrece un ejemplo para ilustrar la instalación del disipador para la CPU de 775 agujas. (Aplique el material termal de interfaz) Paso 1. Aplique el material termal de interfaz en el centro del IHS de la superficie del socket. Español ASRock 775XFire-RAID Motherboard - ASRock 775XFire-RAID | Quick Installation Guide - Page 144
cabezal del ventilador con el conector del ventilador de la CPU en la placa madre. Fije el cable que sobre con un lazo para asegurarse de que el cable no interfiere en el funcionamiento del ventilador y tampoco entra en contacto con otros componentes. Español 144 ASRock 775XFire-RAID Motherboard - ASRock 775XFire-RAID | Quick Installation Guide - Page 145
2.3 Instalación de Memoria La placa 775XFire-RAID ofrece cuatro ranuras DIMM DDRII de 240 pines, y soporta Tecnología de Memoria de Doble Canal. Para la la ranura DDRII; si lo hace, esta placa base y los módulos DIMM pueden resultar dañados. Español ASRock 775XFire-RAID Motherboard 145 - ASRock 775XFire-RAID | Quick Installation Guide - Page 146
de la ranura hasta que los clips de sujeción de ambos lados queden completamente introducidos en su sitio y la DIMM se haya asentado apropiadamente. 146 ASRock 775XFire-RAID Motherboard Español - ASRock 775XFire-RAID | Quick Installation Guide - Page 147
, 2 ranura PCI Express y 1 ranura AGI Express (PCI Express x 4) sobre las placas mardres 775XFire-RAID. Ranuras PCI: Para instalar tarjetas de expansión que tienen 32-bit Interface PCI. Ranura PCI Express . Paso 4. Asegure la tarjeta con tornillos. Español ASRock 775XFire-RAID Motherboard 147 - ASRock 775XFire-RAID | Quick Installation Guide - Page 148
Dual Graphics Esta placa 1_EN3 PCIE x 1_EN2 PCIE x 1_EN1 PCIE x 1_EN5 Español 2.6 Manual de Uso de CrossFireTM Esta placa madre soporta la función CrossFireTM. La Windows XP con Service Pack 2; podrá ser soportado por otros sistemas operativos en el futuro. 148 ASRock 775XFire-RAID Motherboard - ASRock 775XFire-RAID | Quick Installation Guide - Page 149
que han sido lanzados por ATI o que serán lanzadas en el futuro, por favor, consulte su manual de tarjeta de gráficos ATI para una guía de instalación detallada. Paso 1. Ajuste los puentes Español PCIEx1_EN1-4: Pin corto 1, Pin2 PCIEx1_EN5: Pin corto 1, Pin2 ASRock 775XFire-RAID Motherboard 149 - ASRock 775XFire-RAID | Quick Installation Guide - Page 150
. Por favor, conecte un conector de alimentación del disco duro al conector de alimentación SLI/XFIRE. Se recomienda usar una fuente de alimentación de 500 vatios o superior para beneficiarse de la funci paso). Español 150 Cable DVI-DMS Conector DMS Conector DVI ASRock 775XFire-RAID Motherboard - ASRock 775XFire-RAID | Quick Installation Guide - Page 151
Catalyst previamente instalado antes de empezar la instalación. Por favor, visite este sitio web para conseguir el controlador. http://support.ati.com/ics/support/DLRedirect.asp? fileIDExt=050553d40196ef109fff37cbb40aaf28&accountID=737&deptID=894 Español ASRock 775XFire-RAID Motherboard 151 - ASRock 775XFire-RAID | Quick Installation Guide - Page 152
" en su escritorio (El controlador ATI Catalyst debería ser la versión 5.10 ó superior). Podrá encontrar "ATI Catalyst Control Center" en su escritorio. Español 152 ASRock 775XFire-RAID Motherboard - ASRock 775XFire-RAID | Quick Installation Guide - Page 153
registrada de ATI Technologies, Inc., y se usa sólo para identificación o explicación y para el beneficio de los propietarios, sin intención de infringir sus derechos. Español ASRock 775XFire-RAID Motherboard 153 - ASRock 775XFire-RAID | Quick Installation Guide - Page 154
CLRCMOS1 por más que 3 segundos usando un jumper cap. Por favor acuérdase de quitar el jumper cap después de limpiar el COMS. Español 154 ASRock 775XFire-RAID Motherboard - ASRock 775XFire-RAID | Quick Installation Guide - Page 155
/s. Cable de datos de serie ATA (SATA) Ambos extremos del cable pueden conectarse al disco duro SATA o la conexión de la placa base. Español ASRock 775XFire-RAID Motherboard 155 - ASRock 775XFire-RAID | Quick Installation Guide - Page 156
cabezal soporta un módulo infrarrojos de transmisión y recepción wireless opcional. Conector de audio interno (4-pin CD1) (CD1: vea p. 2, N. 32) CD1 Permite recepción de input audio de fuente sónica como CDROM, DVD-ROM, TV tuner, o tarjeta MPEG. Español 156 ASRock 775XFire-RAID Motherboard - ASRock 775XFire-RAID | Quick Installation Guide - Page 157
a este conector y haga coincidir el cable negro con el conector de tierra. Conector del ventilador de la CPU (4-pin CPU_FAN1) (vea p.2, N. 6) Conecte el cable del ventilador de la CPU a este conector y haga coincidir el cable negro con el conector de tierra. ASRock 775XFire-RAID Motherboard 157 - ASRock 775XFire-RAID | Quick Installation Guide - Page 158
cabezal. Conector ATX de 12 V (4-pin ATX12V1) (vea p.2, N. 2) Conector de alimentaciónSLI/XFIRE (4-pin SLI/XFIRE_POWER1) (vea p.2, N. 31) Conexión de juegos (15-pin GAME1) (ver SATA como) entre los modos AHCI, RAID, e IDE después de la instalación del SO. ASRock 775XFire-RAID Motherboard - ASRock 775XFire-RAID | Quick Installation Guide - Page 159
RAID Si desea instalar el sistema operativo Windows 2000 / Windows XP / Windows XP-64bit en su sistema con funciones RAID, siga los pasos siguientes. PASO 1: Configuración de la BIOS. A. Entre en BIOS generate Serial ATA driver diskette [Y/N]?" ("Desea ASRock 775XFire-RAID Motherboard 159 Español - ASRock 775XFire-RAID | Quick Installation Guide - Page 160
"RAID Installation Guide" para establecer la configuración RAID. Antes de comenzar a configurar la función RAID, Windows, instale de nuevo los controladores SATA del CD de soporte de forma que "Intel Matrix Storage Manager" se instale también en su sistema. 160 ASRock 775XFire-RAID Motherboard - ASRock 775XFire-RAID | Quick Installation Guide - Page 161
la migración. 2. Inicie Windows, instale el programa Intel Matrix Storage Manager, si no se encuentra instalado ya, utilizando el paquete deinstalación que se incluye en el CD-ROM o desde Internet. Así se instalará Intel Storage Utility y se iniciarán los ASRock 775XFire-RAID Motherboard 161 - ASRock 775XFire-RAID | Quick Installation Guide - Page 162
elimine este paso. PASO 3: Instale Windows 2000 / XP / XP 64 bits en su sistema. Tras configurar la BIOS, puede comenzar a instalar Windows 2000 / XP / XP 64 bits -Windows XP/ 2000)" o "Intel 82801FR SATA AHCI Controller (Desktop ICH6R-Windows XP64)". 162 ASRock 775XFire-RAID Motherboard - ASRock 775XFire-RAID | Quick Installation Guide - Page 163
los riesgos de daño a la CPU por un uso inadecuado. Para ver esta demo, puede utilizar Microsoft Media Player para reproducir el archivo. Esta demo se encuentra en el CD de soporte de la placa madre, en la siguiente ruta: ..\ MPEGAV \ LGA775INST.DAT Español ASRock 775XFire-RAID Motherboard 163
-
 1
1 -
 2
2 -
 3
3 -
 4
4 -
 5
5 -
 6
6 -
 7
7 -
8
-
9
-
10
-
11
-
12
-
13
-
14
-
15
-
16
-
17
-
18
-
19
-
20
-
21
-
22
-
23
-
24
-
25
-
26
-
27
-
28
-
29
-
30
-
31
-
32
-
33
-
34
-
35
-
36
-
37
-
38
-
39
-
40
-
41
-
42
-
43
-
44
-
45
-
46
-
47
-
48
-
49
-
50
-
51
-
52
-
53
-
54
-
55
-
56
-
57
-
58
-
59
-
60
-
61
-
62
-
63
-
64
-
65
-
66
-
67
-
68
-
69
-
70
-
71
-
72
-
73
-
74
-
75
-
76
-
77
-
78
-
79
-
80
-
81
-
82
-
83
-
84
-
85
-
86
-
87
-
88
-
89
-
90
-
91
-
92
-
93
-
94
-
95
-
96
-
97
-
98
-
99
-
100
-
101
-
102
-
103
-
104
-
105
-
106
-
107
-
108
-
109
-
110
-
111
-
112
-
113
-
114
-
115
-
116
-
117
-
118
-
119
-
120
-
121
-
122
-
123
-
124
-
125
-
126
-
127
-
128
-
129
-
130
-
131
-
132
-
133
-
134
-
135
-
136
-
137
-
138
-
139
-
140
-
141
-
142
-
143
-
144
-
145
-
146
-
147
-
148
-
149
-
150
-
151
-
152
-
153
-
154
-
155
-
156
-
157
-
158
-
159
-
160
-
161
-
162
-
163
 |
 |
1
ASRock
775XFire-RAID
Motherboard
English
English
English
English
English
Copyright Notice:
Copyright Notice:
Copyright Notice:
Copyright Notice:
Copyright Notice:
No part of this installation guide may be reproduced, transcribed, transmitted, or
translated in any language, in any form or by any means, except duplication of
documentation by the purchaser for backup purpose, without written consent of
ASRock Inc.
Products and corporate names appearing in this guide may or may not be registered
trademarks or copyrights of their respective companies, and are used only for
identification or explanation and to the owners’ benefit, without intent to infringe.
Disclaimer:
Disclaimer:
Disclaimer:
Disclaimer:
Disclaimer:
Specifications and information contained in this guide are furnished for informational
use only and subject to change without notice, and should not be constructed as a
commitment by ASRock. ASRock assumes no responsibility for any errors or
omissions that may appear in this guide.
With respect to the contents of this guide, ASRock does not provide warranty of any
kind, either expressed or implied, including but not limited to the implied warranties or
conditions of merchantability or fitness for a particular purpose.
In no event shall ASRock, its directors, officers, employees, or agents be liable for
any indirect, special, incidental, or consequential damages (including damages for
loss of profits, loss of business, loss of data, interruption of business and the like),
even if ASRock has been advised of the possibility of such damages arising from any
defect or error in the guide or product.
This device complies with Part 15 of the FCC Rules. Operation is subject to the
following two conditions:
(1)
this device may not cause harmful interference, and
(2)
this device must accept any interference received, including interference that
may cause undesired operation.
ASRock Website: http://www.asrock.com
Published February 2006
Copyright
©
2006 ASRock INC. All rights reserved.