ASRock B75M-DGS Quick Installation Guide
ASRock B75M-DGS Manual
 |
View all ASRock B75M-DGS manuals
Add to My Manuals
Save this manual to your list of manuals |
ASRock B75M-DGS manual content summary:
- ASRock B75M-DGS | Quick Installation Guide - Page 1
, USA, please follow the related regulations in advance. "Perchlorate Material-special handling may apply, see www.dtsc.ca.gov/hazardouswaste/perchlorate" ASRock Website: http://www.asrock.com Published July 2012 Copyright©2012 ASRock INC. All rights reserved. 1 ASRock B75M-DGS Motherboard English - ASRock B75M-DGS | Quick Installation Guide - Page 2
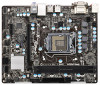
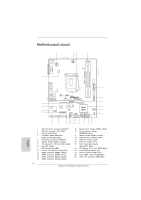
Intel B75 SATA2_3 SATA2_1 SATA2_2 SATA3_0 64Mb BIOS CHA_FAN1 8 9 10 21 20 19 18 17 16 15 14 13 12 11 1 ATX 12V Power Connector (ATX12V1) 2 CPU Fan Connector (CPU_FAN1) 3 1155-Pin CPU Socket CMOS Jumper (CLRCMOS1) 26 Power Fan Connector (PWR_FAN1) 2 ASRock B75M-DGS Motherboard English - ASRock B75M-DGS | Quick Installation Guide - Page 3
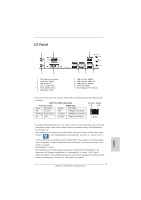
LED next to the LAN port. Please refer to the table below for the LAN port LED indications. LAN Port LED Indications Activity/Link output" to use front panel audio. Then reboot your system. For Windows® 7 / VistaTM: After restarting your computer, please double-click ASRock B75M-DGS Motherboard - ASRock B75M-DGS | Quick Installation Guide - Page 4
Contents ASRock B75M-DGS Motherboard (Micro ATX Form Factor: 8.9-in x 7.2-in, 22.6 cm x 18.3 cm) ASRock B75M-DGS Quick Installation Guide ASRock B75M-DGS Support CD 2 x Serial ATA (SATA) Data Cables (Optional) 1 x I/O Panel Shield ASRock Reminds You... To get better performance in Windows® 7 / 7 64 - ASRock B75M-DGS | Quick Installation Guide - Page 5
Memory Profile (XMP)1.3/1.2 - 1 x PCI Express 3.0 x16 slot (PCIE1: x16 mode) (see CAUTION 5) * PCIE 3.0 is only supported with Intel® Ivy Bridge CPU. With Intel® Sandy Bridge CPU, it only supports PCIE 2.0. - 1 x PCI Express 2.0 x1 slot * Intel® HD Graphics Built-in Visuals and the VGA outputs can be - ASRock B75M-DGS | Quick Installation Guide - Page 6
connector (3-pin) - 24 pin ATX power connector - 4 pin 12V power connector - Front panel audio connector - 2 x USB 2.0 headers (support 4 USB 2.0 ports) - 1 x USB 3.0 header (supports 2 USB 3.0 ports) - 64Mb AMI UEFI Legal BIOS with GUI support - Supports "Plug and Play" ASRock B75M-DGS Motherboard - ASRock B75M-DGS | Quick Installation Guide - Page 7
- ACPI 1.1 Compliance Wake Up Events - Supports jumperfree - SMBIOS 2.3.1 Support - CPU Core, IGPU, DRAM, 1.8V PLL, VTT, VCCSA Voltage Multi-adjustment Support CD - Drivers, Utilities, AntiVirus Software (Trial Version), CyberLink MediaEspresso 6.5 Trial, ASRock MAGIX Multimedia Suite - OEM - ASRock B75M-DGS | Quick Installation Guide - Page 8
there is no such limitation. You can use ASRock XFast RAM to utilize the memory that Windows® cannot use. 5. Only PCIE1 slot supports Gen 3 speed. To run the PCI Express in Gen 3 speed, please install an Ivy Bridge CPU. If you install a Sandy Bridge CPU, the PCI Express will run only at PCI Express - ASRock B75M-DGS | Quick Installation Guide - Page 9
Windows® 32-bit OS. ASRock XFast RAM shortens the loading time of previously visited websites, making web surfing faster than ever. And it also boosts the speed of Adobe Photoshop 5 times faster. Another advantage of ASRock XFast RAM is that it reduces the 9 ASRock B75M-DGS Motherboard English - ASRock B75M-DGS | Quick Installation Guide - Page 10
CPU cooler types, Socket LGA 775, LGA 1155 and LGA 1156. Please be noticed that not all the 775 and 1156 CPU Fan can be used. 20. ASRock XFast RAM is not supported by Microsoft® Windows® XP / XP 64-bit. Intel® Smart Connect Technology and Intel® USB 3.0 ports are not supported by Microsoft® Windows - ASRock B75M-DGS | Quick Installation Guide - Page 11
This is a Micro ATX form factor (8.9" x 7.2", 22.6 x 18.3 cm) motherboard. Before you install the motherboard, study the configuration of your chassis to ensure that the motherboard fits into it. Make sure to unplug the power cord before installing or removing the motherboard. Failure to do - ASRock B75M-DGS | Quick Installation Guide - Page 12
For the installation of Intel 1155-Pin CPU, please follow the steps below. Load Plate Load Lever Contact Array Socket Body 1155-Pin Socket Overview Before you insert the 1155-Pin CPU into the socket, please check if the CPU surface is unclean or if there are any bent pins in the socket. Do not - ASRock B75M-DGS | Quick Installation Guide - Page 13
3-4. Verify that the CPU is within the socket and properly mated to the orient keys. Step 4. Close the socket: Step 4-1. Flip the load plate onto the IHS. Step 4-2. Press down the load lever, and secure it with the load plate tab under the retention tab. English 13 ASRock B75M-DGS Motherboard - ASRock B75M-DGS | Quick Installation Guide - Page 14
. Please be noticed that this motherboard supports Combo Cooler Option (C.C.O.), which provides flexible options to adopt three different CPU cooler types, Socket LGA 775, LGA 1155 and LGA 1156. The white throughholes are for Socket LGA 1155/1156 CPU fan. English 14 ASRock B75M-DGS Motherboard - ASRock B75M-DGS | Quick Installation Guide - Page 15
motherboard provides two 240-pin DDR3 (Double Data Rate 3) DIMM slots, and supports Dual Channel Memory Technology. For dual channel configuration, you always need to install motherboard. It is not recommended to install them on this motherboard. Installing damage to the motherboard and the DIMM - ASRock B75M-DGS | Quick Installation Guide - Page 16
, such as a Gigabit LAN card, SATA2 card, etc. Only PCIE1 slot supports Gen 3 speed. To run the PCI Express in Gen 3 speed, please install an Ivy Bridge CPU. If you install a Sandy Bridge CPU, the PCI Express will with screws. Step 6. Replace the system cover 16 ASRock B75M-DGS Motherboard English - ASRock B75M-DGS | Quick Installation Guide - Page 17
our support CD to your system already, you can freely enjoy the benefits of dual monitor function after your system boots. If you haven't installed onboard VGA driver yet, please install onboard VGA driver from our support CD to your system and restart your computer. 17 ASRock B75M-DGS Motherboard - ASRock B75M-DGS | Quick Installation Guide - Page 18
motherboard. 4. Install the onboard VGA driver and the add-on PCI Express VGA card driver to your system. If you have installed the drivers already, there is no need to install them again. 5. Set up a multi-monitor display. For Windows one, two, three and four. 18 ASRock B75M-DGS Motherboard English - ASRock B75M-DGS | Quick Installation Guide - Page 19
Please refer to below instruction for more details about HDCP function. What is HDCP? HDCP stands for High-Bandwidth Digital Content Protection, a specification developed by Intel® for protecting digital that the HDTV or LCD monitor you purchase is compatible. 19 ASRock B75M-DGS Motherboard English - ASRock B75M-DGS | Quick Installation Guide - Page 20
, user default profile, 1394 GUID and MAC address will be cleared only if the CMOS battery is removed. If you clear the CMOS, the case open may be detected. Please adjust the BIOS option "Clear Status" to clear the record of previous chassis intrusion status. English 20 ASRock B75M-DGS Motherboard - ASRock B75M-DGS | Quick Installation Guide - Page 21
to the SATA / SATA2 / SATA3 hard disk or the SATA2 / SATA3 connector on this motherboard. Print Port Header (25-pin LPT1) (see p.2, No. 20) AFD# ERROR# PINIT# are two USB 2.0 headers on this motherboard. Each USB 2.0 header can support two USB 2.0 ports. 21 ASRock B75M-DGS Motherboard English - ASRock B75M-DGS | Quick Installation Guide - Page 22
High Definition Audio supports Jack Sensing, but the panel wire on the chassis must support HDA to function correctly. Please follow the instruction in our manual and chassis manual to install your system. 2. don't need to connect them for AC'97 audio panel. 22 ASRock B75M-DGS Motherboard English - ASRock B75M-DGS | Quick Installation Guide - Page 23
® XP / XP 64-bit OS: Select "Mixer". Select "Recorder". Then click "FrontMic". For Windows® 7 / 7 64-bit / VistaTM / VistaTM 64-bit OS: Go to the "FrontMic" Tab in the No. 16) 1 SPEAKER DUMMY +5V DUMMY Please connect the chassis speaker to this header. 23 ASRock B75M-DGS Motherboard English - ASRock B75M-DGS | Quick Installation Guide - Page 24
-Pin ATX Power Supply Installation 1 13 ATX 12V Power Connector (4-pin ATX12V1) (see p.2, No. 1) Please connect an ATX 12V power supply to this connector. Serial port Header (9-pin COM1) (see p.2, No. 19) This COM1 header supports a serial port module. English 24 ASRock B75M-DGS Motherboard - ASRock B75M-DGS | Quick Installation Guide - Page 25
. English 2.11.2 Installing Windows® 7 / 7 64-bit / VistaTM / VistaTM 64-bit Without RAID Functions If you want to install Windows® 7 / 7 64-bit / VistaTM / VistaTM 64-bit OS on your SATA / SATA2 / SATA3 HDDs without RAID functions, please follow the steps below. 25 ASRock B75M-DGS Motherboard - ASRock B75M-DGS | Quick Installation Guide - Page 26
to the User Manual (PDF file) contained in the Support CD. 4. Software Support CD information This motherboard supports various Microsoft® Windows® operating systems: 7 / 7 64-bit / VistaTM / VistaTM 64-bit / XP / XP 64-bit. The Support CD that came with the motherboard contains necessary drivers and - ASRock B75M-DGS | Quick Installation Guide - Page 27
asp 1.1 Kartoninhalt ASRock B75M-DGS Motherboard (Micro ATX-Formfaktor: 22.6 cm x 18.3 cm; 8.9 Zoll x 7.2 Zoll) ASRock B75M-DGS Schnellinstallationsanleitung ASRock B75M-DGS Support-CD Zwei Serial ATA (SATA) -Datenkabel (optional) Ein I/O Shield ASRock erinnert... Zur besseren Leistung unter Windows - ASRock B75M-DGS | Quick Installation Guide - Page 28
Intel® ClearVideo-Technik (HD), Intel® InsiderTM, Intel® HD Graphics 2500/4000 - Pixel Shader 5.0, DirectX 11 mit Intel® Ivy Bridge-Prozessor, Pixel Shader 4.1, DirectX 10.1 mit Intel® Sandy BridgeProzessor - Maximal gemeinsam genutzter Speicher 1760MB (siehe VORSICHT 6) ASRock B75M-DGS Motherboard - ASRock B75M-DGS | Quick Installation Guide - Page 29
LAN E/A-Anschlüsse an der Rückseite SATA3 USB3 Codec) - PCIE x1 Gigabit LAN 10/100/1000 Mb/s - Realtek RTL8111E - Unterstützt Wake-On-LAN - Unterstützt LAN-Kabelerkennung - Unterstützt energieef x CPUlüfter-Anschluss (4-pin) - 1 x Gehäuselüfter-Anschluss (4-pin) 29 ASRock B75M-DGS Motherboard Deutsch - ASRock B75M-DGS | Quick Installation Guide - Page 30
) - Combo-Kühleroption (siehe VORSICHT 19) - Gute Nacht-LED Hardware Monitor - Überwachung der CPU-Temperatur - Motherboardtemperaturerkennung - Drehzahlmessung für CPU/Gehäuse/Strom lüfter - Geräuscharmer CPU-/Gehäuselüfter (ermöglicht die au 30 ASRock B75M-DGS Motherboard - ASRock B75M-DGS | Quick Installation Guide - Page 31
unter Windows® 7 / Vista™ / XP etwas Speicher zur Nutzung durch das System reserviert wird. Unter Windows® OS mit 64-Bit-CPU besteht diese Einschränkung nicht. Sie können ASRock XFast RAM zur Nutzung des Speichers, den Windows® nicht verwenden kann, einsetzen. 31 ASRock B75M-DGS Motherboard Deutsch - ASRock B75M-DGS | Quick Installation Guide - Page 32
der 3ten Generation nutzen können, müssen Sie einen Ivy Bridge-Prozessor installieren. Wenn Sie einen Sandy Bridge-Prozessor installieren, läuft PCI Express nur bei der Tiefschlafmodus (S4) aufruft oder ausgeschaltet wird (S5). Nach der Installation des 32 ASRock B75M-DGS Motherboard Deutsch - ASRock B75M-DGS | Quick Installation Guide - Page 33
ASRock XFast LAN bietet einen schnelleren Internetzugang mit den nachfolgenden Vorteilen. LAN unter Windows®-Betriebssystemen mit 32-Bit-CPU nicht verwendet werden kann. ASRock XFast 14. ASRock Crashless BIOS ermöglicht Benutzern die Aktualisierung ihres BIOS, ohne ASRock B75M-DGS Motherboard Deutsch - ASRock B75M-DGS | Quick Installation Guide - Page 34
CPU-Kühlertypen, Socket LGA 775, LGA 1155 und LGA 1156. Beachten Sie bitte, dass nicht alle 775 und 1156 CPU-Lüfter verwendet werden können. 20. ASRock XFast RAM wird von Microsoft® Windows® XP / XP 64 Bit nicht unterstützt. Intel Stromversorgung abzufragen. 34 ASRock B75M-DGS Motherboard Deutsch - ASRock B75M-DGS | Quick Installation Guide - Page 35
BIOS-Aktualisierung löschen müssen, fahren Sie zuerst das System hoch. Fahren Sie es dann vor der CMOS-Löschung herunter. Bitte beachten Sie, dass Kennwort, Datum, Uhrzeit, benutzerdefiniertes Profil, 1394 GUID die BIOS-Option "Status leeren" ein. Deutsch 35 ASRock B75M-DGS Motherboard - ASRock B75M-DGS | Quick Installation Guide - Page 36
Jumperkappen auf diese Header und Anschlüsse. Wenn Sie Jumperkappen auf Header und Anschlüsse setzen, wird das Motherboard unreparierbar beschädigt! Seriell-ATA2-Anschlüsse (SATA2_1: siehe S.2 - No. 11) (SATA2_2: siehe auf einfache Weise anschließen können. Deutsch 36 ASRock B75M-DGS Motherboard - ASRock B75M-DGS | Quick Installation Guide - Page 37
richtig zu funktionieren. Beachten Sie bei der Installation im System die Anweisungen in unserem Handbuch und im Gehäusehandbuch. 2. Wenn Sie die AC'97-Audioleiste verwenden, installieren Sie diese wie nachstehend beschrieben an der Front-Audioanschlussleiste: 37 ASRock B75M-DGS Motherboard Deutsch - ASRock B75M-DGS | Quick Installation Guide - Page 38
AC'97-Audioleiste angeschlossen werden. E. So aktivieren Sie das Mikrofon an der Vorderseite. Bei den Betriebssystemen Windows® XP / XP 64 Bit: Wählen Sie „Mixer". Wählen Sie „Recorder" (Rekorder). Klicken besteht hauptsächlich aus einer Ein-/Austaste, einer 38 ASRock B75M-DGS Motherboard Deutsch - ASRock B75M-DGS | Quick Installation Guide - Page 39
dieses Motherboard einen vierpoligen CPU-Lüfteranschluss (Quiet Fan) bietet, können auch CPU-Lüfter ATX-Netzteil verwendet werden. Um ein 20-pol. ATX-Netzteil zu verwenden, stecken Sie den Stecker mit Pin 1 und Pin 13 ein. Installation eines 20-pol. ATX-Netzteils 1 ASRock B75M-DGS Motherboard - ASRock B75M-DGS | Quick Installation Guide - Page 40
ützen. Dieses Motherboard unterstützt die GEHÄUSE OFFENErkennungsfunktion,die feststellt, ob dieGehäuseabdeckung entferntwurde. Für diese Funktion istein Gehäuse erforderlich, dasmit einem Design zur Erkennung von Gehäuseeindringversuchenausgestattet ist. Deutsch 40 ASRock B75M-DGS Motherboard - ASRock B75M-DGS | Quick Installation Guide - Page 41
der Support-CD, um die Menüs aufzurufen. Das Setup-Programm soll es Ihnen so leicht wie möglich machen. Es ist menügesteuert, d.h. Sie können in den verschiedenen Untermenüs Ihre Auswahl treffen und die Programme werden dann automatisch installiert. 41 ASRock B75M-DGS Motherboard Deutsch - ASRock B75M-DGS | Quick Installation Guide - Page 42
forme Micro ATX: 8.9 pouces x 7.2 pouces, 22.6 cm x 18.3 cm) Guide d'installation rapide ASRock B75M-DGS CD de soutien ASRock B75M-DGS Deux câbles de données de série ATA (SATA) (en option) Un I/O Panel Shield ASRock vous rappelle... Pour bénéficier des meilleures performances sous Windows® 7 / 7 64 - ASRock B75M-DGS | Quick Installation Guide - Page 43
in Visuals: Intel® Quick Sync Video 2.0, Intel® InTruTM 3D, Intel® Clear Video HD Technology, Intel® InsiderTM, Intel® HD Graphics 2500/4000 - Pixel Shader 5.0, DirectX 11 avec CPU Intel® Ivy Bridge, Pixel Shader 4.1, DirectX 10.1 avec CPU Intel® Sandy Bridge 43 ASRock B75M-DGS Motherboard Français - ASRock B75M-DGS | Quick Installation Guide - Page 44
de données pouvant aller jusqu'à 3.0Go/s, supporte NCQ, AHCI et Hot Plug (Branchement à chaud) - 1 x connecteurs SATA3, prennent en charge un taux de transfert de données pouvant aller jusqu'à 6.0Go/s - 1 x En-tête du module infrarouge - 1 x embase de port d'impression ASRock B75M-DGS Motherboard - ASRock B75M-DGS | Quick Installation Guide - Page 45
3.0 (prendre en charge 2 ports USB 3.0 supplémentaires) - 64Mb AMI UEFI Legal BIOS avec support GUI - Support du "Plug and Play" - Compatible pour événements de réveil ACPI 1.1 - Gestion jumperless - Support SMBIOS 2.3.1 - CPU Core, IGPU, DRAM, 1.8V PLL, VTT, VCCSA Tension Multi-ajustement - Pilotes - ASRock B75M-DGS | Quick Installation Guide - Page 46
, assurezvous de bien lire le guide d'installation des modules mémoire en page 15 pour réaliser une installation correcte. 4. Du fait des limites du système d'exploitation, la taille mémoire réelle réservée au système pourra être inférieure à 4 Go sous Windows® 7 / 46 ASRock B75M-DGS Motherboard - ASRock B75M-DGS | Quick Installation Guide - Page 47
/ XP. Avec Windows® OS avec CPU 64 bits, il n'y a pas ce genre de limitation. Vous pouvez utiliser ASRock XFast RAM pour accéder à la mémoire que Windows® ne peut pas utiliser. 5. Pour pouvoir utiliser PCI Express en vitesse Gen 3, vous devez installer le processeur Ivy Bridge. Si vous installez - ASRock B75M-DGS | Quick Installation Guide - Page 48
installé, vous découvrez un mode de mise en charge tout à fait inédit. Site web ASRock : http://www.asrock Windows OS 32-bit ne peuvent pas utiliser. ASRock vie utile. 14. ASRock Crashless BIOS permet aux utilisateurs de mettre à jour leur BIOS sans qu'ils aient ASRock B75M-DGS Motherboard Français - ASRock B75M-DGS | Quick Installation Guide - Page 49
la chaleur, n'oubliez pas de mettre de la pâte thermique entre le CPU le dissipateur lors de l'installation du PC. 20. ASRock XFast RAM n'est pas pris en charge par Microsoft® Windows® XP / XP 64-bit. Les technologie Intel® Smart Connect et ports Intel® USB 3.0 n'est pas pris en charge par Microsoft - ASRock B75M-DGS | Quick Installation Guide - Page 50
batterie du CMOS est enlevée. Si vous effacez la CMOS, il se peut qu'une ouverture du boîtier soitdétectée. Veuillez ajuster l'option du BIOS "Clear Status" (Effacerl'état) pour effacer la mention d'état d'intrusion dans le châssis. Français 50 ASRock B75M-DGS Motherboard - ASRock B75M-DGS | Quick Installation Guide - Page 51
, qui permet le raccordement 1 SPD7 SPD6 ACK# SPD5 BUSY SPD4 PE SPD3 SLCT SPD2 SPD1 SPD0 STB# pratique de périphériques d'impression. Français 51 ASRock B75M-DGS Motherboard - ASRock B75M-DGS | Quick Installation Guide - Page 52
supporte installer votre système. 2. Si vous utilisez le panneau audio AC'97, installez-le sur l'adaptateur audio du panneau avant conformément à la procédure ci-dessous: A. Connectez Mic_IN (MIC) à MIC2_L. B. Connectez Audio_R (RIN) à OUT2_R et Audio_L (LIN) à OUT2_L. 52 ASRock B75M-DGS Motherboard - ASRock B75M-DGS | Quick Installation Guide - Page 53
besoin de les connecter pour le panneau audio AC'97. E. Pour activer le micro avant. Pour les systèmes d'exploitation Windows® XP / XP 64 bits : Sélectionnez "Mixer". Sélectionnez "Recorder" (Enregistreur ez bien à faire correspondre les fils et les broches. 53 ASRock B75M-DGS Motherboard Français - ASRock B75M-DGS | Quick Installation Guide - Page 54
broches, branchez à l'alimentation électrique ainsi qu'aux broches 1 et 13. 20-Installation de l'alimentation électrique ATX 1 13 Connecteur ATX 12V (ATX12V1 br.4) (voir p.2 No. 1) 54 Veuillez connecter une unité d'alimentation électrique ATX 12V sur ce connecteur. ASRock B75M-DGS Motherboard - ASRock B75M-DGS | Quick Installation Guide - Page 55
tout retrait du capot duchâssis. Cette fonctionnécessite un châssis qui a étéconçu pour la détectiond'intrusion dans le châssis. Français 55 ASRock B75M-DGS Motherboard - ASRock B75M-DGS | Quick Installation Guide - Page 56
le rallumant. L'utilitaire d'installation du BIOS est conçu pour BIOS, veuillez consulter le Guide de l'utilisateur (fichier PDF) dans le CD technique. 3. Informations sur le CD de support Cette carte mère supporte divers systèmes d'exploitation Microsoft® Windows ASRock B75M-DGS Motherboard Français - ASRock B75M-DGS | Quick Installation Guide - Page 57
Scheda madre ASRock B75M-DGS (Micro ATX Form Factor: 8.9-in x 7.2-in, 22.6 cm x 18.3 cm) Guida di installazione rapida ASRock B75M-DGS CD di supporto ASRock B75M-DGS Due cavi dati Serial ATA (SATA) (opzionali) Un I/O Shield ASRock vi ricorda... Per ottenere migliori prestazioni in Windows® 7 / 7 64 - ASRock B75M-DGS | Quick Installation Guide - Page 58
Intel® Ivy Bridge, Pixel Shader 4.1, DirectX 10.1 con CPU Intel® Sandy Bridge - Memoria massima condivisa 1760MB (vedi ATTENZIONE 6) - Uscita VGA Doppia: supporto porte DVI e D-Sub tramite verificatore display indipendente - Supporta DVI con risoluzione massima fino a 1920x1200 @ 58 ASRock B75M-DGS - ASRock B75M-DGS | Quick Installation Guide - Page 59
x1 Gigabit LAN 10/100/1000 Mb/s - Realtek RTL8111E - Supporta Wake-On-LAN - Supporta il rilevamento cavo LAN - Supporto CPU ventola (4-pin) - 1 x Connettore Chassis ventola (4-pin) - 1 x Connettore Alimentazione ventola (3-pin) - 24-pin collettore alimentazione ATX 59 ASRock B75M-DGS Motherboard - ASRock B75M-DGS | Quick Installation Guide - Page 60
temperatura del processore - Sensore temperatura scheda madre - Indicatore di velocità per la ventola del CPU/Chassis/potenza Alimentazione - Ventola CPU/Chassis silenziosa (permette la regolazione automatica della ventola dello chassis in base alla temperatura della CPU) ASRock B75M-DGS Motherboard - ASRock B75M-DGS | Quick Installation Guide - Page 61
Sandy Bridge, PCI Express opererà soltanto a velocità Gen 2 PCI Express. 6. La dimensione massima della memoria condivisa viene stabilita dal venditore del chipset ed e' soggetta a modificazioni. Prego fare riferimento al sito internet Intel® per le ultime informazioni. 61 ASRock B75M-DGS Motherboard - ASRock B75M-DGS | Quick Installation Guide - Page 62
possono essere regolate. Overclocking permette di eseguire l'overclocking della frequenza della CPU per ottenere le Windows® 7 / 7 64 bit / VistaTM / VistaTM 64 bit e che la versione del browser sia IE8. Sito web ASRock: http://www.asrock.com/Feature/SmartView/index.asp 62 ASRock B75M-DGS Motherboard - ASRock B75M-DGS | Quick Installation Guide - Page 63
Windows. CPU della scheda madre funzioni correttamente; scollegare e ricollegare il cavo d'alimentazione. Per migliorare la dissipazione del calore, ricordare di applicare l'apposita pasta siliconica tra il processore e il dissipatore quando si installa il sistema. 63 ASRock B75M-DGS Motherboard - ASRock B75M-DGS | Quick Installation Guide - Page 64
CPU, Socket LGA 775, LGA 1155 e LGA 1156. Notare che non possono essere usate tutte le ventole CPU 775 e 1156. 20. ASRock XFast RAM non è supportato da Microsoft® Windows® XP / XP 64-bit. Tecnologia Intel® Smart Connect e porte Intel con il produttore. 64 ASRock B75M-DGS Motherboard Italiano - ASRock B75M-DGS | Quick Installation Guide - Page 65
cancellati solo se è rimossa la batteria della CMOS. Se si cancella la CMOS, potrebbe essere rilevata l'apertura del case.Regolare l'opzione del BIOS "Clear Status" (Cancella stato) per cancellarela registrazione del precedente stato d'intrusione chassis. Italiano 65 ASRock B75M-DGS Motherboard - ASRock B75M-DGS | Quick Installation Guide - Page 66
SPD3 SLCT SPD2 SPD1 SPD0 STB# Questa è un'interfaccia per il cavo porta stampante che consente di collegare, con comodità, dispositivi di stampa. Italiano 66 ASRock B75M-DGS Motherboard - ASRock B75M-DGS | Quick Installation Guide - Page 67
per far sì che questa operi in modo corretto. Attenersi alle istruzioni del nostro manuale e del manuale del telaio per installare il sistema. 2. Se si utilizza un pannello audio AC' ) a MIC2_L. B. Collegare Audio_R (RIN) a OUT2_R e Audio_L (LIN) ad OUT2_L. 67 ASRock B75M-DGS Motherboard Italiano - ASRock B75M-DGS | Quick Installation Guide - Page 68
collegarli per il pannello audio AC'97. E. Per attivare il microfono frontale. Sistema operativo Windows® XP / XP 64-bit: Selezionare "Mixer". Selezionare "Recorder" (Registratore). Poi, fare fili e dei pin sia fatta corrispondere in modo appropriato. 68 ASRock B75M-DGS Motherboard Italiano - ASRock B75M-DGS | Quick Installation Guide - Page 69
. Per usare l'alimentatore ATX a 20 pin, collegare l'alimentatore con il Pin 1 e il Pin 13. Installazione dell'alimentatore ATX a 20 pin 1 13 Connettore ATX 12 V (4-pin ATX12V1) (vedi p.2 Nr. 1) Collegare un alimentatore ATX 12 V a questo connettore. Italiano 69 ASRock B75M-DGS Motherboard - ASRock B75M-DGS | Quick Installation Guide - Page 70
sistema. Per informazioni più dettagliate circa il Setup del BIOS, fare riferimento al Manuale dell'Utente (PDF file) contenuto nel cd di Windows®: 7 / 7 64-bit / VistaTM / VistaTM 64-bit / XP / XP 64-bit. Il CD di supporto a corredo della scheda madre contiene i driver ASRock B75M-DGS Motherboard - ASRock B75M-DGS | Quick Installation Guide - Page 71
base ASRock B75M-DGS (Factor forma Micro ATX: 22,6 cm x 18,3 cm, 8,9" x 7,2") Guía de instalación rápida de ASRock B75M-DGS CD de soporte de ASRock B75M-DGS Dos cables de datos Serial ATA (SATA) (Opcional) Una protección I/O ASRock le recuerda... Para mejorar el rendimiento en Windows® 7 / 7 64 - ASRock B75M-DGS | Quick Installation Guide - Page 72
Micro ATX: 22,6 cm x 18,3 cm, 8,9" x 7,2" - Todo diseño de Capacitor Sólido - Admite procesadores Intel® CoreTM i7 / i5 / i3 de la 3ª y 2ª generación en el paquete LGA1155 admite con una CPU Intel® Ivy Bridge. Con una CPU Intel® Sandy Bridge, solamente admite PCIE ASRock B75M-DGS Motherboard Español - ASRock B75M-DGS | Quick Installation Guide - Page 73
de detección de intrusión en el chasis - 1 x Conector de ventilador de CPU (4-pin) - 1 x Conector de ventilador de chasis (4-pin) - 1 x Conector de ventilador de alimentacion (3-pin) - 24-pin cabezal de alimentación ATX - 4-pin conector de ATX 12V power 73 ASRock B75M-DGS Motherboard Español - ASRock B75M-DGS | Quick Installation Guide - Page 74
procesador y del CPU / chasis / alimentación - Ventilador silencioso del procesador y el chasis (ajuste automático de la velocidad del ventilador del chasis en función de la temperatura del procesador) - Control de ajuste de la velocidad del ventilador de la CPU / chasis ASRock B75M-DGS Motherboard - ASRock B75M-DGS | Quick Installation Guide - Page 75
la CPU Sandy Bridge, PCI Express solamente funcionará a velocidad PCI Express Gen 2. 6. El tamaño de la memoria compartido máximo es definido por el vendedor del chipset y está conforme al cambio. Por favor compruebe el Web site de Intel® para la información más última. 75 ASRock B75M-DGS Motherboard - ASRock B75M-DGS | Quick Installation Guide - Page 76
de la CPU para conseguir un Windows®. Gracias a esta utilidad, sólo necesitará pulsar durante la fase POST o pulsar para acceder al menú de configuración del BIOS y a la utilidad ASRock ASRock: http://www.asrock.com/Feature/AppCharger/index. asp 76 ASRock B75M-DGS Motherboard Español - ASRock B75M-DGS | Quick Installation Guide - Page 77
ASRock XFast LAN proporciona un acceso a Internet más rápido, que incluye las ventajas que se indican a continuación. Priorización de aplicaciones LAN en sistemas operativos Windows®. ASRock XFast RAM de actualización del BIOS, ASRock Crashless BIOS finalizará de ASRock B75M-DGS Motherboard Español - ASRock B75M-DGS | Quick Installation Guide - Page 78
disipador de CPU diferentes, correspondientes a los zócalos LGA 775, LGA 1155 y LGA 1156. Recuerde ASRock XFast RAM no se admite en Microsoft® Windows® XP / XP 64 bits. Las tecnologías Intel® Smart Connect y puertos Intel® USB 3.0 no se admite en Microsoft® Windows ASRock B75M-DGS Motherboard Español - ASRock B75M-DGS | Quick Installation Guide - Page 79
solamente se borrará si la batería CMOS se quita. Si borra la memoria CMOS, se puede detectar un caso de abertura.Ajuste la opción del BIOS "Clear Status" (Borrar estado) para borrar elregistro del estado de intrusión anterior del chasis. Español 79 ASRock B75M-DGS Motherboard - ASRock B75M-DGS | Quick Installation Guide - Page 80
de SATA puede ser conectado con el disco duro de SATA / SATA2 / SATA3 o el conectador de SATA2 / SATA3 en esta placa base. Español 80 ASRock B75M-DGS Motherboard - ASRock B75M-DGS | Quick Installation Guide - Page 81
J_SENSE OUT2_R MIC2_R MIC2_L Este es una interface para cable de audio de panel frontal que permite conexión y control conveniente de apparatos de Audio. 81 ASRock B75M-DGS Motherboard Español - ASRock B75M-DGS | Quick Installation Guide - Page 82
operar correctamente. Por favor, siga las instrucciones en nuestro manual y en el manual de chasis para instalar su sistema. 2. Si utiliza el 97. E. Activación del micrófono frontal. En sistemas operativos Windows® XP / XP 64-bit: Seleccione "Mixer" (Mezclador). ASRock B75M-DGS Motherboard Español - ASRock B75M-DGS | Quick Installation Guide - Page 83
incluso si utiliza una fuente de alimentación ATX de 20 pins tradicional. Para usar una fuente de alimentación ATX de 20 pins, por favor, conecte su fuente de alimentación usando los Pins 1 y 13. Instalación de una Fuente de Alimentación ATX de 20 Pins 1 ASRock B75M-DGS Motherboard 24 13 83 - ASRock B75M-DGS | Quick Installation Guide - Page 84
configurar la BIOS, por favor refiérase al Manual del Usuario (archivo PDF) contenido en el CD. 3. Información de Software Support CD Esta placa-base soporta diversos tipos de sistema operativo Windows®: 7 / el archivo "ASSETUP.EXE" para iniciar la instalación. 84 ASRock B75M-DGS Motherboard Español - ASRock B75M-DGS | Quick Installation Guide - Page 85
www.asrock.com/support/index.asp 1.1 ASRock B75M-DGS Micro ATX: 8,9 x 7,2 22,6 x 18,3 см) ASRock B75M-DGS ASRock B75M-DGS 2 x Serial ATA (SATA 1 x I/O ASRock Windows® 7 / 7 64-bit / VistaTM / VistaTM 64-bit BIOS Storage Configuration AHCI BIOS 85 ASRock B75M-DGS Motherboard - ASRock B75M-DGS | Quick Installation Guide - Page 86
3D Intel® Clear Video HD, Intel® InsiderTM, Intel® HD Graphics 2500/4000 - Pixel Shader 5.0, DirectX 11 Intel® Ivy Bridge, Pixel Shader 4.1, DirectX 10.1 Intel® Sandy Bridge 1760 6 VGA DVI и D-Sub DVI 1920х1200 @ 60 D-Sub 2048х1536 @ 75 HDCP DVI 86 ASRock B75M-DGS Motherboard - ASRock B75M-DGS | Quick Installation Guide - Page 87
- 1 x - 1 x - 1 x COM - 1 x - 1 x CPU FAN (4 - 1 x Chassis FAN (4 - 1 x Power FAN (3 - 24 ATX - 4 ATX 12 В - 2 x USB 2.0 4) USB 2.0 - 1 x USB 3.0 2 USB 3.0) BIOS - 64Mb AMI UEFI Legal BIOS rpaфичеckoro интеpфeйca 87 ASRock B75M-DGS Motherboard - ASRock B75M-DGS | Quick Installation Guide - Page 88
LED CPU/Chassis/Power FAN 12V, +5V, +3.3V, Vcore Microsoft® Windows® 7 / 7 64-bit / VistaTM 64 VistaTM / XP / XP 64-bit 20) - FCC, CE, WHQL ErP/EuP Ready ErP/EuP 21) http://www.asrock.com 88 ASRock B75M-DGS Motherboard - ASRock B75M-DGS | Quick Installation Guide - Page 89
XP Windows® OS с 64-bit ASRock XFast RAM Windows®. 5 PCI Express Gen 3 Ivy Bridge Sandy Bridge PCI Express PCI Express Gen 2. 6 Intel 7 ASRock Extreme Tuning Utility (AXTU Hardware Monitor Fan Control Overclocking OC DNA and IES Hardware Monitor Fan 89 ASRock B75M-DGS Motherboard - ASRock B75M-DGS | Quick Installation Guide - Page 90
S1 S3 S4 S5 APP Charger ASRock: http://www.asrock.com/Feature/AppCharger/index.asp 10. SmartView IE Facebook ASRock SmartView SmartView Windows® 7 / 7 64 bit / VistaTM / VistaTM 64 bit IE8 ASRock: http://www.asrock.com/Feature/SmartView/index.asp 90 ASRock B75M-DGS Motherboard - ASRock B75M-DGS | Quick Installation Guide - Page 91
Tuning Utility (AXTU 32 Windows®. ASRock XFast RAM Adobe Photoshop 5 ASRock XFast RAM SSD 14. ASRock Crashless BIOS BIOS BIOS ASRock Crashless BIOS BIOS BIOS USB USB2.0. 15 OMG OMG 16. Internet Flash UEFI UEFI Windows DHCP 17 S4/S5. 18 91 ASRock B75M-DGS Motherboard - ASRock B75M-DGS | Quick Installation Guide - Page 92
LGA775 или LGA1156 20. ОС Microsoft® Windows® XP / XP 64 ASRock XFast RAM. ОС Microsoft® Windows® VistaTM / VistaTM 64 XP / XP 64 Intel® Smart Connect Technology и Intel USB 3.0. 21. EuP Energy Using Product EuP 1 EuP Intel EuP 50 5V 100 EuP. 92 ASRock B75M-DGS Motherboard - ASRock B75M-DGS | Quick Installation Guide - Page 93
1.3 short open 3 1 и 2 CMOS (CLRCMOS1, 3 2, п. 25) CMOS CLRCMOS1 CMOS 15 5 2 и 3 CLRCMOS1 CMOS BIOS CMOS BIOS CMOS 1394 GUID и MAC CMOS. CMOS Clear Status» в BIOS 93 ASRock B75M-DGS Motherboard - ASRock B75M-DGS | Quick Installation Guide - Page 94
/ SATA3 25 LPT1) (см. cтр. 2, п.20) AFD# ERROR# PINIT# SLIN# GND 1 SPD7 SPD6 ACK# SPD5 BUSY SPD4 PE SPD3 SLCT SPD2 SPD1 SPD0 STB# 94 ASRock B75M-DGS Motherboard - ASRock B75M-DGS | Quick Installation Guide - Page 95
1 GND IRRX 9 HD_AUDIO1) (см. cтр. 2, п. 21) GND PRESENCE# MIC_RET OUT_RET 1 OUT2_L J_SENSE OUT2_R MIC2_R MIC2_L 1 High Definition Audio Jack Sensing p HDA 2 AC'97 95 ASRock B75M-DGS Motherboard - ASRock B75M-DGS | Quick Installation Guide - Page 96
GND Ground (GND). D MIC_RET и OUT_RET HD AC'97 E Windows® XP / XP 64 Mixer Recorder FrontMic Windows® 7 / 7 64-бита, VistaTM / VistaTM 64 FrontMic Realtek Recording Volume 9 PANEL1 2, п. 15) PWRBTN RESET PLED S1/S3 S4 S5). HDLED 96 ASRock B75M-DGS Motherboard - ASRock B75M-DGS | Quick Installation Guide - Page 97
+12V GND CHA_FAN1 4 CPU_FAN1 2, п. 2) FAN_SPEED_CONTROL CPU_FAN_SPEED +12V GND 1 2 3 4 4 3 3 1-3. 1-3 3 ATX (24 ATXPWR1 2, п. 5) 12 24 ATX. 1 13 12 ивает 24 ATX 20 ATX 20 ATX 1 13. 20 ATX 1 ASRock B75M-DGS Motherboard 24 13 97 - ASRock B75M-DGS | Quick Installation Guide - Page 98
Setup BIOS Setup F2> или + + - ASRock B75M-DGS | Quick Installation Guide - Page 99
desempenho em Windows® 7 / 7 64-bit / VistaTM / VistaTM 64-bit, recomendamos que defina a opção Configuração de Armazenamento na BIOS para o modo AHCI. Para mais detalhes acerca da configuração da BIOS consulte o "Manual de utilizador" no nosso CD de suporte. 99 ASRock B75M-DGS Motherboard Português - ASRock B75M-DGS | Quick Installation Guide - Page 100
CPU Chipsets Memória Slots de Expansão VGA integrado 100 - Formato Micro ATX: 8,9 pol. x 7,2 pol., 22,6 cm x 18,3 cm - Design de condensadores banhados a ouro de alta qualidade - Suporta Intel® CoreTM i7 / i5 / i3 de 3ª e 2ª geração no pacote LGA1155 @ 75Hz ASRock B75M-DGS Motherboard Português - ASRock B75M-DGS | Quick Installation Guide - Page 101
CPU (4 pinos) - 1 x Conector do ventilador da chassis (4 pinos) - 1 x Conector do ventilador da energia (3 pinos) - Conector de força do ATX de 24 pinos - Conector ATX 12 V de 4 pinos - Conector Áudio do painel frontal - 2 x cabezal USB 2.0 (suporta 4 portas USB 2.0) 101 ASRock B75M-DGS Motherboard - ASRock B75M-DGS | Quick Installation Guide - Page 102
Detecção de ABERTURA da CAIXA - Monitoramento de voltagem : +12 V, +5 V, +3.3 V, Vcore - Microsoft® Windows® 7 / 7 de 64 bits / VistaTM / VistaTM de 64 bits / XP / XP de 64 bits (veja o AVISO 20) - FCC, CE, WHQL - "ErP/EuP Ready" (é necessária alimentação eléctrica "ErP/ ASRock B75M-DGS Motherboard - ASRock B75M-DGS | Quick Installation Guide - Page 103
esta limitação não existe. Pode usar a função ASRock XFast RAM para utilizar a memória que o Windows® não pode utilizar. 5. Para que a placa PCI Express funcione à velocidade Gen 3, deve instalar a CPU Ivy Bridge. Se instalar a CPU Sandy Bridge, a placa PCI Express apenas funcionará à velocidade PCI - ASRock B75M-DGS | Quick Installation Guide - Page 104
versão do seu navegador é IE8. Página Web da ASRock: http://www.asrock.com/Feature/SmartView/ index.asp 11. O ASRock XFast USB pode aumentar a velocidade dos dispositivos de armazenamento USB. A velocidade poderá depender das propriedades dos dispositivos. 104 ASRock B75M-DGS Motherboard Português - ASRock B75M-DGS | Quick Installation Guide - Page 105
. Cheque o ventilador da CPU na placa-mãe, para verificar se está funcionando corretamente antes de religar o sistema. Para melhorar a dissipação de calor, lembre-se de aplicar o material de interface térmica entre o processador e o dissipador de calor. ASRock B75M-DGS Motherboard 105 Português - ASRock B75M-DGS | Quick Installation Guide - Page 106
de dissipadores de CPU, Socket LGA 775, LGA 1155 e LGA 1156. Tenha em atenção que nem todos os dissipadores de CPU 775 e 1156 poderão ser utilizados. 20. ASRock XFast RAM não é suportada nos sistemas operativos Microsoft® Windows® XP / XP de 64 bits. A tecnologia Smart Connect da Intel® e portas USB - ASRock B75M-DGS | Quick Installation Guide - Page 107
GUID e endereço MAC apenas serão limpos se a bateria do CMOS for retirada. Se limpar o CMOS, poderá ser detectada a abertura da caixa. Ajuste aopção do BIOS "Clear Status" (Limpar estado) para limpar o registo anterior de estado de intrusão no chassis. Português 107 ASRock B75M-DGS Motherboard - ASRock B75M-DGS | Quick Installation Guide - Page 108
BUSY SPD4 PE SPD3 SLCT SPD2 SPD1 SPD0 STB# Esta é a interface do cabo que liga à porta de impressão e permite a fácil ligação de impressoras. Português 108 ASRock B75M-DGS Motherboard - ASRock B75M-DGS | Quick Installation Guide - Page 109
e no manual do chassis para instalar o sistema. 2. Se utilizar o painel de áudio AC'97, instale-o no cabeçalho de áudio do painel frontal, como a figura abaixo mostra: A. Ligue o Mic_IN (MIC) ao MIC2_L. B. Ligue o Audio_R (RIN) ao OUT2_R e o Audio_L (LIN) ao OUT2_L. 109 ASRock B75M-DGS Motherboard - ASRock B75M-DGS | Quick Installation Guide - Page 110
o painel de áudio AC'97. E. Para activar o microfone frontal. Para os Sistemas Operativos Windows® XP / XP 64 bits: Seleccione "Misturador". Seleccione "Gravador". Depois clique em "Microfone frontal". -se que os fios e os pinos têm uma correspondência exacta. ASRock B75M-DGS Motherboard Português - ASRock B75M-DGS | Quick Installation Guide - Page 111
para uma ventoinha de CPU (Ventoinha silenciosa), uma ventoinha de 3 pinos para CPU poderá funcionar mesmo ATX de 20 Pinos 1 13 Conector de força do ATX 12V (ATX12V1 de 4 pinos) (veja a folha 2, No. 1) Ligue a fonte de alimentação ATX 12V neste conector. Português 111 ASRock B75M-DGS Motherboard - ASRock B75M-DGS | Quick Installation Guide - Page 112
computador. Automaticamente iniciará o menu principal, casa o AUTORUN esteja ativado. Se o menu principal não aparecer automaticamente, explore o CD e execute o "ASSETUP.EXE" localizado na pasta BIN. Português 112 ASRock B75M-DGS Motherboard - ASRock B75M-DGS | Quick Installation Guide - Page 113
1.1 Paket İçindekiler ASRock B75M-DGS Anakart (Mikro ATX Form Faktörü: 8,9-inç x 7,2-inç, 22,6 cm x 18,3 cm) ASRock B75M-DGS Hızlı Takma Kılavuzu ASRock B75M-DGS Destek CD'si 2 x Seri ATA (SATA) Veri Kablosu (İsteğe Bağlı) 1 x G/Ç Panel Kalkanı ASRock Size Şunu Hatırlatır... Windows® 7 / 7 64-bit - ASRock B75M-DGS | Quick Installation Guide - Page 114
itleme Videosu 2.0, Intel® InTruTM 3D, Intel® Clear Video HD Teknolojisi, Intel® InsiderTM, Intel® HD Graphics 2500/4000 - Pixel Shader 5.0, Intel® Ivy Bridge işlemciye sahip DirectX 11. Pixel Shader 4.1,Intel® Sandy Bridge işlemciye sahip DirectX 10.1 - Maks. paylaюэlan bellek 1760 MB (bkz. DЭKKAT - ASRock B75M-DGS | Quick Installation Guide - Page 115
ATX güç konektörü - 4 pin 12V güç konektörü - Ön panel ses konektörü - 2 x USB 2.0 fiş (4 USB 2.0 portu destekler) - 1 x USB 3.0 fiş (2 USB 3.0 portu destekler) - 64 Mb GUI destekli AMI UEFI Geçerli BIOS - "Tak Çalıştır"ı destekler - ACPI 1.1 Uyumlu Uyandırma Olayları 115 ASRock B75M-DGS Motherboard - ASRock B75M-DGS | Quick Installation Guide - Page 116
ile Otomatik Ayar'ına izin verir) - CPU/Kasa Fan Çoklu-Hız Kontrolü - KASA AÇIK algılaması - Voltaj İzleme: +12V, +5V, +3,3V, CPU Vcore İS - Microsoft® Windows® 7 / 7 64-bit / ürün bilgileri için lütfen web sitemizi ziyaret edin: http://www.asrock.com Türkçe 116 ASRock B75M-DGS Motherboard - ASRock B75M-DGS | Quick Installation Guide - Page 117
64-bit CPU'lu Windows® OS için bu tür bir sınırlama yoktur. Windows®'un kullanamadığı bellekten yararlanmak için ASRock XFast RAM ASRock Extreme Tuning Utility (AXTU)'nun çalışma prosedürleri için lütfen web sitemizi ziyaret ediniz. ASRock web sitesi: http://www.asrock.com ASRock B75M-DGS Motherboard - ASRock B75M-DGS | Quick Installation Guide - Page 118
BIOS güncelleme aracı, sistem BIOS'unu MSDOS veya Windows® gibi ilk önce işletim sistemine girmeden güncelle menizi sağlar. Bu yardımcı programla, POST sırasında tuşuna basabilirsiniz veya BIOS ayarları menüsünün ASRock kolaylıkla yapılandırabilirsiniz. 118 ASRock B75M-DGS Motherboard Türkçe - ASRock B75M-DGS | Quick Installation Guide - Page 119
utucu tipi olan Soket LGA 775, LGA 1155 ve LGA 1156'yı çalıştıracak esnek seçeneğe sahiptir. Lütfen tüm 775 ve 1156 CPU Fanlarının kullanılamayacağını unutmayın. 20. ASRock XFast RAM, Microsoft® Windows® XP / XP 64-bit ile uyumlu değildir. Intel® Smart Connect Teknolojisini ve Intel® USB 3.0 bağlant - ASRock B75M-DGS | Quick Installation Guide - Page 120
%50'den yüksektir standardını karşılaması gerekir. EuP hazır güç kaynağı seçimi için, daha fazla ayrıntı için güç kaynağı üreticisine başvurmanızı öneririz. 120 ASRock B75M-DGS Motherboard Türkçe - ASRock B75M-DGS | Quick Installation Guide - Page 121
ılan GUID ve MAC adresinin yalnızca CMOS pili çıkarıldığında temizleneceğini lütfen aklınızda bulundurunuz. CMOS'u temizlerseniz, kasa açma algılanabilir. Lütfen "Temizleme Durumu" BIOS seçeneğini önceki kasaya yetkisiz erişim durumunun kaydı için ayarlayın. Türkçe 121 ASRock B75M-DGS Motherboard - ASRock B75M-DGS | Quick Installation Guide - Page 122
ını sağlayan bir arayüzdür. USB 2.0 Fişleri (9-pinli USB4_5) (bkz. s.2 No. 18) (9-pinli USB6_7) (bkz. s.2 No. 17) G/Ç panelindeki varsayılan dört USB 2.0 portundan başka, bu anakartta iki USB 2.0 fişi bulunur. Her USB 2.0 fişi iki USB 2.0 portunu destekler. Türkçe 122 ASRock B75M-DGS Motherboard - ASRock B75M-DGS | Quick Installation Guide - Page 123
lan Windows® 7 / 7 64-bit / VistaTM / VistaTM 64-bit İS için: Realtek Kontrol panelinde "Ön Mikrofon" Sekmesine gidin. "Kayıt Ses Seviyesi"ni ayarlayın. Sistem Paneli Fişi (9-pinli PANEL1) (bkz. s.2 No. 15) Bu fiş, birçok sistem ön paneli işlevini barındırır. Türkçe 123 ASRock B75M-DGS Motherboard - ASRock B75M-DGS | Quick Installation Guide - Page 124
+12V GND (3-pinli PWR_FAN1) (bkz. s.2 No. 26) PWR_FAN_SPEED +12V GND CPU Fan Konektörü 4-pinli CPU_FAN1) (bkz. s.2 No. 2) FAN_SPEED_CONTROL CPU_FAN_SPEED +12V tfen fan kablolarını CPU fanına bu konektöre bağlayın ve siyah kabloyu toprak pinine bağlayın. Türkçe 124 ASRock B75M-DGS Motherboard - ASRock B75M-DGS | Quick Installation Guide - Page 125
CPU fanı bu konektördeki CPU fan konektörüne bağlamayı planlıyorsanız, lütfen Pin 1-3'e bağlayın. Pin 1-3 Bağlı 3-Pinli Fanı Takma ATX Güç Konektörü (24-pinli ATXPWR1) (bkz. s.2 No. 5) 12 24 Lütfen bir ATX erişim tasarımına sahip bir kasa gerektirir. Türkçe 125 ASRock B75M-DGS Motherboard - ASRock B75M-DGS | Quick Installation Guide - Page 126
ından seçim yapmanıza izin veren menü tabanlı bir programdır. BIOS Ayarları hakkında ayrıntılı bilgi için, lütfen Destek CD'sinde vurun. 3. Yazılım Destek CD'si bilgileri Bu anakart çeşitli Microsoft® Windows® işletim sistemleri destekler: 7 / 7 64-bit / VistaTM / ASRock B75M-DGS Motherboard Türkçe - ASRock B75M-DGS | Quick Installation Guide - Page 127
www.asrock.com/support/index.asp 1.1 ASRock B75M-DGS Micro ATX 8.9" x 7.2", 22.6 x 18.3 cm) ASRock B75M-DGS ASRock B75M-DGS 지원 CD 시리얼 ATA (SATA 2 I/O 차폐 1 개 ASRock Windows® 7 / 7 64-비트 / VistaTM / VistaTM 64 Storage Configuration BIOS 옵션을 AHCI BIOS CD 127 ASRock B75M-DGS Motherboard - ASRock B75M-DGS | Quick Installation Guide - Page 128
- Micro ATX 8.9" x 7.2", 22.6 x 18.3 cm LGA1155 3 세대 및 2 세대 Intel® CoreTM i7 / i5 / i3 3 + 1 Intel® Turbo Boost 2.0 1 참조 ) - Intel® B75 - Intel® Small Business Advantage 2 참조 ) - Intel® Rapid Start 기술과 Smart Connect 3 참조 ) - DDR3 DIMM 슬롯 2 개 - DDR3 1600/1333/1066 비 -ECC (Intel® Ivy Bridge - ASRock B75M-DGS | Quick Installation Guide - Page 129
지원 - 3 개 의 SATA2 3.0Gb/s NCQ, AHCI 및"핫 1 개 의 SATA3 6.0Gb/s 1 1 개 - COM 1 1 개 - CPU 1 개 (4 1 개 (4 1 개 (3 핀 ) - 24 핀 ATX 4 핀 ATX 12V USB 2.0 헤더 2 개 (4 USB 2.0 2개 ) - USB 3.0 헤더 1 개 (2 USB 3.0 2개 ) - 64Mb GUI AMI UEFI 적합형 BIOS ACPI 1.1 129 ASRock B75M-DGS Motherboard 한 국 어 - ASRock B75M-DGS | Quick Installation Guide - Page 130
주의 19 참조 ) - 굿나잇 LED CPU - CPU 속도계 - CPU CPU 가능 ) - CPU 12V,+5V,+3.3V,Vcore OS Windows® 7/7 64 비트 /VistaTM/VistaTM 64 비트 / XP/XP 64 20 참조 ) 인증서 - FCC, CE, WHQL - ErP/EuP 지원 (ErP/EuP ( 주의 21 참조 ) http://www.asrock.com 한 국 어 130 ASRock B75M-DGS Motherboard - ASRock B75M-DGS | Quick Installation Guide - Page 131
Intel 7. AXTU (ASRock Extreme Tuning Utility OC DNA, IES CPU OC DNA 에서는 OC OS OS IES (Intelligent Energy Saver CPU ASRock 의 AXTU (Extreme Tuning Utility ASRock http://www.asrock.com 8. ASRock Instant Flash ROM BIOS BIOS MS-DOS 나 Windows BIOS POST 중 131 ASRock B75M-DGS Motherboard - ASRock B75M-DGS | Quick Installation Guide - Page 132
LAN LAN Youtube HD 13. ASRock XFast RAM 은 AXTU (ASRock Extreme Tuning Utility Windows® OS 32-bit CPU ASRock XFast RAM Adobe Photoshop 속도를 5 ASRock XFast RAM SSD 또는 HDD 14. ASRock Crashless BIOS BIOS BIOS ASRock Crashless BIOS BIOS BIOS 파일 은 USB USB2.0 132 ASRock B75M-DGS Motherboard - ASRock B75M-DGS | Quick Installation Guide - Page 133
1156 CPU 20. ASRock XFast RAM 은 Microsoft® Windows® XP / XP 64 Intel® Smart Connect 기술 과 Intel® USB 3.0 포트은 Microsoft® Windows® VistaTM / VistaTM 64- 비트 / XP / XP 64 21. EuP 는 Energy Using Product EuP AC 1.00W EuP EuP EuP Intel EuP 5V 100 mA 50 EuP 133 ASRock B75M-DGS Motherboard - ASRock B75M-DGS | Quick Installation Guide - Page 134
1.3 3 1-2 점퍼 CMOS 초기화 (CLRCMOS1, 3 2 25 세팅 CMOS 삭제 참고 : CLRCMOS1 CMOS 15 CLRCMOS1 의 핀 2 와 핀 3 을 5 BIOS CMOS BIOS CMOS CMOS CMOS 1394 GUID, MAC CMOS BIOS 옵션 Clear Status 한 국 어 134 ASRock B75M-DGS Motherboard - ASRock B75M-DGS | Quick Installation Guide - Page 135
/ SATA3 SATA2 / SATA3 (25 핀 LPT1) (2 20 AFD# ERROR# PINIT# SLIN# GND 1 SPD7 SPD6 ACK# SPD5 BUSY SPD4 PE SPD3 SLCT SPD2 SPD1 SPD0 STB# 한국어 135 ASRock B75M-DGS Motherboard - ASRock B75M-DGS | Quick Installation Guide - Page 136
1 OUT2_L J_SENSE OUT2_R MIC2_R MIC2_L I/O 2 USB 3.0 1 개의 USB 3.0 USB 3.0 헤더는 2 개 의 USB 3.0 1. High Definition Audio HAD 2. AC'97 A. Mic_IN (MIC) 을 MIC2_L B. Audio_R (RIN) 을 OUT2_R Audio_L (LIN) 을 OUT2_L 136 ASRock B75M-DGS Motherboard 한 국 어 - ASRock B75M-DGS | Quick Installation Guide - Page 137
는 HD AC'97 Windows® XP / XP 64 비트 OS Mixer Recorder Front Mic Windows® 7 / 7 64 비트 / VistaTM / VistaTM 64 비트 OS Realtek FrontMic Recording Volume PWRBTN RESET PLED LED LED S1/S3 LED S4 S5 LED HDLED LED LED LED LED LED 한국어 137 ASRock B75M-DGS Motherboard - ASRock B75M-DGS | Quick Installation Guide - Page 138
CPU 1 2 3 4 4 핀 CPU 3 핀 CPU CPU 3 핀 CPU 1-3 1-3 3 ATX (24 핀 ATXPWR1) (2 5 12 24 ATX 1 13 24 핀 ATX 12 24 종래의 20 핀 ATX 20 핀 ATX Pin 1 과 Pin 13 ATX 12V (4 핀 ATX12V1) (2 1 20 핀 ATX 1 13 ATX 12V 한 국 어 138 ASRock B75M-DGS Motherboard - ASRock B75M-DGS | Quick Installation Guide - Page 139
PDF 3 CD 정보 7/7 64 비트 /VistaTM/VistaTM 64 비트 /XP/XP 64 CD CD CD-ROM CD AUTORUN CD BIN 폴더 ASSETUP.EXE D: \ BIN \ ASSETUP.EXE, D: 는 CD-ROM 한국어 139 ASRock B75M-DGS Motherboard - ASRock B75M-DGS | Quick Installation Guide - Page 140
asrock.com Web www.asrock.com/support/index.asp 1.1 ASRock B75M-DGS Micro ATX 8.9-in x 7.2-in, 22.6 cm x 18.3 cm) ASRock B75M-DGS ASRock B75M-DGS CD 2 x ATA (SATA 1 x I/O ASRock Windows® 7 / 7 64-bit / VistaTM / VistaTM 64-bit BIOS AHCI B I O S C D 140 ASRock B75M-DGS Motherboard - ASRock B75M-DGS | Quick Installation Guide - Page 141
Quick Sync Video 2.0、Intel® InTruTM 3D、Intel® Clear Video HD Technology、Intel® InsiderTM、Intel® HD Graphics 2500/4000 - Intel® Ivy Bridge CPU DirectX 11、Pixel Shader 5.0。Intel® Sandy Bridge CPU DirectX 10.1、Pixel Shader 4.1 1760MB ( 注意 6 VGA DVI および D-Sub 141 ASRock B75M-DGS Motherboard 日本語 - ASRock B75M-DGS | Quick Installation Guide - Page 142
CH HD Realtek ALC662 Codec) - PCIE x1 Gigabit LAN 10/100/1000 Mb/s - Realtek RTL8111E - Wake-On-LAN LAN Energy Efficient Ethernet 802.3az PXE I/O Panel - PS x 1 x 1 - COM x 1 x 1 - CPU x 1 (4 x 1 (4 x 1 (3 ピン ) - 24 ピン ATX 4 ピン 12V USB 2.0 USB 2.0 用 4 x 2 ASRock B75M-DGS Motherboard - ASRock B75M-DGS | Quick Installation Guide - Page 143
UEFI ASRock 17 - ASRock U-COP ( 注意 18 Boot Failure Guard:B.F.G C.C.O.) ( 注意 19 LED - CPU CPU CPU CPU CPU 12V, +5V, +3.3V, Vcore - Microsoft® Windows® 7 / 7 64-bit / VistaTM / VistaTM 64-bit / XP / XP 64-bit compliant( 注意 20 FCC, CE, Microsoft® WHQL 143 ASRock B75M-DGS Motherboard 日本語 - ASRock B75M-DGS | Quick Installation Guide - Page 144
4GB 64 ビット CPU の Windows® OS ASRock XFast RAM Windows Gen3 速度で PCI Express Ivy Bridge CPU Sandy Bridge CPU PCI Express は PCI Express Gen 2 Intel® 社の WEB ASRock Extreme Tuning Utility (AXTU OC DNA、ES CPU OC DNA OC OC OC IES CPU ASRock Extreme Tuning ASRock B75M-DGS Motherboard 日本語 - ASRock B75M-DGS | Quick Installation Guide - Page 145
占的に SmartView SmartView OS Windows® 7 / 7 64 bit / VistaTM / VistaTM 64 bit IE8 ASRock http://www.asrock.com/Feature/SmartView/ index.asp 11. ASRock XFast USB は USB 12. ASRock XFast LAN LAN Youtube HD ます。 日本語 145 ASRock B75M-DGS Motherboard - ASRock B75M-DGS | Quick Installation Guide - Page 146
とヒー 19. C.C.O.) では、Socket LGA 775、LGA 1155 と LGA 1156 の 3 CPU 775 と 1156 CPU 20. ASRock XFast RAM は、Microsoft® Windows® XP / XP 64 Intel® Smart Connect Intel® USB 3.0 Microsoft® Windows® VistaTM / VistaTM 64 ビット / XP / XP 64 日本語 146 ASRock B75M-DGS Motherboard - ASRock B75M-DGS | Quick Installation Guide - Page 147
21. Energy Using Product EuP EuP に従っ AC 1.00W EuP EuP EuP 対応電 Intel EuP 5v 100 mA 50 EuP 日本語 147 ASRock B75M-DGS Motherboard - ASRock B75M-DGS | Quick Installation Guide - Page 148
1.3 1-2 CMOS CLRCMOS1 2 25 参照) 設定 説明 CMOS の消去 注 : CLRCMOS1 CMOS 15 CLRCMOS1 のピン 2 とピン 3 を 5 BIOS CMOS BIOS CMOS CMOS 1394 GUID と MAC CMOS CMOS BIOS Clear Status 日本語 148 ASRock B75M-DGS Motherboard - ASRock B75M-DGS | Quick Installation Guide - Page 149
# SLIN# GND 1 SPD7 SPD6 ACK# SPD5 BUSY SPD4 PE SPD3 SLCT SPD2 SPD1 SPD0 STB# USB 2.0 ヘッダ (9 ピン USB4_5) ページ 2 18 を参照 (9 ピン USB6_7) ページ 2 17 を参照 I/O 4 つの USB 2.0 2 つの USB 2.0 USB 2.0 2 つの USB 2.0 日本語 149 ASRock B75M-DGS Motherboard - ASRock B75M-DGS | Quick Installation Guide - Page 150
を OUT2_L C. Ground (GND) を Ground (GND D. MIC_RET と OUT_RET AC'97 E. Windows® XP / XP 64-bit OS の場合 : "Mixer Recorder FrontMic Windows® 7 / 7 64-bit / VistaTM / VistaTM 64-bit OS の場合 : Realtek FrontMic Recording Volume ASRock B75M-DGS Motherboard 日本語 - ASRock B75M-DGS | Quick Installation Guide - Page 151
/S3 S4 S5 LED HDLED LED LED LED LED LED 4 ピン SPEAKER1) ページ 2 16 を参照 (4 ピン CHA_FAN1) ページ 2 10 を参照 FAN_SPEED_CONTROL CHA_FAN_SPEED +12V GND (3 ピン PWR_FAN1) ページ 2 26 を参照 PWR_FAN_SPEED +12V GND CHA_FAN1 151 ASRock B75M-DGS Motherboard 日本語 - ASRock B75M-DGS | Quick Installation Guide - Page 152
24 ピン ATXPWR1) ページ 2 5 を参照 12 24 ATX 1 13 24 ピン ATX 12 24 20 ピン ATX ます。20 ピン ATX 1 13 と ATX 12V 4 ピン ATX12V1) ページ 2 1 を参照 9 ピン COM1) ページ 2 19 を参照 20 ピン ATX 1 13 ATX 電 12V この COM1 日本語 2 ピン CI1 24 を参照 1 GND Signal 152 ASRock B75M-DGS Motherboard - ASRock B75M-DGS | Quick Installation Guide - Page 153
2. BIOS 情報 BIOS POST F2 Del BIOS POST BIOS POST Ctrl〉+〈Alt〉+〈Delete BIOS BIOS CD PDF 3 CD 情報 Microsoft® Windows® 7 / 7 64-bit / VistaTM / VistaTM 64bit / XP / XP 64-bit CD CD CDROM CD AUTORUN AUTORUN CD 内の BIN ASSETUP.EXE 153 ASRock B75M-DGS Motherboard 日本語 - ASRock B75M-DGS | Quick Installation Guide - Page 154
asrock.com/support/index.asp 1.1 華擎 B75M-DGS 主板 (Micro ATX 規格 : 8.9 英吋 X 7.2 英吋 , 22.6 厘米 X 18.3 厘米 ) 華擎 B75M-DGS B75M-DGS Serial ATA(SATA I/O 擋板 ASRock 為了在 Windows® 7 / 7 64-bit / VistaTM / VistaTM 64-bit BIOS中將Storage Configuration AHCI BIOS User Manual 154 ASRock B75M-DGS Motherboard - ASRock B75M-DGS | Quick Installation Guide - Page 155
- Micro ATX 規格 : 8.9 英吋 X 7.2 英吋 , 22.6 厘米 X 18.3 厘米 Intel® CoreTM i7 / i5 / i3 處理器 (LGA1155 針腳 ) - 3 + 1 Intel® Turbo Boost 2.0 Hyper-Threading 1) - Intel® B75 - 支持 Intel® Small Business Advantage 2 Intel DDR3 3 DDR3 DIMM DDR3 1600/1333/1066 non-ECC、un-buffered 內存 (Intel® Ivy Bridge CPU - ASRock B75M-DGS | Quick Installation Guide - Page 156
CPU 4 針 ) - 1 x 4 針 ) - 1 x 3 針 ) - 24 針 ATX 4 針 12V 2 x USB 2.0 4 USB 2.0 接口 ) - 1 x USB 3.0 2 USB 3.0 接口 ) - 64Mb AMI UEFI Legal BIOS, 支持 GUI Plug and Play,PnP) - ACPI 1.1 jumperfree SMBIOS 2.3.1 - CPU Core, IGPU, DRAM, 1.8V PLL, VTT, VCCSA 調節器 簡體中文 156 ASRock B75M-DGS Motherboard - ASRock B75M-DGS | Quick Installation Guide - Page 157
C.C.O 19) - CPU - CPU - CPU CPU 度) - CPU 12V, +5V, +3.3V 操作系統 - Microsoft® Windows® 7/7 64 位元 /VistaTM/VistaTM 64 位元 / XP/XP 64 20) 認證 - FCC, CE, WHQL - 支持 ErP/EuP ErP/EuP 21) http://www.asrock.com BIOS 簡體中文 157 ASRock B75M-DGS Motherboard - ASRock B75M-DGS | Quick Installation Guide - Page 158
。對於 Windows 64 位元 CPU XFast RAM 來利用 Windows 5 PCI Express 運行于 Gen 3 Ivy Bridge CPU Sandy Bridge CPU,則 PCI Express Gen 2 速度。 6 I n t e l 7、 ASRock Extreme Tuning Utility (AXTU O C DNA 和 IES。在 Hardware Monitor Fan Control Overclocking CPU OC DNA OC O C OC IES CPU ASRock Extreme - ASRock B75M-DGS | Quick Installation Guide - Page 159
E F I Windows DHCP 17 S4/S5 18 CPU C P U PC CPU 19 C . C . O C P U L G A775, L G A1155 與 L G A1156 775 和 1156 CPU 20、Microsoft® Windows® XP / XP 64-bit XFast RAM。Microsoft® Windows® VistaTM / VistaTM 64-bit / XP / XP 64-bit Intel Intel® USB 3.0 159 ASRock B75M-DGS Motherboard - ASRock B75M-DGS | Quick Installation Guide - Page 160
21、EuP, 全稱 Energy Using Product E u P 1.00W EuP EuP EuP Intel EuP 100m A 5V s b 50 E u P 160 ASRock B75M-DGS Motherboard 簡體中文 - ASRock B75M-DGS | Quick Installation Guide - Page 161
1.3 3 1 和針腳 2 CMOS (CLRCMOS1, 3 2 頁第 25 項 ) 設定 默認設置 清除 CMOS 注意: C L R C M O S1 C M O S 15 C L R C M O S1 2 和插針 3 短接 5 B I O S C M O S B I O S C M O S C M O S C M O S 1394 GUID 和 MAC C M O S B I O S 選 項"Clear Status 簡體中文 161 ASRock B75M-DGS Motherboard - ASRock B75M-DGS | Quick Installation Guide - Page 162
# SLIN# GND 1 SPD7 SPD6 ACK# SPD5 BUSY SPD4 PE SPD3 SLCT SPD2 SPD1 SPD0 STB# USB 2.0 (9 針 USB4_5) ( 見第 2 頁第 18 項 ) (9 針 USB6_7) ( 見第 2 頁第 17 項 ) I/O USB 2.0 USB 2.0 USB 2.0 USB 2.0 接 口。 簡體中文 162 ASRock B75M-DGS Motherboard - ASRock B75M-DGS | Quick Installation Guide - Page 163
OUT2_L。 C. 將 Ground(GND) 連接到 Ground(GND)。 D. MIC_RET 和 OUT_RET 僅用于 HD AC'97 E Windows® XP / XP 64 Mixer"。選擇"Recorder FrontMic"。 在 Windows® 7 / 7 64 位元 / VistaTM / VistaTM 64 Realtek FrontMic"。調節"Recording Volume"。 (9 針 PANEL1) ( 見第 2 頁第 15 項 ) 簡體中文 163 ASRock B75M-DGS Motherboard - ASRock B75M-DGS | Quick Installation Guide - Page 164
FAN_SPEED_CONTROL CHA_FAN_SPEED +12V GND PWR_FAN_SPEED +12V GND CHA_FAN1 CPU (4 針 CPU_FAN1) ( 見第 2 頁第 2 項 ) FAN_SPEED_CONTROL CPU_FAN_SPEED +12V GND 請將 CPU 1 2 3 4 4-Pin CPU 風扇 (Quiet Fan 3-Pin CPU 3-Pin CPU CPU Pin 1-3。 Pin 1-3 連接 3-Pin 簡體中文 164 ASRock B75M-DGS Motherboard - ASRock B75M-DGS | Quick Installation Guide - Page 165
) 12 24 請將 ATX 1 13 24-pin ATX 12 24 傳統的 20-pin ATX 20-pin ATX Pin 1 和 Pin 13 ATX 12V 接頭 (4 針 ATX12V1) ( 見第 2 頁第 1 項 ) (9 針 COM1) ( 見第 2 頁第 19 項 ) 20-Pin ATX 1 13 ATX 12V 這個 COM1 (2 針 CI1) ( 見第 2 頁第 24 項 ) 1 GND Signal 簡體中文 165 ASRock B75M-DGS Motherboard - ASRock B75M-DGS | Quick Installation Guide - Page 166
2. BIOS 信息 Flash Memory 存儲了 BIOS POST F2> 或 < D e l B I O S P O S T P O S T B I O S Ctrl>++ - ASRock B75M-DGS | Quick Installation Guide - Page 167
SJ/T 11364-2006 10 年。 圖一 部件名稱 鉛 (Pb) 鎘 (Cd) 汞 (Hg Cr(VI PBB PBDE) X O O O O O X O O O O O O SJ/T 11363-2006 X SJ/T 11363-2006 2002/95/EC 簡體中文 167 ASRock B75M-DGS Motherboard - ASRock B75M-DGS | Quick Installation Guide - Page 168
CPU http://www.asrock.com www.asrock.com/support/index.asp 1.1 華擎 B75M-DGS 主機板 (Micro ATX 規格 : 8.9 英吋 x 7.2 英吋 , 22.6 公分 x 18.3 公分 ) 華擎 B75M-DGS B75M-DGS Serial ATA(SATA I/O 擋板 ASRock提醒您... 若要在Windows® 7 / 7 64位元 / VistaTM / VistaTM 64 BIOS選項設為AHCI BIOS 168 ASRock B75M-DGS Motherboard - ASRock B75M-DGS | Quick Installation Guide - Page 169
Ivy Bridge CPU 支援 Pixel Shader 5.0、DirectX 11 技術。Intel® Sandy Bridge CPU 支援 Pixel Shader 4.1、 DirectX 10.1 1760MB 6) - 雙 VGA DVI 和 D-Sub DVI 1920x1200 @ 60Hz - 支援 D-Sub 2048x1536 @ 75Hz - DVI HDCP 功能 - DVI 1080p BD) / HD-DVD 光碟 - 5.1 Realtek ALC662 繁體中文 169 ASRock B75M-DGS Motherboard - ASRock B75M-DGS | Quick Installation Guide - Page 170
CPU 4 針 ) - 1 x 4 針 ) - 1 x 3 針 ) - 24 針 ATX 4 針 12V 2 x USB 2.0 4 USB 2.0 接口 ) - 1 x USB 3.0 2 USB 3.0 接口 ) - 64Mb AMI UEFI Legal BIOS ( 支援 GUI Plug and Play,PnP) - ACPI 1.1 jumperfree SMBIOS 2.3.1 - CPU Core, IGPU, DRAM, 1.8V PLL, VTT, VCCSA 調節 繁體中文 170 ASRock B75M-DGS Motherboard - ASRock B75M-DGS | Quick Installation Guide - Page 171
- 晚安 LED 指示燈 硬體監控 - CPU - CPU - CPU CPU 度) - CPU 12V, +5V, +3.3V 操作系統 - Microsoft® Windows® 7/7 64 位元 /VistaTM/VistaTM 64 位元 / XP/XP 64 20) 認證 - FCC, CE, WHQL - 支援 ErP/EuP ErP/EuP 21) http://www.asrock.com BIOS 繁體中文 171 ASRock B75M-DGS Motherboard - ASRock B75M-DGS | Quick Installation Guide - Page 172
及 USB Blocker。 3 15 4 Windows® 7 / VistaTM / XP 4GB。對於 Windows 64 位元 CPU XFast RAM 來利用 Windows 5 Gen 3 PCI Express Ivy Bridge CPU Sandy Bridge CPU PCI Express Gen 2 PCI Express。 6 Intel 7、 ASRock Extreme Tuning Utility (AXTU Hardware Monitor、 Fan Control、Overclocking、OC DNA 及 IES - ASRock B75M-DGS | Quick Installation Guide - Page 173
F I W i n d o w s D H C P 17 S4/S5 18 C P U C P U PC CPU 19 C.C.O CPU LGA775,LGA1155 與 LGA1156 775 和 1156 CPU 20、Microsoft® Windows® XP / XP 64-bit XFast RAM。Microsoft® Windows® VistaTM / VistaTM 64-bit / XP / XP 64-bit Intel Intel® USB 3.0 接頭。 173 ASRock B75M-DGS Motherboard 繁體中文 - ASRock B75M-DGS | Quick Installation Guide - Page 174
21、EuP, 全稱 Energy Using Product EuP 1.00W EuP EuP EuP Intel EuP 100mA 5Vsb 50 EuP 174 ASRock B75M-DGS Motherboard 繁體中文 - ASRock B75M-DGS | Quick Installation Guide - Page 175
1.3 3 1 和針腳 2 CMOS (CLRCMOS1, 3 2 頁第 25 項 ) 設定 默認設置 清除 CMOS 註: C L R C M O S1 C M O S 15 CLRCMOS1 的 pin2 及 pin3 短路 5 BIOS CMOS BIOS CMOS CMOS C M O S 1394 GUID 及 MAC C M O S B I O S 選 項"Clear Status 繁體中文 175 ASRock B75M-DGS Motherboard - ASRock B75M-DGS | Quick Installation Guide - Page 176
# SLIN# GND 1 SPD7 SPD6 ACK# SPD5 BUSY SPD4 PE SPD3 SLCT SPD2 SPD1 SPD0 STB# USB 2.0 (9 針 USB4_5) ( 見第 2 頁第 18 項 ) (9 針 USB6_7) ( 見第 2 頁第 17 項 ) I/O USB 2.0 USB 2.0 USB 2.0 USB 2.0 接 口。 繁體中文 176 ASRock B75M-DGS Motherboard - ASRock B75M-DGS | Quick Installation Guide - Page 177
LIN) 連接到 OUT2_L。 C. 將 Ground(GND) 連接到 Ground(GND)。 D. MIC_RET 和 OUT_RET 僅用於 HD AC'97 E Windows® XP / XP 64 Mixer Recorder FrontMic"。 在 Windows® 7 / 7 64 位元 / VistaTM / VistaTM 64 Realtek FrontMic Recording Volume"。 (9 針 PANEL1) ( 見第 2 頁第 15 項 ) 繁體中文 177 ASRock B75M-DGS Motherboard - ASRock B75M-DGS | Quick Installation Guide - Page 178
) FAN_SPEED_CONTROL CHA_FAN_SPEED +12V GND PWR_FAN_SPEED +12V GND CHA_FAN1 CPU (4 針 CPU_FAN1) ( 見第 2 頁第 2 項 ) FAN_SPEED_CONTROL CPU_FAN_SPEED +12V GND 請將 CPU 1 2 3 4 4-Pin CPU 風扇 (Quiet Fan 3-Pin CPU 3-Pin CPU CPU Pin 1-3。 Pin 1-3 連接 3-Pin 繁體中文 178 ASRock B75M-DGS Motherboard - ASRock B75M-DGS | Quick Installation Guide - Page 179
) 12 24 請將 ATX 1 13 24-pin ATX 12 24 20-pin ATX 20-pin ATX 著 Pin 1 和 Pin 13 ATX 12V (4 針 ATX12V1) ( 見第 2 頁第 1 項 ) 序列埠 (9 針 COM1) ( 見第 2 頁第 19 項 ) 20-Pin ATX 1 13 請將 ATX 12V COM1 (2 針 CI1) ( 見第 2 頁第 24 項 ) 1 GND Signal 繁體中文 179 ASRock B75M-DGS Motherboard - ASRock B75M-DGS | Quick Installation Guide - Page 180
2. BIOS 訊息 Flash Memory BIOS POST F2> 或 + + - ASRock B75M-DGS | Quick Installation Guide - Page 181
Pemimpin Instalasi Cepat B75M-DGS ASRock Support CD B75M-DGS ASRock 2 x Kabel satu serial Data ATA (SATA) (bebas-pilih) 1 x Satu Pelindung I/O ASRock Mengingatkan... Untuk mendapatkan performa lebih baik di Windows® 7/ 7 64-bit/ VistaTM/ VistaTM 64-bit, sebaiknya atur pilihan BIOS dalam Storage Con - ASRock B75M-DGS | Quick Installation Guide - Page 182
Intel® Sandy Bridge CPU - Ingatan sama Max. 1760MB - Output VGA Ganda: mendukung port DVI dan D-Sub melalui pengontrol tampilan independen - Mendukung DVI dengan resolusi maksimal hingga 1920x1200 @ 60Hz - Mendukung D-Sub dengan resolusi maksimal hingga 2048x1536 @ 75Hz ASRock B75M-DGS Motherboard - ASRock B75M-DGS | Quick Installation Guide - Page 183
KIPAS casis (4 pin) - 1 x Penghubung KIPAS Power (3 pin) - Penghubung power 24 pin ATX - Penghubung power 4 pin 12V - Penghubung audio panel dapan - 2 x USB 2.0 header (menggunakan 4 port USB 2.0) - 1 x USB 3.0 header (menggunakan 2 port USB 3.0) Bahasa Indonesia 183 ASRock B75M-DGS Motherboard - ASRock B75M-DGS | Quick Installation Guide - Page 184
digunakan Microsoft® Windows® 7 / 7 64-bit / VistaTM / VistaTM 64-bit / XP / XP 64-bit Sertifikasi - FCC, CE, WHQL - ErP/EuP Ready (memerlukan catu daya ErP/EuP ready) * Untuk informasi rinci, silakan kunjungi website kami: http://www.asrock.com Bahasa Indonesia 184 ASRock B75M-DGS Motherboard - ASRock B75M-DGS | Quick Installation Guide - Page 185
> Boot > Boot Option #1. ("xxx" is the device which contains your Windows® installation files. Normally it is an optical drive.) You can also press to launch boot menu at system POST and choose the item "UEFI:xxx" to boot. 4. Start Windows® installation. 185 ASRock B75M-DGS Motherboard English
-
 1
1 -
 2
2 -
 3
3 -
 4
4 -
 5
5 -
 6
6 -
 7
7 -
8
-
9
-
10
-
11
-
12
-
13
-
14
-
15
-
16
-
17
-
18
-
19
-
20
-
21
-
22
-
23
-
24
-
25
-
26
-
27
-
28
-
29
-
30
-
31
-
32
-
33
-
34
-
35
-
36
-
37
-
38
-
39
-
40
-
41
-
42
-
43
-
44
-
45
-
46
-
47
-
48
-
49
-
50
-
51
-
52
-
53
-
54
-
55
-
56
-
57
-
58
-
59
-
60
-
61
-
62
-
63
-
64
-
65
-
66
-
67
-
68
-
69
-
70
-
71
-
72
-
73
-
74
-
75
-
76
-
77
-
78
-
79
-
80
-
81
-
82
-
83
-
84
-
85
-
86
-
87
-
88
-
89
-
90
-
91
-
92
-
93
-
94
-
95
-
96
-
97
-
98
-
99
-
100
-
101
-
102
-
103
-
104
-
105
-
106
-
107
-
108
-
109
-
110
-
111
-
112
-
113
-
114
-
115
-
116
-
117
-
118
-
119
-
120
-
121
-
122
-
123
-
124
-
125
-
126
-
127
-
128
-
129
-
130
-
131
-
132
-
133
-
134
-
135
-
136
-
137
-
138
-
139
-
140
-
141
-
142
-
143
-
144
-
145
-
146
-
147
-
148
-
149
-
150
-
151
-
152
-
153
-
154
-
155
-
156
-
157
-
158
-
159
-
160
-
161
-
162
-
163
-
164
-
165
-
166
-
167
-
168
-
169
-
170
-
171
-
172
-
173
-
174
-
175
-
176
-
177
-
178
-
179
-
180
-
181
-
182
-
183
-
184
-
185
 |
 |
1
ASRock
B75M-DGS
Motherboard
English
Copyright Notice:
No part of this installation guide may be reproduced, transcribed, transmitted, or trans-
lated in any language, in any form or by any means, except duplication of documentation
by the purchaser for backup purpose, without written consent of ASRock Inc.
Products and corporate names appearing in this guide may or may not be registered
trademarks or copyrights of their respective companies, and are used only for identi
fi
ca-
tion or explanation and to the owners’ bene
fi
t, without intent to infringe.
Disclaimer:
Speci
fi
cations and information contained in this guide are furnished for informational use
only and subject to change without notice, and should not be constructed as a commit-
ment by ASRock. ASRock assumes no responsibility for any errors or omissions that may
appear in this guide.
With respect to the contents of this guide, ASRock does not provide warranty of any kind,
either expressed or implied, including but not limited to the implied warranties or condi-
tions of merchantability or
fi
tness for a particular purpose. In no event shall ASRock, its
directors, of
fi
cers, employees, or agents be liable for any indirect, special, incidental, or
consequential damages (including damages for loss of pro
fi
ts, loss of business, loss of
data, interruption of business and the like), even if ASRock has been advised of the pos-
sibility of such damages arising from any defect or error in the guide or product.
This device complies with Part 15 of the FCC Rules. Operation is subject to the following
two conditions:
(1) this device may not cause harmful interference, and
(2) this device must accept any interference received, including interference that
may cause undesired operation.
CALIFORNIA, USA ONLY
The Lithium battery adopted on this motherboard contains Perchlorate, a toxic substance
controlled in Perchlorate Best Management Practices (BMP) regulations passed by the
California Legislature. When you discard the Lithium battery in California, USA, please
follow the related regulations in advance.
“Perchlorate Material-special handling may apply, see
www.dtsc.ca.gov/hazardouswaste/perchlorate”
ASRock Website: http://www.asrock.com
Published July 2012
Copyright
©
2012 ASRock INC. All rights reserved.