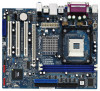
ASRock P4VM900-SATA2 RAID Installation Guide
ASRock P4VM900-SATA2 Manual
 |
View all ASRock P4VM900-SATA2 manuals
Add to My Manuals
Save this manual to your list of manuals |
ASRock P4VM900-SATA2 manual content summary:
- ASRock P4VM900-SATA2 | RAID Installation Guide - Page 1
With RAID Functions 5 1.4 BIOS Configuration Utility ...6 1.4.1 Enter BIOS Configuration Utility 6 1.4.2 Create Disk Array ...6 1.4.3 Delete Disk Array ...8 1.4.4 Select Boot Array ...8 2 VIA Windows RAID Installation Guide 10 2.1 VIA Windows RAID Installation Guide for Windows 2000/XP Users 10 - ASRock P4VM900-SATA2 | RAID Installation Guide - Page 2
2.1.7 Duplicate Critical RAID 1 Array 16 2.1.8 Rebuild Broken RAID 1 array 16 2.2 VIA Windows RAID Installation Guide for Windows Vista Users 19 2.2.1 Create Disk Array ...19 2.2.2 Remove Array ...22 2.2.3 Add/Remove Spare ...22 2.2.4 Synchronize Mirror Disk ...23 2.2.5 Repair Broken Disk Array - ASRock P4VM900-SATA2 | RAID Installation Guide - Page 3
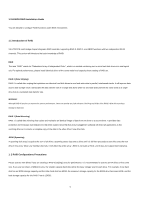
1 VIA BIOS RAID Installation Guide You are allowed to configure RAID functions under BIOS environment. 1.1 Introduction of RAID VIA VT8237S south bridge chipset integrates RAID controller supporting RAID 0, RAID 1, and JBOD functions with two independent SATA channels. This section will introduce - ASRock P4VM900-SATA2 | RAID Installation Guide - Page 4
Guide STEP 4: Install Windows 2000 / XP OS on your system. After step1, 2, 3, you can start to install Windows 2000 / XP OS on your system. At the beginning of Windows setup, press F6 to install a third-party RAID driver. When prompted, insert the SATA / SATAII driver diskette containing the VIA - ASRock P4VM900-SATA2 | RAID Installation Guide - Page 5
follow the instruction to install Windows Vista OS on your system. When you see "Where do you want to install Windows?" page, please insert the ASRock Support CD into your optical drive, and click the "Load Driver" button on the left on the bottom to load the VIA RAID drivers. VIA RAID drivers are - ASRock P4VM900-SATA2 | RAID Installation Guide - Page 6
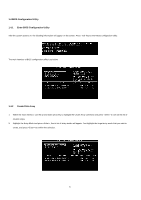
Utility After the system powers on, the following information will appear on the screen. Press 'Tab' key to enter BIOS configuration utility. The main interface of BIOS configuration utility is as below: 1.4.2 Create Disk Array 1. Within the main interface, use the up and down arrow key - ASRock P4VM900-SATA2 | RAID Installation Guide - Page 7
"Auto Setup", and another is "Select Disk Drives". Select "Auto Setup" to allow BIOS to select the disk drives and create array automatically. Select "Select Disk Drives" to let user select the array drives manually. When using Select Disk Drives method, the channel column will be activated. Just - ASRock P4VM900-SATA2 | RAID Installation Guide - Page 8
the first disk drive and become free space. Expand Span (JBOD) Array function is not available if VT8237S only supports 2 SATA ports. 1.4.3 Delete Disk Array User can delete a specific RAID that has been created. Following are the steps to delete a created disk array. 1. Use arrow key to highlight - ASRock P4VM900-SATA2 | RAID Installation Guide - Page 9
warning message will appear. Press Y to delete a specific array or press N to cancel. Delete a disk array will destroy all the data on the disk array except RAID 1. When a RAID 1 is deleted, the data - ASRock P4VM900-SATA2 | RAID Installation Guide - Page 10
VIA Windows RAID Installation Guide You are allowed to configure RAID functions under Windows environment. The "RAID Software" is a Windows- SATA controller. Please read this guide carefully and follow the instructions below to configure and manage RAID functions. For Windows 2000 / XP and Windows - ASRock P4VM900-SATA2 | RAID Installation Guide - Page 11
creating. Select a disk drive and click right arrow button to add the specific disk drive to array. After adding a disk drive, user can also remove the selected disk drive from array. Click the disk drive in "Array Disks" windows, then click left arrow button to remove the selected disk drive. Press - ASRock P4VM900-SATA2 | RAID Installation Guide - Page 12
expanded behind the first disk drive and become free space. 2.1.2 Delete Disk Array 1. Select the disk array that you want to delete from the left window. Click "Remove Array" button , then a warning message will pop up. 12 - ASRock P4VM900-SATA2 | RAID Installation Guide - Page 13
disk drives work normally by clicking button. After you complete the checking, a dialog window will pop up to show each disk's current status as following picture. Your hard disk drive must be compatible with ATA/ATAPI-5 specifications and support SMART commands; otherwise the checking will fail. 13 - ASRock P4VM900-SATA2 | RAID Installation Guide - Page 14
2.1.4 Verify Mirror Disk Data on the mirror disk must be the same as its corresponding source disk to provide fault tolerance for RAID 1. 1. Select a RAID 1. Right-click the selected RAID, and then a shortcut menu will appear. Click "Verify Mirror" to verify whether the source and the mirror disks - ASRock P4VM900-SATA2 | RAID Installation Guide - Page 15
"need-sync" mirror disk should be synchronized as soon as possible. 2.1.5 Synchronize Mirror Disk For RAID 1, it must be synchronized when data on the mirror disk is not identical with its corresponding source disk. Sometimes the data on the mirror disk may be newer than the source disk. For - ASRock P4VM900-SATA2 | RAID Installation Guide - Page 16
2.1.6 Disk Error Detection RAID will pop up an error message when the failure or absence of a disk drive is detected. 2.1.7 Duplicate Critical RAID 1 Array If, during the system-booting, the software detects the inconsistence between the source and the mirror disks of RAID 1, the disk array will be - ASRock P4VM900-SATA2 | RAID Installation Guide - Page 17
RAID 1 array is detected by the RAID software, it will indicate a serial steps to repair this problem. 1. A dialog box will pop up to indicate the RAID is broken. Click Yes. 2. Then another dialog box will pop up. If the source or the - ASRock P4VM900-SATA2 | RAID Installation Guide - Page 18
4. A warning message will pop up. If you want to rebuild the RAID by using the disk drive that you selected in the previous step, click "Next". Warning: The data on the selected disk drive will be lost. 5. Reboot the system. 6. This RAID is marked as a critical RAID. The RAID software will do the " - ASRock P4VM900-SATA2 | RAID Installation Guide - Page 19
2.2 NVIDIA Windows RAID Installation Guide for Windows Vista Users After GUI software is installed, it will automatically start every time when your Windows OS is started. An icon tray of the tool bar to indicate that GUI software is currently running. will appear in the system Just double - ASRock P4VM900-SATA2 | RAID Installation Guide - Page 20
to do anything. Selecting "Custom", tool will list all available disks in the available disks list, and you have to select disks for the array manually. You may adjust the selected disks manually in both cases. C. Select Array Disks 20 - ASRock P4VM900-SATA2 | RAID Installation Guide - Page 21
You need to select the disks for the array you are creating. Please select an available disk from the left side list, then click the Right-Arrow button to add a disk into array. Array disks will be added in the order of Source, Mirror and Spare disk. A Spare disk can also be added or removed after a - ASRock P4VM900-SATA2 | RAID Installation Guide - Page 22
"Remove Array" on the pop-up shortcut menu. Then follow the instructions on the screen to remove array. 2.2.3 Add/Remove Spare This function Remove Spare" wizard will guide you to finish this operation. You can also shift the top-left block of main application window to Array View/Tree, select - ASRock P4VM900-SATA2 | RAID Installation Guide - Page 23
from the one with newer data to the other disk. Note that the source disk does not always have the latest data. Please follow the instructions on the screen to synchronize mirror array. 2.2.5 Repair Broken Disk Array If some disk(s) in a disk array can not work any more (due to disk
-
 1
1 -
 2
2 -
 3
3 -
 4
4 -
 5
5 -
 6
6 -
 7
7 -
8
-
9
-
10
-
11
-
12
-
13
-
14
-
15
-
16
-
17
-
18
-
19
-
20
-
21
-
22
-
23
 |
 |

1
VIA RAID Installation Guide
1 VIA BIOS RAID Installation Guide …………………………………………………………………………………..….. 3
1.1 Introduction of RAID …………………………………………………………………………………………..……. 3
1.2 RAID Configuration Precautions …………………………………………………………………………...……… 3
1.3 Installing Windows 2000 / XP / Vista With RAID Functions ………………………………………………..…… 4
1.4.1 Installing Windows 2000 / XP With RAID Functions………………………………………………..…….. 4
1.4.2 Installing Windows Vista With RAID Functions………………………………………………………..…... 5
1.4 BIOS Configuration Utility ……………………………………………………………………………………..……. 6
1.4.1 Enter BIOS Configuration Utility ……………………………………………………………………..…….. 6
1.4.2 Create Disk Array ………………………………………………………………………………………..…... 6
1.4.3 Delete Disk Array …………………………………………………………………………………………
.....
8
1.4.4 Select Boot Array …………………………………………………………………………………………….. 8
2 VIA Windows RAID Installation Guide ………………………………………………………………………………...… 10
2.1 VIA Windows RAID Installation Guide for Windows 2000/XP Users ……………………………….………….. 10
2.1.1 Create RAID Array ………………………………………………………………………………………………… 10
2.1.2 Delete Disk Array ……………………………………………………………………………………………..…… 12
2.1.3 Check All Disks ……………………………………………………………………………………………………. 13
2.1.4 Verify Mirror Disk ………………………………………………………………………………………………….. 14
2.1.5 Synchronize Mirror Disk ………………………………………………………………………………………….. 15
2.1.6 Disk Error Detection ………………………………………………………………………………………………. 16