ASRock X79 Extreme6 User Manual - Page 25
ASRock Game Blaster Installation Guide X79 Extreme6/GB, ASRock Game Blaster and Driver Installation
 |
View all ASRock X79 Extreme6 manuals
Add to My Manuals
Save this manual to your list of manuals |
Page 25 highlights
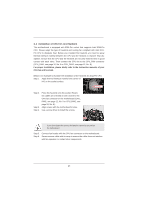
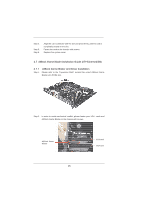
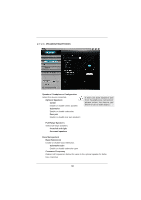
Step 4. Step 5. Step 6. Align the card connector with the slot and press firmly until the card is completely seated on the slot. Fasten the card to the chassis with screws. Replace the system cover. 2.7 ASRock Game Blaster Installation Guide (X79 Extreme6/GB) 2.7.1 ASRock Game Blaster and Driver Installation Step 1. Please refer to the "Expansion Slots" section then insert ASRock Game Blaster into PCIE4 slot. Step 2. In order to avoid mechanical conflict, please fasten your VGA cards and ASRock Game Blaster to the chassis with screws. ASRock Game Blaster VGA card VGA card 25
-
 1
1 -
2
-
3
-
4
-
5
-
6
-
7
-
8
-
9
-
10
-
11
-
12
-
13
-
14
-
15
-
16
-
17
-
18
-
19
-
 20
20 -
 21
21 -
 22
22 -
 23
23 -
 24
24 -
 25
25 -
 26
26 -
 27
27 -
 28
28 -
 29
29 -
 30
30 -
31
-
32
-
33
-
34
-
35
-
36
-
37
-
38
-
39
-
40
-
41
-
42
-
43
-
44
-
45
-
46
-
47
-
48
-
49
-
50
-
51
-
52
-
53
-
54
-
55
-
56
-
57
-
58
-
59
-
60
-
61
-
62
-
63
-
64
-
65
-
66
-
67
-
68
-
69
-
70
-
71
-
72
-
73
-
74
-
75
-
76
-
77
-
78
-
79
-
80
-
81
-
82
-
83
-
84
-
85
-
86
-
87
-
88
-
89
-
90
-
91
-
92
-
93
-
94
-
95
-
96
-
97
-
98
-
99
-
100
-
101
 |
 |

25
2.7
ASRock Game Blaster Installation Guide (X79 Extreme6/GB)
2.7.1
ASRock Game Blaster and Driver Installation
Step 1.
Please refer to the “Expansion Slots” section then insert ASRock Game
Blaster into PCIE4 slot.
Step 2.
In order to avoid mechanical con
fl
ict, please fasten your VGA
cards and
ASRock Game Blaster to the chassis with screws.
ASRock Game
Blaster
VGA card
VGA card
Step 4.
Align the card connector with the slot and press
fi
rmly until the card is
completely seated on the slot.
Step 5.
Fasten the card to the chassis with screws.
Step 6.
Replace the system cover.