ATI X3-256 User Guide - Page 15
Installing the Card, Connect the power extension cable to the 4-pin power connection
 |
UPC - 727419411837
View all ATI X3-256 manuals
Add to My Manuals
Save this manual to your list of manuals |
Page 15 highlights
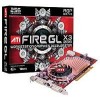
Detailed Installation 9 Installing the Card 1 Turn off the computer, monitor, and other peripheral devices. 2 Unplug the computer's power cord and disconnect all cables from the back of your computer. L WARNING - Wait approximately 20 seconds after unplugging the power cord before disconnecting a peripheral or removing a component from the motherboard to avoid possible damage to the motherboard. 3 Remove the computer cover. If necessary, consult your computer's manual for help in removing the cover. L WARNING - Remember to discharge your body's static electricity by touching the power supply or the metal surface of the computer chassis. 4 Unscrew or unfasten and remove any existing graphics card from your computer. Note: If your computer has an on-board graphics capability, you may need to disable it on the motherboard. For more information, see your computer documentation. 5 Locate the appropriate slot and, if necessary, remove the metal back- plate cover. 6 Align your ATI graphics card with the slot and press it in firmly until the card is fully seated. 7 Remove the power cable from the hard drive power connector. 8 Connect the power extension cable to the 4-pin power connection on the graphics card. 9 Connect the power extension cable to the power supply . 10 Connect the power extension cable to the hard drive. 11 Screw in or fasten the graphics card securely. Make sure the cables are not interfering with anything inside the computer (for example, a cooling fan) and replace the computer cover. 12 Reconnect any cables you have disconnected and plug in the computer's power cord.
-
 1
1 -
2
-
3
-
4
-
5
-
6
-
7
-
8
-
9
-
 10
10 -
 11
11 -
 12
12 -
 13
13 -
 14
14 -
 15
15 -
 16
16 -
 17
17 -
 18
18 -
 19
19 -
 20
20 -
21
-
22
-
23
-
24
-
25
-
26
-
27
-
28
-
29
-
30
-
31
-
32
-
33
-
34
-
35
-
36
-
37
-
38
-
39
-
40
-
41
-
42
-
43
-
44
-
45
-
46
-
47
-
48
-
49
-
50
-
51
-
52
-
53
-
54
 |
 |
