Acer Aspire S7-392 Quick Guide - Page 6
Left view, Information on USB 3.0 - ports
 |
View all Acer Aspire S7-392 manuals
Add to My Manuals
Save this manual to your list of manuals |
Page 6 highlights
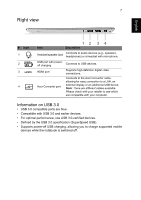
6 Left view Your Acer notebook tour English 12 3 4 # Icon Item 1 DC-in jack 2 Power button 3 USB port 4 SD card reader Description Connects to an AC adapter. Turns the computer on and off. Note: The computer will also turn on by opening the lid. Connects to USB devices. Accepts one Secure Digital card (SD or SDHC). Note: To remove the card, simply pull it from the slot. Warning: The card sticks from the side of the computer. Ensure you don't damage your card. Information on USB 3.0 • USB 3.0 compatible ports are blue. • Compatible with USB 3.0 and earlier devices. • For optimal performance, use USB 3.0-certified devices. • Defined by the USB 3.0 specification (SuperSpeed USB).
-
 1
1 -
 2
2 -
 3
3 -
 4
4 -
 5
5 -
 6
6 -
 7
7 -
 8
8 -
 9
9
 |
 |

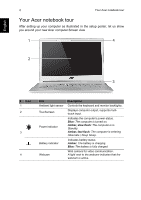
Your Acer notebook tour
6
English
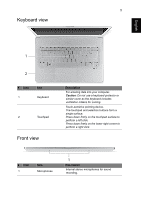
Left view
2
3
1
4
#
Icon
Item
Description
1
DC-in jack
Connects to an AC adapter.
2
Power button
Turns the computer on and off.
Note
: The computer will also turn on by
opening the lid.
3
USB port
Connects to USB devices.
4
SD card reader
Accepts one Secure Digital card (SD or
SDHC).
Note
: To remove the card, simply pull it from
the slot.
Warning
: The card sticks from the side of the
computer. Ensure you don’t damage your
card.
Information on USB 3.0
•
USB 3.0 compatible ports are blue.
•
Compatible with USB 3.0 and earlier devices.
•
For optimal performance, use USB 3.0-certified devices.
•
Defined by the USB 3.0 specification (SuperSpeed USB).