Airlink AGSW1600V2 Quick Installation Guide - Page 7
Installing the Switch
 |
View all Airlink AGSW1600V2 manuals
Add to My Manuals
Save this manual to your list of manuals |
Page 7 highlights
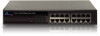
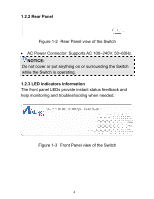
Section 2 Installing the Switch The site where you place the Switch may greatly affect its performance. 2.1 Installation Please follow the guidelines below to install the Switch: • Please install the Switch in a fairly cool and dry place. Please refer to the Technical Specifications for the acceptable temperature and humidity operating ranges. • Please install the Switch on a sturdy, level surface that can support its weight. • When connecting the power cord to the Switch and the power outlet, the distance should be no more than 182cm. • Please leave at least 10cm (about 4 inches) of space at the front and rear of the Switch for ventilation. 2.2 Desktop or Shelf Installation When installing the Switch on the desktop or shelf, please attach the rubber feet to the Switch. Peel off the protective paper on the pads and attach them to the bottom of the Switch (one at each corner). 6
-
 1
1 -
 2
2 -
 3
3 -
 4
4 -
 5
5 -
 6
6 -
 7
7 -
 8
8 -
 9
9 -
 10
10 -
 11
11 -
 12
12 -
13
 |
 |
