Airlink ANAS350 User Manual
Airlink ANAS350 Manual
 |
View all Airlink ANAS350 manuals
Add to My Manuals
Save this manual to your list of manuals |
Airlink ANAS350 manual content summary:
- Airlink ANAS350 | User Manual - Page 1
Office NAS 3.5" IDE/SATA Network Attached Storage Model # ANAS350 User's Manual Ver. 2.3 - Airlink ANAS350 | User Manual - Page 2
- Access Control 22 6. Download Assistant ...24 6.1 Download Assistant - FTP Configuration 24 6.2 Download Assistant - HTTP Configuration 25 6.3 Download Assistant - E-mail Alert 25 7. Administration ...27 7.1 Administration - Management 27 7.2 Administration - Firmware Upgrade 27 - Airlink ANAS350 | User Manual - Page 3
account support for read/write security • Real-time clock synchronization for scheduled disk activity • Firmware Upgradeable • Web-based Configuration allows for remote management • Supports Hard Disk Power Saving mode (Standby) • Built-in FTP server • UPnP support. • Supports scheduled downloads - Airlink ANAS350 | User Manual - Page 4
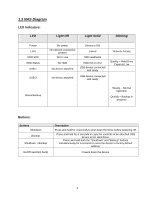
to shut down the Drive before powering off. Press and hold for 4 seconds to copy the contents of an attached USB device to the Hard Drive. Press and hold both the "Shutdown" and "Backup" buttons simultaneously for 6 seconds to reset the device to factory default settings. Powers down the device. 4 - Airlink ANAS350 | User Manual - Page 5
2. Hard Drive Installation This section provides instructions on how to properly install a hard drive into the NAS device. WARNING: The Network Storage device is not hot-swappable. Please make sure that it is turned off and not connected to the power outlet when performing the following assembly - Airlink ANAS350 | User Manual - Page 6
Step 3 Put the 3.5-inch IDE or SATA hard disk into the slot, and connect the proper data cable for your hard drive. (The red cable is used for SATA and the gray one is for IDE). Step 3a IDE Step 3b SATA Step 4 Secure the drive to the metal plate on the sides with the provided four screws. 6 - Airlink ANAS350 | User Manual - Page 7
and secure it with the two screws removed in step 1. Step 7 Connect Office NAS to your router or your computer with the provided Ethernet cable, and connect the supplied power adapter. Plug the power cord into a power outlet. (Note: connecting this device to your computer directly is not recommended - Airlink ANAS350 | User Manual - Page 8
Step 8 Turn it on by pressing the On switch in the back of the device. Verify the Power and LAN LEDs are lit. Congratulations! The hard drive installation is complete! 8 - Airlink ANAS350 | User Manual - Page 9
do some configuration which can be accessed in a few different ways. Step1 There are multiple methods to access the NAS configuration. Method 1: Use the and select Install NAS Configuration Utility. When the setup wizard coming up, follow the screen instructions and click Next to finish - Airlink ANAS350 | User Manual - Page 10
To open the NAS Configuration Utility go to Start > (All) Programs > Airlink101 NAS Configuration Utility > Airlink101 NAS Configuration Utility. When prompted for login access, type in default username and password admin for both blanks and click OK button. 10 - Airlink ANAS350 | User Manual - Page 11
reset the device to factory default settings. Method 2: Use your web browser such as Internet Explorer or Firefox. To use your web browser, open up the browser and in the Address bar type in http://airnas and press Enter or hit the Go button. (Optional: You can also type in the IP address of the NAS - Airlink ANAS350 | User Manual - Page 12
enter the proper username and password. The default username is admin and the default password is admin. Be sure to enter it all lowercase. If you ever change the username or password and forget, you will need to perform the factory reset procedure to reset the system to factory defaults. To do this - Airlink ANAS350 | User Manual - Page 13
Once you are at the configuration screen you can setup specific options for the NAS device through the Setup screen. This will configure many of the network options and other settings such as the System Time the default mode of the device. 4.1 Setup - Wizard If you wish, you can use the Setup - Airlink ANAS350 | User Manual - Page 14
do not have a router you can choose the second option (Server). If you are not sure which one you should choose, just choose Auto. To manually assign an IP address to the NAS device, choose the 4th option (Static). Click Next to continue. 14 - Airlink ANAS350 | User Manual - Page 15
Zone, you can choose how the time is set. If the device has access to the Internet it can synchronize the time with a specified time server on time with your computer, or you can set the time manually. There is also an option for the NAS device to keep track of Daylight Savings changes. Click Next - Airlink ANAS350 | User Manual - Page 16
choose Guest Mode, all users will be able to view and access the contents of the shared folder that you create. There is allow you to create a shared folder which can be accessed by anyone, and private folders which can only be accessed by each user. You can specify the disk space for each folder. - Airlink ANAS350 | User Manual - Page 17
you are satisfied with the options you have selected click the Save Settings button to complete the Setup Wizard process. Congratulations! the setup of your NAS device is complete! 17 - Airlink ANAS350 | User Manual - Page 18
Provider. Secondary DNS: A backup DNS server in case the Primary DNS fails to work. This is also normally provided by your Internet Service Provider. Gateway: This is the IP address with which the NAS device will connect to the Internet. If you are unsure what this is, please contact your Internet - Airlink ANAS350 | User Manual - Page 19
this button and Enabling the MAC Address Control, the NAS can be setup to specifically assign an IP address to a certain computer based on the computers MAC Address. This way the IP address of the computer will never change, where normally it may change when the computer is powered on/off. 4.3 Setup - Airlink ANAS350 | User Manual - Page 20
diagnostics and formatting tools as well as how to setup the access rules and user permissions for the shared folders. 5.1 Storage problems with the disk that may have been caused by powering off the NAS device before properly shutting it down. This diagnostic will attempt to correct any problems - Airlink ANAS350 | User Manual - Page 21
when viewed from My Network Places. Workgroup: The current workgroup under which the NAS will be viewed. This option is generally found in your Windows System options under the Control Panel and the default is usually set to WORKGROUP. Please consult your Windows operating system documentation for - Airlink ANAS350 | User Manual - Page 22
FTP Max Connections per IP: This is the support each connection with an adequate data transfer speed (as determined by the administrator). 5.3 Storage Configuration - Access Control Under the Access Control Menu of the NAS a username and password and maximum number of different user accounts is 20. 22 - Airlink ANAS350 | User Manual - Page 23
Add: Clicking Add will add the user to the table with the corresponding username, password and quota. Cancel: Clicking Cancel will clear all entries for the current user. Previous: Clicking they have each been allocated. Back: Clicking Back will bring you back to the main Access Control screen. 23 - Airlink ANAS350 | User Manual - Page 24
. 6.1 Download Assistant - FTP Configuration This page allows you to setup the NAS device to download files from a remote FTP server. This is different from NAS server is operating as the FTP Client. Name: This is the name of the FTP server and can be anything you choose. URL: This is the IP address - Airlink ANAS350 | User Manual - Page 25
to access the file you specify. Otherwise the NAS device will use the standard Anonymous login. Please contact your FTP server administrator for your login method. Username/Password: If a Username and Password are required, fill in this information here. E-mail Alert: By typing in an e-mail address - Airlink ANAS350 | User Manual - Page 26
being sent from. Outgoing E-mail (SMTP) Server Address: This is the SMTP server address of the email provider you are using such as smtp.hotmail.com Account Name: This is the e-mail account username for the specified e-mail provider. Account Password: This is the password for the e-mail account. 26 - Airlink ANAS350 | User Manual - Page 27
and confirming it. The default password is admin 7.2 Administration - Firmware Upgrade This page displays the current firmware version and allows you to upgrade to a newer firmware if available. Typically any updated firmware can be found at our website at http://www.airlink101.com and must be - Airlink ANAS350 | User Manual - Page 28
7.3 Administration - Backup/Restore This page allows you to perform various maintenance operations such as restoring the NAS device to default settings. You can also save the current configuration to your computer so that it can be restored at a later time if necessary. 28 - Airlink ANAS350 | User Manual - Page 29
be in progress. 8.1 Status - System This page shows us the current firmware version along with the current system time and the host name of the NAS Device. It also displays information about the current status of the hard disk and any USB devices that may be attached. Clicking the Device Information - Airlink ANAS350 | User Manual - Page 30
8.2 Status - Local Network The Local Network page displays information regarding the network configuration of the NAS device such as its IP Address and MAC Address and any DHCP options that have been configured. Here it is also possible to view the current list of DHCP clients that are connected to - Airlink ANAS350 | User Manual - Page 31
8.4 Status - Log On the Log page you will find a complete log of all actions that the NAS device has taken including network and file activity and also shows a history of any downloads that it has made. This can be useful in troubleshooting or diagnosing any problems that may have occurred. 31 - Airlink ANAS350 | User Manual - Page 32
easily accessible. Basically it can be setup so that the NAS device shows up as a drive letter when you use My Computer or Windows Explorer. Step 1 Open My Computer or Windows Explorer and in the address bar type in \\airnas\ in the Address Bar. If you have changed the host name of the NAS device - Airlink ANAS350 | User Manual - Page 33
mode, you need to click the link to "Connect using a different user name" and enter in the username and password information. Step 4 Now whenever you wish to access your folder on the NAS device you can simply open My Computer or Windows Explorer and you should see the folder listed under the - Airlink ANAS350 | User Manual - Page 34
can also be used as a remote backup site in case something happens to your computer. All backup data can be saved to the NAS instead of to your local disk. If you are using Windows XP Professional you can find the Backup Utility under Start>Programs->Accessories->System Tools-> - Airlink ANAS350 | User Manual - Page 35
Step 2 Choose the option to Back up files and settings and click Next. Step 3 Choose the fourth option to Let me chose what to back up and click Next. 35 - Airlink ANAS350 | User Manual - Page 36
"backup". You can either choose to back up entire drives, or just specific folders. Just be sure that there is enough disk space on the NAS device to hold all the data you wish to save. Click Next to continue. Step 5 Here is where we select the destination location of the - Airlink ANAS350 | User Manual - Page 37
Step 6 Finally you can complete the Backup Wizard. Clicking finish will start the backup process immediately or you can click Advanced to schedule the backup for a later time. 37 - Airlink ANAS350 | User Manual - Page 38
, 10/100 Mbps with Auto-MDI/MDIX • 2 x USB2.0 host (480Mbps high speed) IDE Controller • UltraDMA 133 Button • Backup • Shutdown • Reset LED • Power • LAN • HDD/RW, HDD Status • USB1, USB2 • Status (Backup) Power adapter • External, 12V/4A Dimensions • 216 x 150 x 52mm (L x W x H) Weight • 1.6 lb - Airlink ANAS350 | User Manual - Page 39
and logos that are identified as trademarks and/or service marks are, unless noted otherwise, the trademarks and service marks of AirLink101. All other product or service names are the property of their respective holders. AirLink101 products are protected under numerous U.S. and foreign patents and
-
 1
1 -
 2
2 -
 3
3 -
 4
4 -
 5
5 -
 6
6 -
 7
7 -
8
-
9
-
10
-
11
-
12
-
13
-
14
-
15
-
16
-
17
-
18
-
19
-
20
-
21
-
22
-
23
-
24
-
25
-
26
-
27
-
28
-
29
-
30
-
31
-
32
-
33
-
34
-
35
-
36
-
37
-
38
-
39
 |
 |

Office NAS
3.5” IDE/SATA Network Attached Storage
Model # ANAS350
User’s Manual
Ver. 2.3