Airlink APSUSB1 Quick installation guide
Airlink APSUSB1 Manual
 |
View all Airlink APSUSB1 manuals
Add to My Manuals
Save this manual to your list of manuals |
Airlink APSUSB1 manual content summary:
- Airlink APSUSB1 | Quick installation guide - Page 1
Model # APSUSB1 Installation Guide - Airlink APSUSB1 | Quick installation guide - Page 2
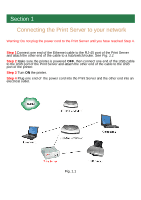
is powered OFF, then connect one end of the USB cable to the USB port of the Print Server and attach the other end of the cable to the USB port of the printer. Step 3 Turn ON the printer. Step 4 Plug one end of the power cord into the Print Server and the other end into an electrical outlet. Fig - Airlink APSUSB1 | Quick installation guide - Page 3
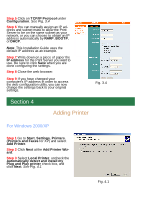
network in order for you to print through the Print Server. Follow the steps below to access the Print Server's Web Configuration Utility. If your network ID is already using the 192. 168.1.x segment, skip to Section 3, Accessing the Web Configuration Utility. For Windows 2000/XP Step 1 On one of - Airlink APSUSB1 | Quick installation guide - Page 4
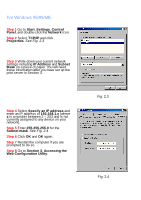
For Windows 95/98/ME Step 1 Go to Start Mask on a piece of paper. You will need these information after you have set up the print server in Section 3. Step 4 Select Specify an IP address and enter an IP address of 192. 8 Go to Section 3, Accessing the Web Configuration Utility. Fig. 2.3 Fig. 2.4 - Airlink APSUSB1 | Quick installation guide - Page 5
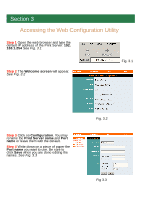
the Web Configuration Utility Step 1 Open the web browser and type the default IP address of the Print Server: 192. 168.1.254 See Fig. 3.1 Step 2 The Welcome screen will appear. See Fig. 3.2 Fig. 3.1 Step 3 Click on Configuration. You may rename the Print Server name and Port name or leave - Airlink APSUSB1 | Quick installation guide - Page 6
Protocol under Configuration. See Fig. 3.4 Step 6 You can manually assign an IP address and subnet mask to allow the Print Server to be on the same subnet as your network, or you can choose to obtain an IP address automatically by RARP, BOOTP, or DHCP. Note: This Installation Guide uses the default - Airlink APSUSB1 | Quick installation guide - Page 7
click Next. See Fig. 4.2 Step 5 Click Next at the Add Standard TCP/IP Printer Port Wizard. Step 6 Type in the IP address of the Print Server and the port name you have written down on the piece of paper in Section 3 and click Next. See Fig. 4.3 Fig. 4.2 Step 7 Select Custom then click on Settings - Airlink APSUSB1 | Quick installation guide - Page 8
Step 12 If a driver for the printer is already installed, select Keep existing driver and click Next. Step 13 Type in a name for your printer and click Next. For Windows 2000, select if you want to set this printer as the default printer. See Fig. 4.7 Step 14 Select if you want to print a test page - Airlink APSUSB1 | Quick installation guide - Page 9
For Windows 95/98/ME Step 1 Go to Start, Settings, Control Panel, and double-click on Network. Step 2 Click of the LPR file. See Fig. 4.10 Step 9 Click OK. Step 10 Select LPR for TCP/IP Printing and click Properties. See Fig. 4.11 Step 11 Click Add Port. Fig. 4.8 Fig. 4.9 Fig. 4.10 Fig. 4.11 - Airlink APSUSB1 | Quick installation guide - Page 10
the IP address of the Print Server and the port name you have written down on the piece of paper in Section 3 and click OK. See Fig. 4.12 Step 13 The IP address and the port name will be displayed in the port list. Click OK. Step 14 Click OK. Note: Windows 98 may prompt you - Airlink APSUSB1 | Quick installation guide - Page 11
manufacturer and model of your printer and click Next. Note: If your printer is not on the list, click Have Disk, insert the printer driver disk that came with your printer, and click Next. See Fig. 4.15 Step 22 If a driver for the printer is already installed, select Keep existing driver and click - Airlink APSUSB1 | Quick installation guide - Page 12
sections to choose from: Management, Configuration, Tools, and Help. Note: As an option, you can also use the Print Server Admin utility (PS Admin) included in the provided CD to manage your Print Server. Please refer to the User's Manual in the CD for installation and operation procedures for the - Airlink APSUSB1 | Quick installation guide - Page 13
USB port. PJL Printer: This feature supports Hewlett-Packard PJL (Printer Job Language) standard for bi-directional printing. Click Save to update any changes you have made. TCP/IP Protocol: Configures the TCP/IP properties of the Print Server to manually assign an IP address to the Print Server, or - Airlink APSUSB1 | Quick installation guide - Page 14
Font Group: Select the font group Click Save to update any changes you have made. Tools Print Test: Prints an ASCII test page from the Print Server to the printer. Your USB printer must support Native DOS mode printing. Click Test to print the test page. See Fig. 5.7 Fig. 5.5 Fig. 5.6 Fig. 5.7 - Airlink APSUSB1 | Quick installation guide - Page 15
Yes to restart the Print Server. See Fig. 5.7 Factory Reset: Reset all settings to factory default and restart the Print Server. The IP address of the Print Server will return to the factory default of 192.168.1. 254 Click Yes to Factory Reset and restart the Print Server. See Fig. 5.8 Help About - Airlink APSUSB1 | Quick installation guide - Page 16
Section 6 Product Specifications Printer Connection Printer Interface: One USB Port (ver 1.1) Network Connection Network Interface SNAP (auto-switching) Transport Protocols: TCP/IP, NetBEUI, AppleTalk TCP/IP Protocols Supported: BOOTP, SNMP, Telnet, TFTP, FTP, LPD, RARP, DHCP Management and - Airlink APSUSB1 | Quick installation guide - Page 17
Section 7 Technical Support E-mail: [email protected] Toll Free: 1-888-746-3238 Web site: www.airlinkplus.com
-
 1
1 -
 2
2 -
 3
3 -
 4
4 -
 5
5 -
 6
6 -
 7
7 -
8
-
9
-
10
-
11
-
12
-
13
-
14
-
15
-
16
-
17
 |
 |
Installation Guide
Model # APSUSB1