Airlink APSUSB1 Quick installation guide - Page 9
Start, Settings, Control, Panel, Network, Client, Have Disk, Browse, lpr folder, lpr.inf, LPR - windows 7
 |
View all Airlink APSUSB1 manuals
Add to My Manuals
Save this manual to your list of manuals |
Page 9 highlights
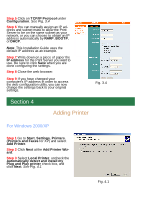
For Windows 95/98/ME Step 1 Go to Start, Settings, Control Panel, and double-click on Network. Step 2 Click Add. Step 3 Select Client and click Add. See Fig. 4.8 Step 4 Click Have Disk. Step 5 Insert the provided CD into the CDROM drive. Step 6 Click Browse and browse to your CD-ROM drive. Step 7 Select the letter of your CD-ROM drive, double-click on the lpr folder, select lpr.inf, and click OK. See Fig. 4.9 Step 8 Click OK to accept the location of the LPR file. See Fig. 4.10 Step 9 Click OK. Step 10 Select LPR for TCP/IP Printing and click Properties. See Fig. 4.11 Step 11 Click Add Port. Fig. 4.8 Fig. 4.9 Fig. 4.10 Fig. 4.11
-
 1
1 -
2
-
3
-
 4
4 -
 5
5 -
 6
6 -
 7
7 -
 8
8 -
 9
9 -
 10
10 -
 11
11 -
 12
12 -
 13
13 -
 14
14 -
15
-
16
-
17
 |
 |

For Windows 95/98/ME
Step 1
Go to
Start
,
Settings
,
Control
Panel
, and double-click on
Network
.
Step 2
Click
Add
.
Step 3
Select
Client
and click
Add
.
See
Fig. 4.8
Fig. 4.8
Step 4
Click
Have Disk
.
Step 5
Insert the provided CD into the CD-
ROM drive.
Step 6
Click
Browse
and browse to your
CD-ROM drive.
Step 7
Select the letter of your CD-ROM
drive, double-click on the
lpr folder
, select
lpr.inf
, and click
OK
.
See Fig. 4.9
Fig. 4.9
Step 8
Click
OK
to accept the location of
the LPR file.
See Fig. 4.10
Step 9
Click
OK
.
Fig. 4.10
Step 10
Select
LPR for TCP/IP Printing
and click
Properties
.
See Fig. 4.11
Step 11
Click
Add Port
.
Fig. 4.11