Airlink APSUSB2 Quick installation guide - Page 10
Step 12, Step 13, Step 14, Step 15, Step 16, Step 17, Step 18, Step 19, Step 20
 |
View all Airlink APSUSB2 manuals
Add to My Manuals
Save this manual to your list of manuals |
Page 10 highlights
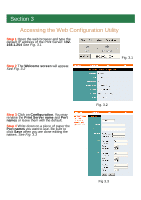
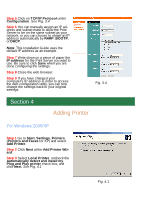
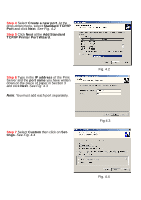
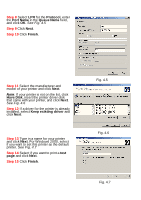
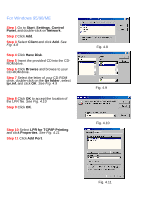
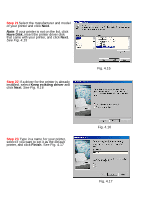
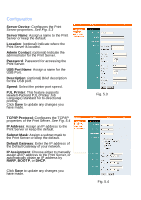
Step 12 Type in the IP address of the Print Server and the port name you have written down on the piece of paper in Section 3 and click OK. See Fig. 4.12 Step 13 The IP address and the port name will be displayed in the port list. Click OK. Step 14 Click OK. Note: Windows 98 may prompt you for the Windows 98 CD-ROM. Insert the Windows 98 CD, and type in D:\Win98 (where D is the letter of your CD-ROM drive) and click OK. See Fig. 4.13 Restart the computer if you are prompted to do so. Step 15 After your computer is restarted, go to Start, Settings, Printers, Add Printer. Step 16 Click Next at the Add Printer Wizard. Step 17 Select Network Printer and click Next. Step 18 Click Browse. Step 19 Browse to the Printer Port, highlight it, and click OK. See Fig. 4.14 Step 20 Verify the Network path is correct, select if you print from MS-DOSbased programs, and click Next. Fig. 4.12 Fig. 4.13 Fig. 4.14
-
 1
1 -
2
-
3
-
4
-
 5
5 -
 6
6 -
 7
7 -
 8
8 -
 9
9 -
 10
10 -
 11
11 -
 12
12 -
 13
13 -
 14
14 -
 15
15 -
16
-
17
 |
 |
