Airlink APSUSB2 Quick installation guide - Page 6
Adding Printer - manual
 |
View all Airlink APSUSB2 manuals
Add to My Manuals
Save this manual to your list of manuals |
Page 6 highlights
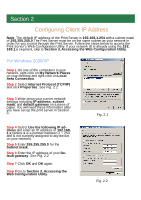
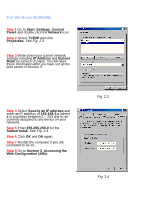
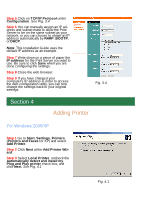
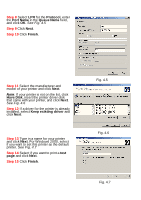
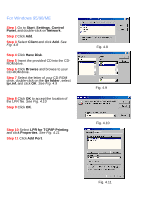
Step 5 Click on TCP/IP Protocol under Configuration. See Fig. 3.4 Step 6 You can manually assign an IP address and subnet mask to allow the Print Server to be on the same subnet as your network, or you can choose to obtain an IP address automatically by RARP, BOOTP, or DHCP. Note: This Installation Guide uses the default IP address as an example. Step 7 Write down on a piece of paper the IP address for the Print Server you want to use. Be sure to click Save when you are done configuring the settings. Step 8 Close the web browser. Step 9 If you have changed your computer's IP address in order to access the web configuration utility, you can now change the settings back to your original settings. Fig. 3.4 Section 4 Adding Printer For Windows 2000/XP Step 1 Go to Start, Settings, Printers. (Printers and Faxes for XP) and select Add Printer. Step 2 Click Next at the Add Printer Wizard. Step 3 Select Local Printer, uncheck the Automatically detect and install my Plug and Play printer check box, and click Next. See Fig. 4.1 Fig. 4.1
-
 1
1 -
 2
2 -
 3
3 -
 4
4 -
 5
5 -
 6
6 -
 7
7 -
 8
8 -
 9
9 -
 10
10 -
 11
11 -
 12
12 -
13
-
14
-
15
-
16
-
17
 |
 |
