Alpine CDA-9886 User Manual - Page 32
Rear/Balance Between Left and Right - imprint
 |
View all Alpine CDA-9886 manuals
Add to My Manuals
Save this manual to your list of manuals |
Page 32 highlights
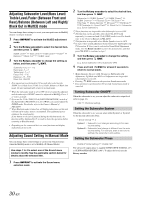
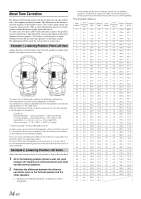
Adjusting Subwoofer Level/Bass Level/ Treble Level/Fader (Between Front and Rear)/Balance (Between Left and Right)/ Black Out in MultEQ mode You can change these settings to create your own preference in MultEQ (Curve 1 or Curve 2) mode. 1 Press IMPRINT to activate the MultEQ adjustment mode. 2 Turn the Rotary encoder to select the desired item, and then press /ENT. SUBW. Level*1 Bass Level Treble Level Balance Black Out*3 SUBW. Level Fader*2 3 Turn the Rotary encoder to change the setting as below, and then press /ENT. Subwoofer level: 0 ~ +15 Bass level: -7~+7 Treble level: -7~+7 Fader: R15 ~ F15 Balance: L15 ~ R15 Black Out: ON/OFF • If no operation is performed for 60 seconds after selecting the SUBW. Level, Bass Level, Treble Level, Fader, Balance or Black Out mode, the unit automatically returns to normal mode. *1 When the subwoofer mode is set to OFF, its level cannot be adjusted, and the subwoofer ON/OFF cannot be adjusted in MultEQ (Curve 1 or Curve 2) mode. *2 If you set the 2.2ch (3WAY)/4.2ch (FRONT/REAR/SUBW.) switch of the Imprint-Box (PXA-H100) to 2.2ch (3WAY), you cannot adjust the FADER mode. For details, refer to the Owner's Manual of PXA-H100. *3 When Blackout mode is turned on, all display indications on this unit will turn off to reduce power consumption. This additional power enhances the sound quality. If any button on the unit is pressed during the blackout mode, the function will be displayed for 5 seconds to show the operation before returning to Blackout mode. • Depending on the connected devices, some functions and display indications do not work. Adjusting Sound Setting in Manual Mode You can change these sound settings to create your own preference when the MultEQ mode is set to MultEQ off (Manual Mode). Use steps 1 to 4 to select one of the Sound menu modes to modify. See the applicable section below for details about the selected item. 1 Press IMPRINT to activate the Sound menu selection mode. 2 Turn the Rotary encoder to select the desired item, and then press /ENT. Subwoofer SUBW. System*1 SUBW. Phase*1 SUBW. Channel*1 Factory's EQ TW Setup*2 Filter Type Media Xpander MX Level*3 EQ Mode TCR Parameter Sound Field*4 Black Out Subwoofer (e.g. Select Subwoofer) *1 These functions are inoperable when Subwoofer is set to OFF. *2 This function can be operable only when PXA-H100 (sold separately) is connected and 2.2ch (3WAY) mode is set. For details, refer to the Owner's Manual of PXA-H100. *3 This function is inoperable when Media Xpander is set to OFF. *4 In step 2, three sound adjustment items (Parametric EQ/Graphic EQ, T.Correction, X-Over) can be selected in Sound Field Adjustment mode, turn the Rotary encoder to select the desired item, and then press /ENT to continue to step 3. 3 Turn the Rotary encoder to change the setting, and then press /ENT. (e.g. Select Subwoofer ON or Subwoofer OFF) 4 Press and hold /ESC for at least 2 seconds to return to normal mode. • Media Xpander, Factory's EQ, Parametric EQ/Graphic EQ Adjustment, EQ Mode and MX Level Adjustment are inoperable when Defeat is set to ON. • Pressing /ESC returns to the previous Sound menu mode. • If no operation is performed for 60 seconds, Sound menu mode is canceled. Turning Subwoofer ON/OFF When the subwoofer is on, you can adjust the subwoofer output level (refer to page 14). OFF ON (Initial setting) Setting the Subwoofer System When the subwoofer is on, you can select either System1 or System2 for the desired subwoofer effect. 1 (Initial setting) 2 System 1 : Subwoofer level changes according to the main volume setting. System 2 : Subwoofer level change is different from the main volume setting. For example, even at low volume settings, the subwoofer is still audible. Setting the Subwoofer Phase PHASE 0° (Initial setting) PHASE 180° The subwoofer output phase is toggled SUBWOOFER NORMAL (0°) or SUBWOOFER REVERSE (180°). To adjust the level, turn the Rotary encoder. 30-EN
-
 1
1 -
2
-
3
-
4
-
5
-
6
-
7
-
8
-
9
-
10
-
11
-
12
-
13
-
14
-
15
-
16
-
17
-
18
-
19
-
20
-
21
-
22
-
23
-
24
-
25
-
26
-
 27
27 -
 28
28 -
 29
29 -
 30
30 -
 31
31 -
 32
32 -
 33
33 -
 34
34 -
 35
35 -
 36
36 -
 37
37 -
38
-
39
-
40
-
41
-
42
-
43
-
44
-
45
-
46
-
47
-
48
-
49
-
50
-
51
-
52
-
53
-
54
-
55
-
56
-
57
-
58
-
59
-
60
-
61
-
62
-
63
-
64
-
65
-
66
-
67
-
68
-
69
-
70
-
71
-
72
-
73
-
74
-
75
-
76
-
77
-
78
-
79
-
80
-
81
-
82
-
83
-
84
-
85
-
86
-
87
-
88
-
89
-
90
-
91
-
92
-
93
-
94
-
95
-
96
-
97
-
98
-
99
-
100
-
101
-
102
-
103
-
104
-
105
-
106
-
107
-
108
-
109
-
110
-
111
-
112
-
113
-
114
-
115
-
116
-
117
-
118
-
119
-
120
-
121
-
122
-
123
-
124
-
125
-
126
-
127
-
128
-
129
-
130
-
131
-
132
-
133
-
134
-
135
-
136
-
137
-
138
-
139
-
140
-
141
-
142
-
143
-
144
-
145
-
146
-
147
-
148
-
149
-
150
-
151
-
152
 |
 |