Alpine CDE-147BT User Manual - Page 20
Storing the 9BAND P-EQ/TCR/X-OVER - images
 |
View all Alpine CDE-147BT manuals
Add to My Manuals
Save this manual to your list of manuals |
Page 20 highlights
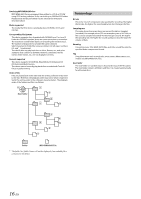
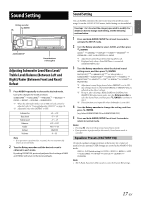
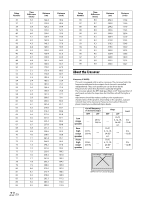
Note • The total adjustment distance for all speakers should be less than 510 centimeters (201 inches). 3 Repeat steps 1 and 2 for setting other speakers. By setting these values, sound from all speakers can be made to reach the listener at the same time. Adjusting SPATIAL This function allows you to change the sound field easily. There are three modes to choose from. For details, refer to the table below. Mode OFF (Initial setting) FRONT WIDE REAR WIDE Effect No effect is applied. OFF status Creates the effect of widening the front sound field by delaying the sound of the front speakers. Creates the effect of making the front sound image clear and far by delaying the sound of the rear speakers. Adjusting the Crossover Settings (X-OVER) Before performing the following procedures, refer to "About the Crossover" on page 22. Setting item: X-OVER 1 Turn the Rotary encoder to select the channel, and then press ENTER. FRONT (HPF) REAR (HPF) SUBW LPF FRONT (HPF) 2 Turn the Rotary encoder to select the desired item, and then press ENTER. Selecting the Cut-Off Frequency Setting contents: 20 / 25 / 31.5 / 40 / 50 / 63 / 80 (Initial setting) / 100 / 125 / 160 / 200 (Hz) Adjusting the Slope Setting contents: FLAT (Initial setting) / 6 / 12 / 18 / 24 (dB/oct.) Adjusting the Level Setting contents: −12 to 0 (dB) (Initial setting: 0) 3 Repeat steps 1 to 2 to make adjustment to the other channels. Note • While adjusting the X-OVER you should consider the frequency response of the connected speakers. Storing the 9BAND P-EQ/TCR/X-OVER Settings The Settings of 9BAND P-EQ/TCR/X-OVER can be stored in the preset memory. 1 The 9BAND P-EQ/TCR/X-OVER settings can be stored in any one of the preset buttons (1 through 6). After completing any adjustment for 9BAND P-EQ/TCR/X-OVER (e.g. BAND), press and hold the desired preset button for at least 2 seconds. 2 Turn the Rotary encoder to select PROTECT NO/YES, and then press ENTER to store the adjusted contents. PROTECT NO PROTECT YES (Initial setting) Notes • If PROTECT YES is selected, the adjusted contents are protected and stored into the preset buttons. When you want to store the parameter into a protected preset button, "REPLACE NO/YES" can be selected. If PROTECT NO is selected, the preset is stored. • While performing this operation, all adjusted contents of Parametric EQ/Time Correction/X-Over will be stored in the preset buttons. • The stored contents are not deleted even when resetting the unit or disconnecting the battery. • The stored contents can be recalled by performing operation (refer to "Recalling the Stored 9BAND P-EQ/TCR/X-OVER Adjustment Settings" on page 20). Recalling the Stored 9BAND P-EQ/TCR/ X-OVER Adjustment Settings The stored Settings of 9BAND P-EQ/TCR/X-OVER are in the preset memory. 1 After selecting any adjusting item of 9BAND P-EQ/TCR/ X-OVER (e.g. BAND), press any one of the preset buttons (1 through 6) that has your desired characteristic in memory. The adjusted contents of Parametric EQ/Time Correction/X-Over stored in the preset button will be demonstrated. 2 Press the preset button again during the demonstration to recall the stored settings. 20-EN
-
 1
1 -
2
-
3
-
4
-
5
-
6
-
7
-
8
-
9
-
10
-
11
-
12
-
13
-
14
-
 15
15 -
 16
16 -
 17
17 -
 18
18 -
 19
19 -
 20
20 -
 21
21 -
 22
22 -
 23
23 -
 24
24 -
 25
25 -
26
-
27
-
28
-
29
-
30
-
31
-
32
-
33
-
34
-
35
-
36
-
37
-
38
-
39
-
40
-
41
-
42
-
43
-
44
-
45
-
46
-
47
-
48
-
49
-
50
-
51
-
52
-
53
-
54
-
55
-
56
-
57
-
58
 |
 |
