Alpine IDA-X303 Ida-x303 Owner's Manual (english) - Page 22
Setup
 |
UPC - 793276711601
View all Alpine IDA-X303 manuals
Add to My Manuals
Save this manual to your list of manuals |
Page 22 highlights
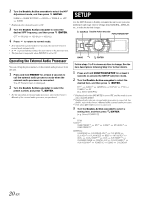
2 Turn the Double Action encoder to select the HPF Adjustment mode, and then press /ENTER. SUBW SUBW SYSTEM* BASS TREBLE HPF SUBW * Displayed only when subwoofer is ON. 3 Turn the Double Action encoder to select the desired HPF frequency, and then press /ENTER. OFF 80 (Hz) 120 (Hz) 160 (Hz) 4 Press to return to normal mode. • If no operation is performed for 15 seconds, the unit will return to normal mode automatically. • If is pressed during setting, the unit returns to the previous item. • The function is inoperable when DEFEAT is set to ON. Operating the External Audio Processor You can call up the preset memory of the external audio processor from this unit. 1 Press and hold PRESET for at least 2 seconds to call the external audio processor mode when the external audio processor is connected. The AP Preset screen is displayed. 2 Turn the Double Action encoder to select the preset number, and press /ENTER. • For the operation of external audio processor, refer to the Owner's Manual of the external audio processor you purchased. SETUP Use the SETUP menu to flexibly customize the unit to suit your own preferences and usage. Choose settings from GENERAL, DISPLAY, etc., to make the desired changes. SOURCE Double Action encoder FUNCTION/SETUP BAND /ENTER Follow steps 1 to 5 to choose an item to change. See the item descriptions following Step 5 for further details. 1 Press and hold FUNCTION/SETUP for at least 2 seconds to activate the SETUP selection mode. 2 Turn the Double Action encoder to select the desired item, and then press /ENTER. BT*1 AUDIO*2 TUNER*3 BT GENERAL (e.g. Select GENERAL) DISPLAY IPOD *1 Displayed only when INT MUTE is set to OFF, and the mode is set to other than BT AUDIO. *2 Displayed only when an external audio processor is connected. For details, refer to the Owner's Manual of the external audio processor. *3 Only when HD / SAT receiver is connected. 3 Turn the Double Action encoder to select a setting item, and then press /ENTER. (e.g. Select POWER IC) BT: BT IN AUDIO*4: USER PRESET*5 USER PRESET*5 MX*5 SUBW*5 MX LEVEL*6 GENERAL: CALENDAR CALENDAR ADJ*7 CLK MODE CLK ADJ*8 PLAY MODE BEEP INT MUTE*9 AUX+ AUX+ NAME*10 AUX AUX NAME*10 CHANGER NAME DIGITAL AUX D-AUX NAME*11 AUX IN GAIN*12 POWER IC DEMO CALENDAR 20-EN
-
 1
1 -
2
-
3
-
4
-
5
-
6
-
7
-
8
-
9
-
10
-
11
-
12
-
13
-
14
-
15
-
16
-
 17
17 -
 18
18 -
 19
19 -
 20
20 -
 21
21 -
 22
22 -
 23
23 -
 24
24 -
 25
25 -
 26
26 -
 27
27 -
28
-
29
-
30
-
31
-
32
-
33
-
34
-
35
-
36
-
37
-
38
-
39
-
40
-
41
-
42
-
43
-
44
-
45
-
46
-
47
-
48
 |
 |
