Amana AGG200AA Installation Instruction - Page 10
Level Range, Installing/Replacing the Battery
 |
View all Amana AGG200AA manuals
Add to My Manuals
Save this manual to your list of manuals |
Page 10 highlights
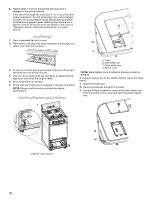
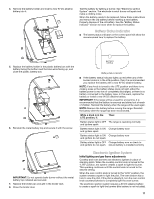
6. Repeat steps 1 and 2 to ensure that the range foot is engaged in the anti-tip bracket. If the rear of the range lifts more than ½" (1.3 cm) off the floor without resistance, the anti-tip bracket may not be installed correctly. Do not operate the range without anti-tip bracket installed and engaged. Please reference the "Assistance or A Service" section of the Use and Care Guide, or the cover or "Warranty" section of the User Instructions, to contact B service. Level Range C 1. Place a standard flat rack in oven. 2. Place level on the rack and check levelness of the range, first D side to side; then front to back. 3. If range is not level, pull range forward until rear leveling leg is removed from the anti-tip bracket. 4. Use a ³⁄₈" drive ratchet and slip-joint pliers to adjust leveling legs up or down until the range is level. 5. Push range back into position. 6. Check that rear leveling leg is engaged in the anti-tip bracket. NOTE: Range must be level for satisfactory baking performance. Installing/Replacing the Battery A. Screw B. Metal battery top* C. Plastic battery box D. Battery holder *NOTE: Metal battery top is included in the bag containing literature. To install or replace the 9V DC alkaline battery, follow the steps below. 1. Open the broiler door. 2. Remove broiler pan and grill from broiler. 3. Using a Phillips screwdriver, remove the metal battery top from the bottom of the range and open the plastic battery box. A A. Battery holder location 10
-
 1
1 -
2
-
3
-
4
-
 5
5 -
 6
6 -
 7
7 -
 8
8 -
 9
9 -
 10
10 -
 11
11 -
 12
12 -
 13
13 -
 14
14 -
 15
15 -
16
-
17
-
18
-
19
-
20
 |
 |
