Amana AGG200AA Installation Instruction - Page 15
To Convert Surface Burners
 |
View all Amana AGG200AA manuals
Add to My Manuals
Save this manual to your list of manuals |
Page 15 highlights
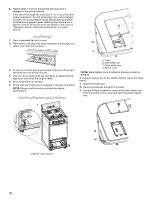
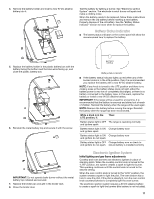
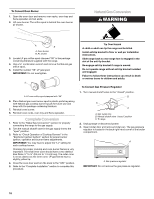
4. Remove the cap from the gas pressure regulator using a flat-blade screwdriver. NOTE: Do not remove the spring beneath the cap. A 4. Install LP gas orifice spuds using a 7 mm combination wrench. A. Cap 5. Turn the cap over so the LP is visible. A 6. Reinstall the cap. A. Cap To Convert Surface Burners 1. Remove burner grate, burner caps and burners. A B A B A. Spud B. Holder NOTE: This range cooktop is equipped with 2 standard burners and 2 super burners. Spud size and location remain the same. 2 superburners.Spud size/location rem ain the sam e. Standard Burner 78 Super Burner 88 Super Burner 88 Standard Burner 78 A. Burner cap B. Burner 2. Locate LP gas orifice spuds for top burners in the literature bag included with the range. Two LP gas spuds are stamped "88" and two "78." 3. Remove Natural gas orifice spuds using a 7 mm combination wrench. 5. Place the Natural gas orifice spuds in the parts bag for future use and keep with the bag containing literature. 6. Reinstall burners, burner caps and burner grates. 15
-
 1
1 -
2
-
3
-
4
-
5
-
6
-
7
-
8
-
9
-
 10
10 -
 11
11 -
 12
12 -
 13
13 -
 14
14 -
 15
15 -
 16
16 -
 17
17 -
 18
18 -
 19
19 -
 20
20
 |
 |
