Asko D5536XXLFI Installation instructions EN
Asko D5536XXLFI Manual
 |
View all Asko D5536XXLFI manuals
Add to My Manuals
Save this manual to your list of manuals |
Asko D5536XXLFI manual content summary:
- Asko D5536XXLFI | Installation instructions EN - Page 1
, AND DRAIN 13 STEP 5. CHECKING DISHWASHER FUNCTION AND FIT 16 STEP 6. SECURING THE DISHWASHER 16 STEP 7. ATTACHING THE TOE KICK (IF APPLICABLE 18 INSTALLATION CHECKLIST...20 IMPORTANT! READ ALL OF THESE INSTRUCTIONS BEFORE INSTALLING THE DISHWASHER. SAVE THESE INSTRUCTIONS FOR FUTURE REFERENCE. - Asko D5536XXLFI | Installation instructions EN - Page 2
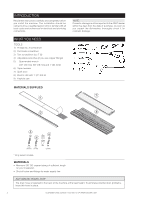
Read these instructions carefully and completely before you install the machine. The installation should be Cosmetic damage must be reported to the ASKO dealer within five days from the date of purchase. As soon as you unpack the dishwasher, thoroughly check it for cosmetic damage. MATERIALS - Asko D5536XXLFI | Installation instructions EN - Page 3
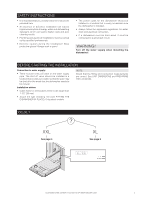
that you closely follow the instructions provided here. • An incorrect or defective installation can lead to higher consumption of energy, water and dishwashing detergent, which can lead to higher costs and poor cleaning results. • Plumbing and electrical installations must be carried out by - Asko D5536XXLFI | Installation instructions EN - Page 4
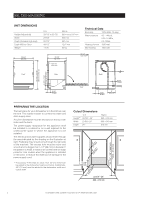
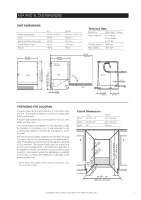
sink. This makes it easier to connect the water and drain supply lines. A built-in dishwasher must be enclosed on the top, both sides and the back. The power-supply receptacle for the appliance shall be installed in a cabinet or on a wall adjacent to the undercounter space in whitch the appliance is - Asko D5536XXLFI | Installation instructions EN - Page 5
sink. This makes it easier to connect the water and drain supply lines. A built-in dishwasher must be enclosed on the top, both sides and the back. The power-supply receptacle for the appliance shall be installed in a cabinet or on a wall adjacent to the undercounter space in whitch the appliance is - Asko D5536XXLFI | Installation instructions EN - Page 6
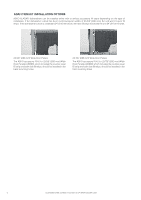
TRIM KIT INSTALLATION OPTIONS ASKO XLADAFI dishwashers can be installed either with or without accessory fill strips depending on the type of installation. If the dishwasher cutout has been cut to European widths of 23-5/8˝ (600 mm), the unit won't require fill strips. If the dishwasher cutout is - Asko D5536XXLFI | Installation instructions EN - Page 7
door sealing (only certain models). 1 This strip is an essential part of the Turbo Dry Express system and must be installed to ensure an optimum seal between the dishwasher tank 2 2 and door. 4. Start by measuring the height from the floor to the bottom edge of the counter top. Measure - Asko D5536XXLFI | Installation instructions EN - Page 8
drain hose, and the fill hose through the appropriate cut outs. Use caution when sliding the dishwasher into place. The protective slides could cause damage to certain types of soft flooring. NOTE: If installing in a metal cabinet, the hole(s) for the drain hose and connection pipe must be fitted - Asko D5536XXLFI | Installation instructions EN - Page 9
the front legs. 12. Place the spirit level on the dishwasher door to check that the machine is level and adjust if necessary. The door must be fully closed! NOTE: The dishwasher must be level! An unlevel machine can affect the amount of water taken - Asko D5536XXLFI | Installation instructions EN - Page 10
DOOR OR CUSTOM PANEL Follow the separate instructions supplied with the dishwasher to attach the chosen accessory door *2 or custom panel to the front of the machine. NOTE: Once you have fitted the accessory door or custom panel to the dishwasher, the door springs may need adjusting. Check - Asko D5536XXLFI | Installation instructions EN - Page 11
is balanced. It should not fall open or snap shut. Adjust as necessary. TYPE A The door springs are on the sides of the dishwasher. If necessary, pull out the dishwasher and adjust the tension of the door springs. A good idea is to try adjusting one side only first. 1. Be sure the door - Asko D5536XXLFI | Installation instructions EN - Page 12
and forward to fasten it in the mount. 7. Open the door and check the spring tension again. If necessary, make further adjustments as above. XXL DISHWASHERS The machine is delivered from the factory with two blue door springs that are designed to accommodate a door panel that weighs up to 15 lbs - Asko D5536XXLFI | Installation instructions EN - Page 13
ways to connect the drain supply line. THREE WAYS TO INSTALL DRAIN CONNECTIONS A) Typical connection to sink plumbing before trap (high loop drain) 508 THE HIGH LOOP The high loop is necessary for proper draining. Therefore, all ASKO dishwashers have the drain hoses attached to the drain pump and - Asko D5536XXLFI | Installation instructions EN - Page 14
geothermal power to heat your home. Choosing a hot water connection cuts program times and reduces the dishwasher's electricity consumption. For service convenience, a shut-off valve (not supplied) should be installed in the supply line in an easily accessible location, such as, beneath the sink. In - Asko D5536XXLFI | Installation instructions EN - Page 15
an extension cord! The dishwasher must be connected to a grounded outlet. GROUNDING INSTRUCTIONS This appliance must be grounded into an appropriate outlet that is installed and grouded in accordance with all . Check with a qualified electrican or service representative if you are in doubt whether - Asko D5536XXLFI | Installation instructions EN - Page 16
the upper and center basket if present. 3. Remove the lower basket. Otherwise it easily rolls out if you need to adjust the dishwasher during installation. 4. Screw the dishwasher to the counter from the inside or to the cabinets on either side. If the counter Alt. 1 Alt. 2 is a hard material - Asko D5536XXLFI | Installation instructions EN - Page 17
mounting tabs. If it is, turn the front feet to lower them until the machine is resting on the feet. 6. Also adjust the dishwasher's steel feet so that the dishwasher is level. 7. Tighten the lock nuts on the steel feet with a 5/8 inch (16 mm) open-ended wrench. 5/8" (16 mm) CUSTOMER CARE CENTER - Asko D5536XXLFI | Installation instructions EN - Page 18
STEP 7. ATTACHING THE TOE KICK (IF APPLICABLE) *7 7 *8 8 Insulation material 1. 4. 5. x x 6. 2. 3. 18 CUSTOMER CARE CENTER 1-800-898-1879 • WWW.ASKONA.COM - Asko D5536XXLFI | Installation instructions EN - Page 19
NOTES CUSTOMER CARE CENTER 1-800-898-1879 • WWW.ASKONA.COM 19 - Asko D5536XXLFI | Installation instructions EN - Page 20
INSTALLATION CHECKLIST ASKO - DISHWASHER Appliance Installation Checklist • Remove packaging and check for cosmetic damages. • Remove the information packets from inside the dishwasher. • Attach any accessories as required by the installation. Fill strips, light shielding film, supplied door sealing
-
 1
1 -
 2
2 -
 3
3 -
 4
4 -
 5
5 -
 6
6 -
 7
7 -
8
-
9
-
10
-
11
-
12
-
13
-
14
-
15
-
16
-
17
-
18
-
19
-
20
 |
 |

Installation Instructions
FI Dishwasher
INTRODUCTION
.........................................................................................................................
2
WHAT YOU NEED
......................................................................................................................
2
SAFETY INSTRUCTIONS
............................................................................................................
3
BEFORE STARTING THE INSTALLATION
..................................................................................
3
XXL DISHWASHERS
...................................................................................................................
4
– UNIT DIMENSIONS
...............................................................................................................
4
– PREPARING THE LOCATION
................................................................................................
4
ADA AND XL DISHWASHERS
....................................................................................................
5
– UNIT DIMENSIONS
...............................................................................................................
5
– PREPARING THE LOCATION
................................................................................................
5
– ADAFI TRIM KIT INSTALLATION OPTIONS
..........................................................................
6
STEP 1. FITTING THE DISHWASHER IN PLACE
........................................................................
7
STEP 2. ATTACHING THE ACCESSORY DOOR OR CUSTOM PANEL
....................................
10
STEP 3. ADJUSTING THE DOOR SPRINGS
............................................................................
11
STEP 4. CONNECTING ELECTRICITY, WATER, AND DRAIN
..................................................
13
STEP 5. CHECKING DISHWASHER FUNCTION AND FIT
.......................................................
16
STEP 6. SECURING THE DISHWASHER
..................................................................................
16
STEP 7. ATTACHING THE TOE KICK (IF APPLICABLE)
..........................................................
18
INSTALLATION CHECKLIST
.....................................................................................................
20
CONTENTS
IMPORTANT!
READ ALL OF THESE INSTRUCTIONS BEFORE INSTALLING THE DISHWASHER.
SAVE THESE INSTRUCTIONS FOR FUTURE REFERENCE.