Asko D5536XXLFI Installation instructions EN - Page 10
Step 2. Attaching The Accessory Door Or Custom Panel
 |
View all Asko D5536XXLFI manuals
Add to My Manuals
Save this manual to your list of manuals |
Page 10 highlights
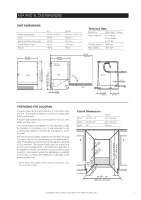
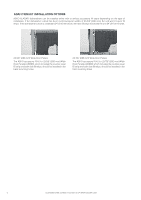
*1 STEP 2. ATTACHING THE ACCESSORY DOOR OR CUSTOM PANEL Follow the separate instructions supplied with the dishwasher to attach the chosen accessory door *2 or custom panel to the front of the machine. NOTE: Once you have fitted the accessory door or custom panel to the dishwasher, the door springs may need adjusting. Check that the door stays in the position in which it is placed. If the door drops down when you open it, the springs need to be tightened. If the door shuts on its own, the springs need to be loosened. See step 3 for further instructions. NOTE: The custom panel must not cover the air nozzle and thereby block the flow of air. 3 6 45 6x 1-1/2" (38 mm) 2x 3/8" (10 mm) 2x 2x 1" (25 mm) Custom Panel Dimensions XXL DISHWASHERS Width 24˝ (610 mm) minimum to cabinet width minus 1/4˝ reveal Height 28-1/8˝ (714 mm) for 6˝ toe kick to 30-1/8˝ (765 mm) for 4˝ toe kick Thickness 3/4˝ (19mm) ADA AND XL DISHWASHERS 24˝ (610 mm) minimum to cabinet width minus 1/4˝ reveal 28-1/8˝ (714 mm) for 4˝ toe kick 3/4˝ (19mm) 10 CUSTOMER CARE CENTER 1-800-898-1879 • WWW.ASKONA.COM
-
 1
1 -
2
-
3
-
4
-
 5
5 -
 6
6 -
 7
7 -
 8
8 -
 9
9 -
 10
10 -
 11
11 -
 12
12 -
 13
13 -
 14
14 -
 15
15 -
16
-
17
-
18
-
19
-
20
 |
 |
