Asko T702 User manual Use & Care Guide Asko T702 EN - Page 22
Adjusting the feet, Air exhaust
 |
View all Asko T702 manuals
Add to My Manuals
Save this manual to your list of manuals |
Page 22 highlights
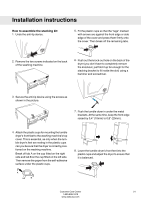
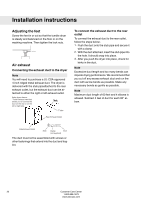
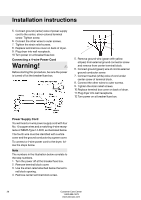
Installation instructions Adjusting the feet Screw the feet in or out so that the tumble dryer is steady and balanced on the floor or on the washing machine. Then tighten the lock nuts. Lock nut Air exhaust Connecting the exhaust duct to the dryer Note You will need to purchase a UL-CSA-approved 4-inch ridged metal exhaust duct. The dryer is delivered with the stub pipeattached to the rear exhaust outlet, but the exhaust duct can be attached to either the right or left exhaust outlet. Asko dryers have a "T-stile" exhaust vent that allows you to connect the Vent duct on the rear or on the left or right side. T-tube Rear Exhaust Outlet To connect the exhaust duct to the rear outlet To connect the exhaust duct to the rear outlet, follow the steps below:. 1. Push the duct onto the stub pipe and secure it with a clamp 2. With the duct attached, insert the stub pipe into the hole. It should snap into place. 3. After you push the dryer into place, check for kinks in the duct. Note Excessive duct length and too many bends can impede drying performance. We recommend that you cut off any excess exhaust duct and run the duct with as few bends as possible. Make any necessary bends as gentle as possible. Note Maximum duct length of 60 feet and 4 elbows is allowed. Subtract 4 feet of duct for each 90° elbow. Side Exhaust Outlet Stub Clamp Duct (not supplied) The duct must not be assembled with screws or other fastenings that extend into the duct and trap lint. 22 Customer Care Center 1-800-898-1879 www.askousa.com
-
 1
1 -
2
-
3
-
4
-
5
-
6
-
7
-
8
-
9
-
10
-
11
-
12
-
13
-
14
-
15
-
16
-
 17
17 -
 18
18 -
 19
19 -
 20
20 -
 21
21 -
 22
22 -
 23
23 -
 24
24 -
 25
25 -
 26
26 -
 27
27 -
28
-
29
-
30
-
31
-
32
 |
 |
