Asko T711 User manual Use & Care Guide EN - Page 5

Installation Examples

Page 5 highlights

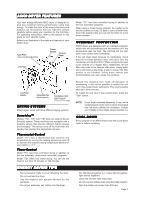
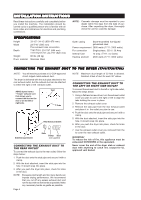
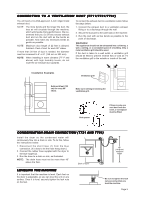
ENGLISH CONNECTING TO A VENTILATION DUCT (T711/T731/T761) You will need a UL-CSA-approved, 4-inch ridged metal exhaust duct. NOTE: The more bends and the longer the duct, the less air will circulate through the machine, which will impede drying performance. We recommend that you cut off any excess exhaust duct and run the duct with as few bends as possible. And make any necessary bends as gentle as possible. NOTE: Maximum duct length of 22 feet is allowed. Subtract 4 feet of duct for each 90° elbow. If more than 20 feet of duct is needed, the diameter must be increased to 6" or 8" (152 mm or 203 mm). NOTE: When installing in warm climates (77° F and above) with high humidity levels, do not route the air exhaust duct upwards. To connect the exhaust duct to a ventilation outlet, follow the steps below: 1. Connect the exhaust duct to a ventilation exhaust fitting or to a discharge through the wall. 2. Secure the duct joint to the outlet stub on the machine. 3. Run the duct with as few bends as possible to the point of discharge. WARNING! This appliance should not be exhausted into a chimney, a wall, a ceiling, or a concealed space of a building. Only a metal ventilation grill should be used. If the duct is taken to a wall outlet, a ventilation grill should be fitted to prevent reverse flow of cold air. Fit the ventilation grill to the outside or inside of the wall. Installation Examples Ventilation grill Subtract 4 feet (122 cm) for every 90° elbow. Make sure nothing is blocking the ventilation grill. Vent spacer If there is only one vent duct from the room, a vent spacer must be fitted. CONDENSATION DRAIN CONNECTION (T721 AND T781) Install the dryer so the condensed water will continuously flow into a drain or sink. To do this, follow the instructions below: 2 3 1. Disconnect the short hose (1) from the blue connection. (It's okay to let the hose hang down.) 2. Connect the rubber hose supplied with the dryer to the blue nipple (2). 1 3. Run the hose to a drain or sink, as illustrated. NOTE: The drain hose must not be more than 40" above the floor. Back of dryer 3 LEVELING THE MACHINE It is important that the machine is level. Each foot on the dryer is adjustable, so you can level the unit on any surface. Once it is level, securely tighten the lock nuts on the feet. Be sure to tighten the lock nuts securely when you level the machine. Page 5

  • 1
  • 2
  • 3
  • 4
  • 5
  • 6
  • 7
  • 8
  • 9
  • 10
  • 11
  • 12
  • 13
  • 14
  • 15
  • 16
  • 17
  • 18
  • 19
  • 20
  • 21
  • 22
  • 23
  • 24
  • 25
  • 26
  • 27
  • 28

Page 5
ENGLISH
ENGLISH
ENGLISH
ENGLISH
ENGLISH
1
3
2
3
CONDENSA
CONDENSA
CONDENSA
CONDENSA
CONDENSATION DRAIN CONNECTION (T721
TION DRAIN CONNECTION (T721
TION DRAIN CONNECTION (T721 AND
AND
AND
AND
AND T781)
T781)
T781)
T781)
T781)
Install the dryer so the condensed water will
continuously flow into a drain or sink. To do this, follow
the instructions below:
1. Disconnect the short hose (1) from the blue
connection. (It’s okay to let the hose hang down.)
2. Connect the rubber hose supplied with the dryer to
the blue nipple (2).
3.
Run the hose to a drain or sink, as illustrated.
NOTE:
The drain hose must not be more than 40”
above the floor.
Back of dryer
You will need a UL-CSA-approved, 4-inch ridged metal
exhaust duct.
NOTE:
The more bends and the longer the duct, the
less air will circulate through the machine,
which will impede drying performance. We rec-
ommend that you cut off any excess exhaust
duct and run the duct with as few bends as
possible. And make any necessary bends as
gentle as possible.
NOTE:
Maximum duct length of 22 feet is allowed.
Subtract 4 feet of duct for each 90° elbow.
If more than 20 feet of duct is needed, the diameter
must be increased to 6” or 8” (152 mm or 203 mm).
NOTE:
When installing in warm climates (77° F and
above) with high humidity levels, do not
route the air exhaust duct upwards.
CONNECTING
CONNECTING
CONNECTING
CONNECTING
CONNECTING TO
O
O
O
O A
A
A
A
A VENTILA
VENTILA
VENTILA
VENTILA
VENTILATION DUCT (T711/T731/T761)
TION DUCT (T711/T731/T761)
Subtract 4 feet (122
cm) for every 90°
elbow.
Ventilation grill
Installation Examples
Vent spacer
If there is only one
vent duct from the
room, a vent spacer
must be fitted.
To connect the exhaust duct to a ventilation outlet, follow
the steps below:
1. Connect the exhaust duct to a ventilation exhaust
fitting or to a discharge through the wall.
2.
Secure the duct joint to the outlet stub on the machine.
3. Run the duct with as few bends as possible to the
point of discharge.
WARNING!
This appliance should not be exhausted into a chimney, a
wall, a ceiling, or a concealed space of a building. Only a
metal ventilation grill should be used.
If the duct is taken to a wall outlet, a ventilation grill
should be fitted to prevent reverse flow of cold air. Fit
the ventilation grill to the outside or inside of the wall.
Make sure nothing is blocking the
ventilation grill.
LEVELING
LEVELING
LEVELING
LEVELING
LEVELING THE MA
THE MA
THE MA
THE MA
THE MACHINE
CHINE
CHINE
CHINE
CHINE
It is important that the machine is level. Each foot on
the dryer is adjustable, so you can level the unit on any
surface. Once it is level, securely tighten the lock nuts
on the feet.
Be sure to tighten the lock
nuts securely when you
level the machine.