Asus A8N5X A8N5X User's Manual for English Edition - Page 93
Software information
 |
View all Asus A8N5X manuals
Add to My Manuals
Save this manual to your list of manuals |
Page 93 highlights
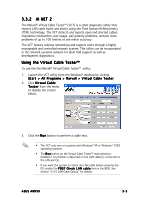
3.3 Software information Most of the applications in the support CD have wizards that will conveniently guide you through the installation. View the online help or readme file that came with the software application for more information. 3.3.1 ASUS MyLogo2™ The ASUS MyLogo2™ utility lets you customize the boot logo. The boot logo is the image that appears on screen during the Power-On Self-Tests (POST). The ASUS MyLogo2™ is automatically installed when you install the A S U S U p d a t e utility from the support CD. See section "3.2.3 Utilities menu" for details. • Before using the ASUS MyLogo2™, use the Award BIOS Flash utility to make a copy of your original BIOS file, or obtain the latest BIOS version from the ASUS website. See section "2.1.2 Updating the BIOS". • Make sure that the BIOS item F u l l S c r e e n L o g o is set to [Enabled] if you wish to use ASUS MyLogo2. See section "2.6.5 Boot Settings Configuration". • You can create your own boot logo image in GIF, JPG, or BMP file formats. To launch the ASUS MyLogo2™: 1. Launch the ASUS Update utility. Refer to section "2.1.6 ASUS Update utility" for details. 2. Select O p t i o n s from the drop down menu, then click N e x t. 3. Check the option L a u n c h M y L o g o t o r e p l a c e s y s t e m b o o t l o g o b e f o r e f l a s h i n g B I O S, then click N e x t. 4. Select U p d a t e B I O S f r o m a f i l e from the drop down menu, then click N e x t. 5. When prompted, locate the new BIOS file, then click N e x t. The ASUS MyLogo2 window appears. 6. From the left window pane, select the folder that contains the image you intend to use as your boot logo. ASUS A8N5X 3-7
-
 1
1 -
2
-
3
-
4
-
5
-
6
-
7
-
8
-
9
-
10
-
11
-
12
-
13
-
14
-
15
-
16
-
17
-
18
-
19
-
20
-
21
-
22
-
23
-
24
-
25
-
26
-
27
-
28
-
29
-
30
-
31
-
32
-
33
-
34
-
35
-
36
-
37
-
38
-
39
-
40
-
41
-
42
-
43
-
44
-
45
-
46
-
47
-
48
-
49
-
50
-
51
-
52
-
53
-
54
-
55
-
56
-
57
-
58
-
59
-
60
-
61
-
62
-
63
-
64
-
65
-
66
-
67
-
68
-
69
-
70
-
71
-
72
-
73
-
74
-
75
-
76
-
77
-
78
-
79
-
80
-
81
-
82
-
83
-
84
-
85
-
86
-
87
-
 88
88 -
 89
89 -
 90
90 -
 91
91 -
 92
92 -
 93
93 -
 94
94 -
 95
95 -
 96
96 -
 97
97 -
 98
98 -
99
-
100
-
101
-
102
-
103
-
104
-
105
-
106
-
107
-
108
-
109
-
110
-
111
-
112
-
113
-
114
-
115
-
116
 |
 |
