Asus K8V SE DELUXE K8V SE Deluxe user's manual - Page 135
RAID 1 for data protection
 |
View all Asus K8V SE DELUXE manuals
Add to My Manuals
Save this manual to your list of manuals |
Page 135 highlights
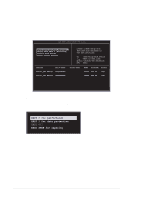
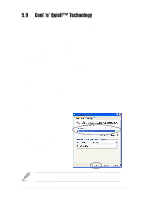
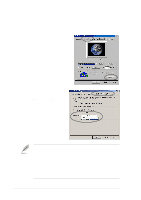
4K TIP: For server systems, use of a lower array 8K block size is recommended. For multimedia 16K computer systems used mainly for audio and 32K video editing, a higher array block size is 64K recommended for optimum performance. Use arrow keys to move selection bar on items and press to select. 5. Select Start Create Process and press to set up hard disk for RAID system. The following confirmation message appears: The data on the selected disks will be destroyed. Continue? Press Y/N The same confirmation message appears when you select the Auto Setup for Performance option. 6. Press to confirm or to return to the configuration options. RAID 1 for data protection 1. Select the second option item Array Mode, then press . The RAID system setting pop-up menu appears. RAID 0 for performance RRAAIIDD 11 ffoorr ddaattaa pprrootteeccttiioonn RAID 0/1 RAID SPAN for capacity 2. Select RAID 1 for data protection from the menu and press . Select next task from pop-up menu. The task Create only creates the mirrored set without creating a backup. Create and duplicate creates both mirrored set and backup. Create only Create and duplicate 3. Select task and press . The screen returns to Create Array menu items. From this point, you may choose to auto-configure the RAID array by selecting Auto Setup for Data Security or manually configure the RAID array for mirrored sets. If you want to manually configure the RAID array continue with next step, otherwise, proceed to step 5. ASUS K8V SE Deluxe motherboard 5-29
-
 1
1 -
2
-
3
-
4
-
5
-
6
-
7
-
8
-
9
-
10
-
11
-
12
-
13
-
14
-
15
-
16
-
17
-
18
-
19
-
20
-
21
-
22
-
23
-
24
-
25
-
26
-
27
-
28
-
29
-
30
-
31
-
32
-
33
-
34
-
35
-
36
-
37
-
38
-
39
-
40
-
41
-
42
-
43
-
44
-
45
-
46
-
47
-
48
-
49
-
50
-
51
-
52
-
53
-
54
-
55
-
56
-
57
-
58
-
59
-
60
-
61
-
62
-
63
-
64
-
65
-
66
-
67
-
68
-
69
-
70
-
71
-
72
-
73
-
74
-
75
-
76
-
77
-
78
-
79
-
80
-
81
-
82
-
83
-
84
-
85
-
86
-
87
-
88
-
89
-
90
-
91
-
92
-
93
-
94
-
95
-
96
-
97
-
98
-
99
-
100
-
101
-
102
-
103
-
104
-
105
-
106
-
107
-
108
-
109
-
110
-
111
-
112
-
113
-
114
-
115
-
116
-
117
-
118
-
119
-
120
-
121
-
122
-
123
-
124
-
125
-
126
-
127
-
128
-
129
-
 130
130 -
 131
131 -
 132
132 -
 133
133 -
 134
134 -
 135
135 -
 136
136 -
 137
137 -
 138
138 -
 139
139 -
 140
140
 |
 |